Using Webpack to compile Javascript in an Wordpress Plugin
Table Of Contents
So JavaScript is the future of the web, and that’s not just me saying, everybody is saying it.
Just look at Gutenberg, the new editor for WordPress… Is completely written using React which is a JavaScript framework if you didn’t knew (how come you didn’t knew????).
So if you want to work on WordPress, you need to use JavaScript… And if you want to work in JavaScript, you have to bundle your assets.
¿What is asset bundling you ask?
Is the process of compiling all of your javascript, css and even images in just one javascript file, or bundle, that can be included in your HTML. Or in our case, enqueued in WordPress with wp_enqueue_script().
Some of the advantages of bundling web assets are:
- You’ll end up with less files. In some cases just one.
- You can develop your JavaScript using multiple files and let the bundler join them.
- You’ll catch errors on build time and not at the deployment since the bundler has to parse the files first before joining them together.
- The overall project will be more manageable.
If you want to know more about Webpack and asset bundling, head over to the documentation page and have a quick read.
Now that I’ve convinced you that asses bundling is the way to go. Lets set up a WordPress project that uses webpack for asset bundling.
Starting your project
I’m going to assume you already know how to create WordPress plugins. So I’m not going to go over how to do that. Instead I’m going to show you how to start with Webpack.
So first create a package.json file with npm init -y. And then add webpack to it.
npm init -y
npm install --save-dev webpack webpack-cli
If you executed those commands correctly, you should have a file in your directory called package.json similar to the following:
// package.json
{
  "name": "test-webpack",
  "version": "1.0.0",
  "description": "",
  "main": "index.js",
  "scripts": {
    "test": "echo \"Error: no test specified\" && exit 1"
  },
  "keywords": [],
  "author": "",
  "license": "ISC",
  "devDependencies": {
    "webpack": "^4.41.2",
    "webpack-cli": "^3.3.10"
  }
}
To make our life easier, I’m going to add the start script in that same fie, so I can execute npm start and have webpack bundle our scripts.
Lets just edit the scripts section replacing the test script with the following:
// package.json
{
  "name": "test-webpack",
  "version": "1.0.0",
  "description": "",
  "main": "index.js",
  "scripts": {
    "start": "webpack"
  }
  // ...
}
And I’ll test that to see if it works:
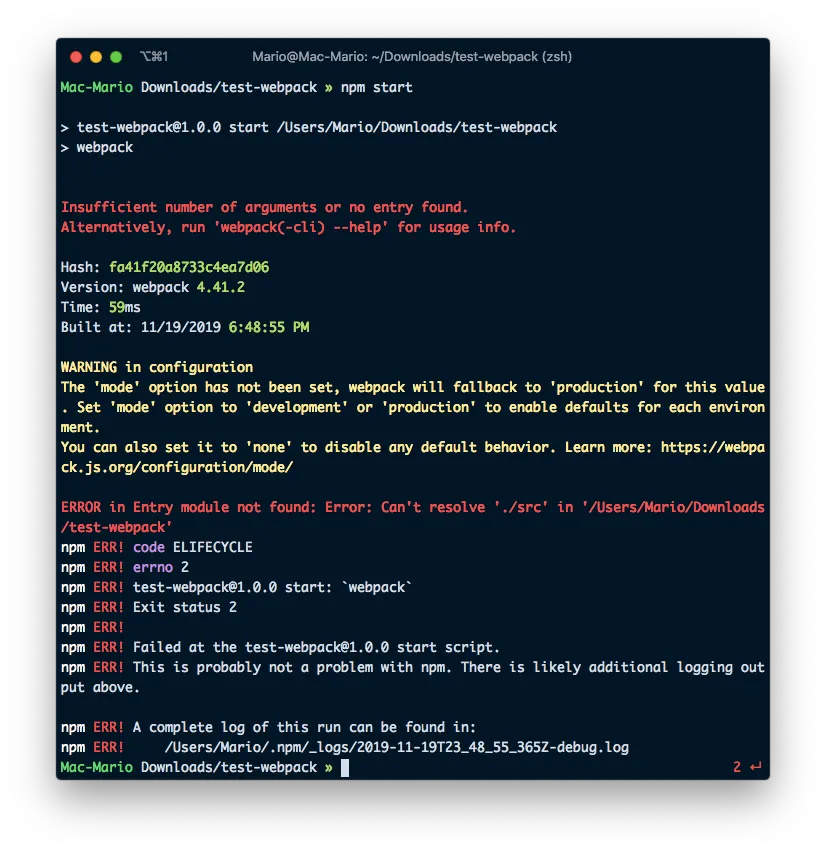
It Doesn’t! You didn’t thought it was going to be that easy, right?
It doesn’t work because we are not using standard conventions and we don’t have any files to pack.
WebPack Configuration
You can instruct webpack which files to bundle and where to put them using a bunch of command line arguments, but they would be to many and to complicated to be a viable solution. Instead we’re going to instruct webpack what to bundle, how to bundle it and where to put it by creating the configuration file webpack.config.js.
So lets create that file and add our initial configuration:
// webpack.config.js
const path = require("path");

module.exports = {
  entry: "./src/js/frontend.js",
  output: {
    filename: "[name].js",
    path: path.resolve(__dirname, "js"),
  },
};
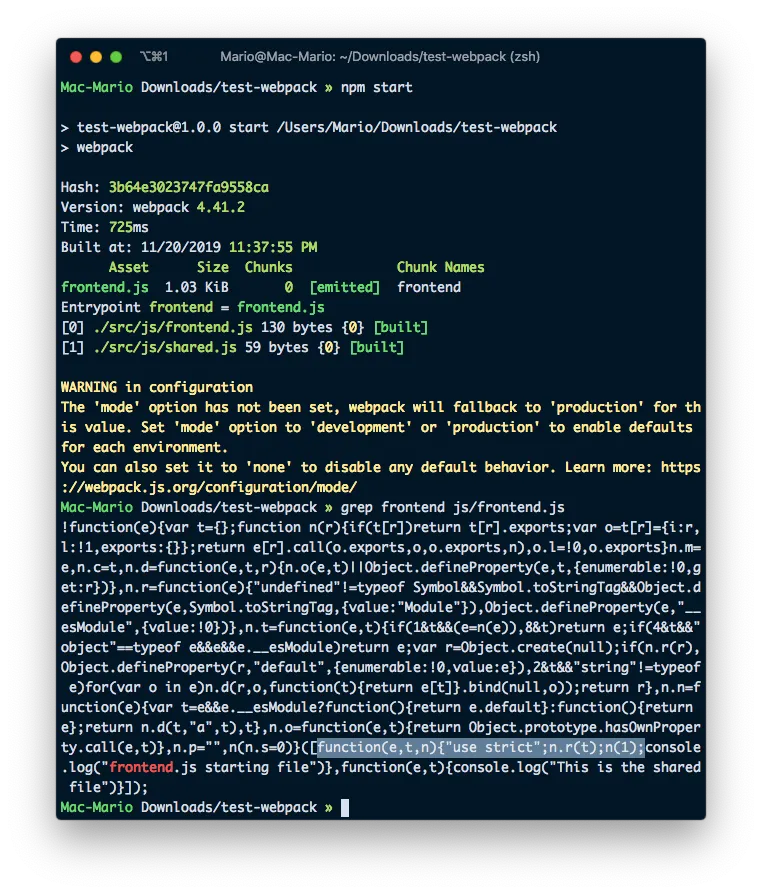
Also, lets create the src/js/frontend.js file that we just told webpack to look for:
// src/js/frontend.js
const myFunction = () => {
  console.log("frontend.js starting file");
};
myFunction();
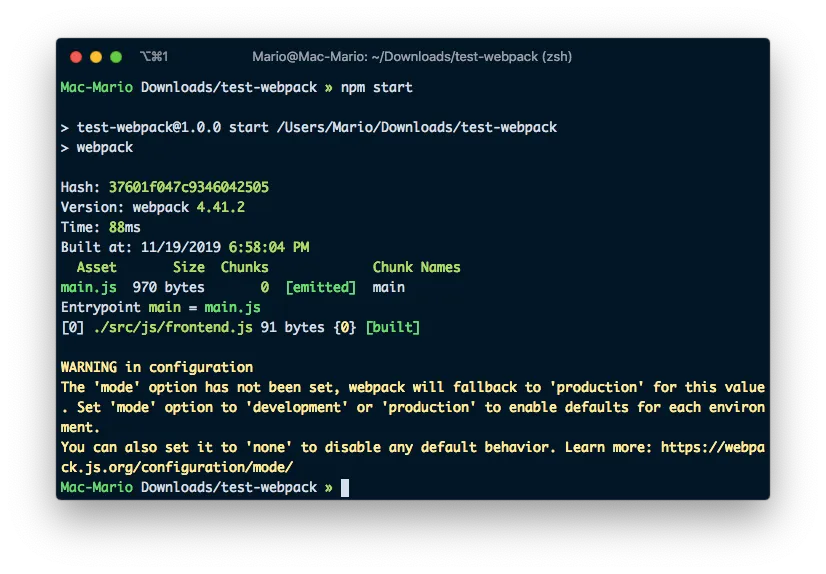
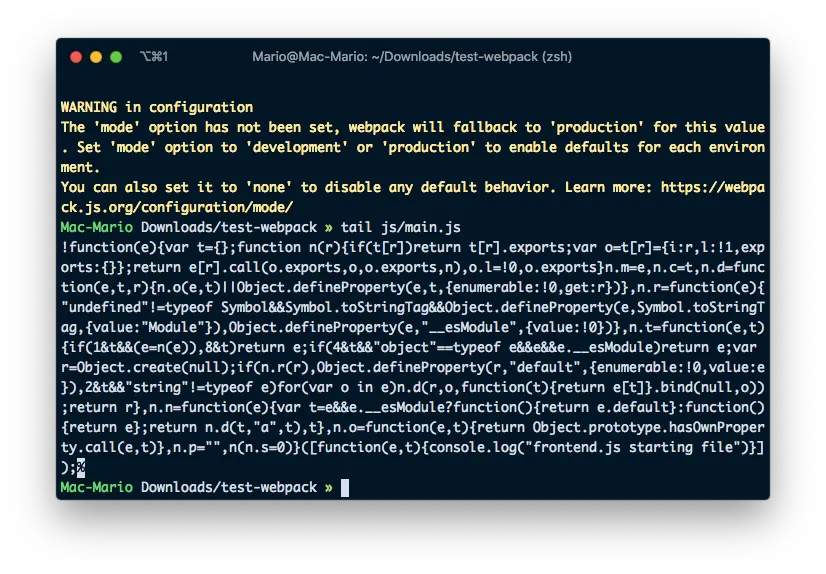
If you look into js/main.js you’ll see a javascript file with a bunch of gibberish and at the end the text “frontend.js starting file”.
That means that is working, we just created our first bundle.
Bundling assets
So far we just have created a file (js/main.js) with a bunch of content and at the end our original file. That’s actually kind of underwhelming.
That’s because we haven’t done any actual bundling.
To test bundling, create the file src/js/shared.js with the following content
// src/js/shared.js
console.log("This is the shared file");
And change src/js/frontend.js to this:
// src/js/frontend.js
import "./shared";

const myFunction = () => {
  console.log("frontend.js starting file");
};
myFunction();
And again, run npm start and take a look at the output file (js/main.js).
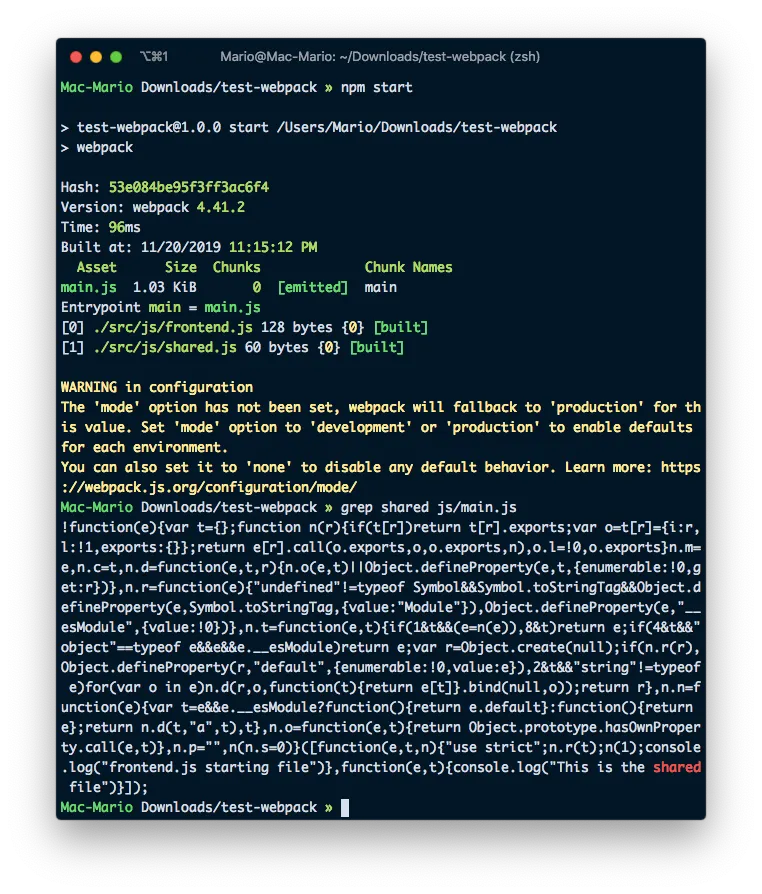
You see the content of both files? Not only that, Do you see that they are joined together in a way that it looks that they where never part of different files? That’s bundling baby… Yeah!!! (Austin Powers pun intended).
This is exciting stuff: You can now write your scripts in multiple files and have them be compiled (not joined) into one.
Specify names
Maybe you’ve noticed, but the output file was named js/main.js instead of js/frontend.js. That’s because we didn’t used names on the entry points.
So lets do that. Lest use the name frontend as the entry point. Lest edit webpack.config.js and change some settings:
// webpack.config.js
const path = require("path");

module.exports = {
  entry: {
    frontend: "./src/js/frontend.js",
  },
  output: {
    filename: "[name].js",
    path: path.resolve(__dirname, "js"),
  },
};
and execute npm start again. You should have a js/frontend.js file now with the code of both src/js/frontend.js and src/js/shared.js.
Adding babel
Webpack is powerful, very powerful… Webpack uses loaders to “preprocess files”. In other words, loaders allows you to transform your source files even further.
There are loaders for transforming images into base64 strings (that you can use in your scripts afterwards), embedding CSS, convert javascript into old format, etc.
In this case, we’re going to use the babel-loader to convert all the .js files written in modern JavaScript into a flavor of JavaScript that is more compatible with older browser, before the bundling happens.
So lets install the babel-loader it with:
npm install --save-dev babel-loader @babel/core @babel/cli @babel/preset-env
And change webpack.config.js to include a modules section. This section will have the loaders that we’re going to use and specifications on which files should be passed trough which loaders.
// webpack.config.js
const path = require("path");

module.exports = {
  entry: {
    frontend: "./src/js/frontend.js",
  },
  output: {
    filename: "[name].js",
    path: path.resolve(__dirname, "js"),
  },
  module: {
    rules: [
      {
        test: /\.js$/,
        exclude: /node_modules/,
        loader: "babel-loader",
        options: {
          presets: ["@babel/preset-env"],
        },
      },
    ],
  },
};
What I’m doing here is:
- Looking for
jsfiles with the regular expression/\.js$/ - Excluding the
node_modlesfolder - Passing those files trough the
babel-loaderso they get converted - Enjoying 😉
Now the output file, which is js/frontend.js will be compiled from ES6 to an version that is more compatible with older browsers.
Look at that! No arrow function but a regular function. We’re doing great so far.
Develop vs Build
¿Aren’t you annoyed by the warning?
WARNING in configuration
The 'mode' option has not been set, webpack will fallback to 'production' for this value. Set 'mode' option to 'development' or 'production' to enable defaults for each environment.
You can also set it to 'none' to disable any default behavior. Learn more: https://webpack.js.org/configuration/mode/
I am.
To get rid of that we have to tell webpack that we are working either with development or production mode. And for that we need to change the scripts in the package.json file. Specifically, we need to modify the start script to pass the flag mode like so.
// package.json
{
  // ...
  "scripts": {
    "start": "webpack --mode=development --watch",
    "build": "webpack --mode=production"
  }
  // ...
}
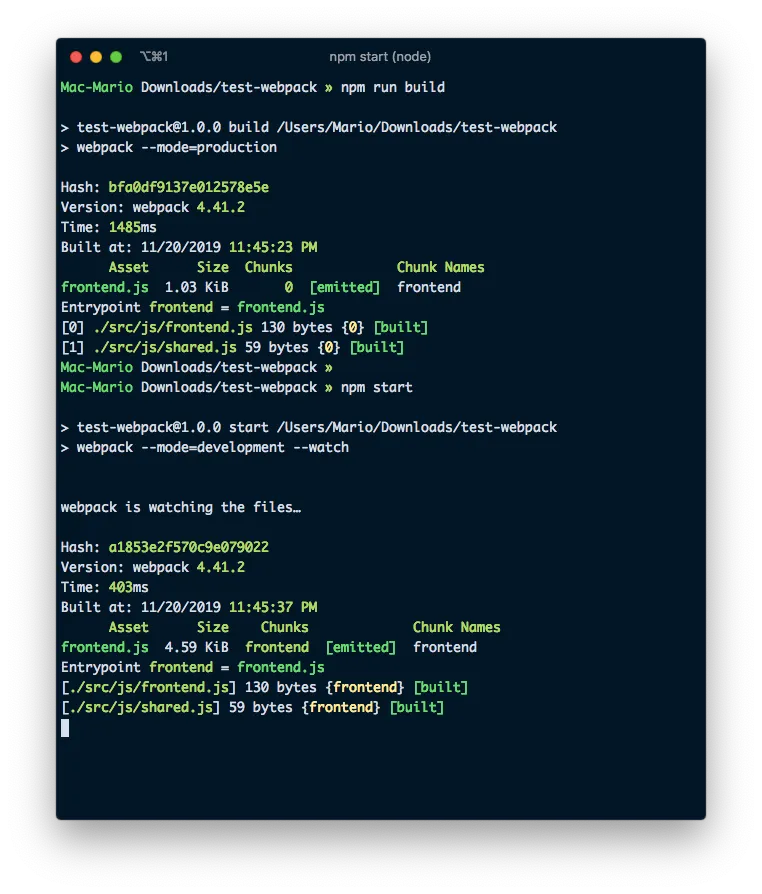
Now, when you can execute npm start and not have that annoying message. Also, if you look closely, you can see that development mode takes control of the terminal. That’s because we added the --watch flag.
The --watch flag tells webpack to keep looking for changes in the src/js/frontend.js file (and any file that it requires), and if any changes happen, re-bundle all the project.
¿Isn’t that special?… We don’t need to keep issuing the npm start command all the time. We just now have to change any file, and webpack will compile immediately.
I also created a new script called build without the --watch flag to be able to compile our files without blocking the terminal.
SASS
Enough about JS for now. Lets dig into CSS and SASS Bundling. But not only bundling but conversion and generation of CSS from SASS.
As always, it all begins by installing new packages:
npm install --save-dev node-sass sass-loader css-loader mini-css-extract-plugin
We also have to instruct webpack to
- Find
.scssfiles (with a new test rule in the modules section). - Convert them to
cssby using thesass-loaderandcss-loader. - And then extract the results and save them in the
css/directory:
That last item is kind of a curveball. It turns out that Webpack bundles everytihng!!!. Including CSS files. So by default your CSS would be included inside your bundle as a JavaScript variable.
That’s why we need to tell webpack to extract the CSS and save it elsewhere… Well, if that’s what you want that is (Hint: I do want that).
// webpack.config.js
const path = require("path");
const MiniCssExtractPlugin = require("mini-css-extract-plugin");

module.exports = {
  entry: {
    frontend: "./src/js/frontend.js",
  },
  output: {
    filename: "[name].js",
    path: path.resolve(__dirname, "js"),
  },
  module: {
    rules: [
      {
        test: /\.js$/,
        exclude: /node_modules/,
        loader: "babel-loader",
        options: {
          presets: ["@babel/preset-env"],
        },
      },
      {
        test: /\.(sa|sc|c)ss$/,
        use: [
          {
            loader: MiniCssExtractPlugin.loader,
            options: {
              hmr: process.env.NODE_ENV == "development",
            },
          },
          "css-loader",
          "sass-loader", // loading order is inverse
        ],
      },
    ],
  },
  plugins: [
    new MiniCssExtractPlugin({
      filename: "../css/[name].min.css", // Relative to output path.
      chunkFilename: "[id].css",
    }),
  ],
};
Let me explain:
- I included the
mini-css-extract-pluginto extract the CSS from the final bundle. - I created a new rule that instructs webpack to bundle any imported SCSS or CSS files.
- I instructed the Extract Plugin to save the resulting CSS in
css/.
To test this new loader, lets make a SASS file in src/sass/main.scss with the contents:
// src/sass/main.scss
$body-bg: lightgray;

body {
  background-color: $body-bg;
}
h1 {
  font-size: 3.05rem;
}
And include that file in our src/js/frontend.js file. (If you don’t include it, it wont get bundled).
// src/js/frontend.js
import "./shared";
import "../sass/main.scss";

const myFunction = () => {
  console.log("frontend.js starting file");
};
myFunction();
Again, npm start (or npm run build if you don’t want to block your terminal) and lets look at the result:
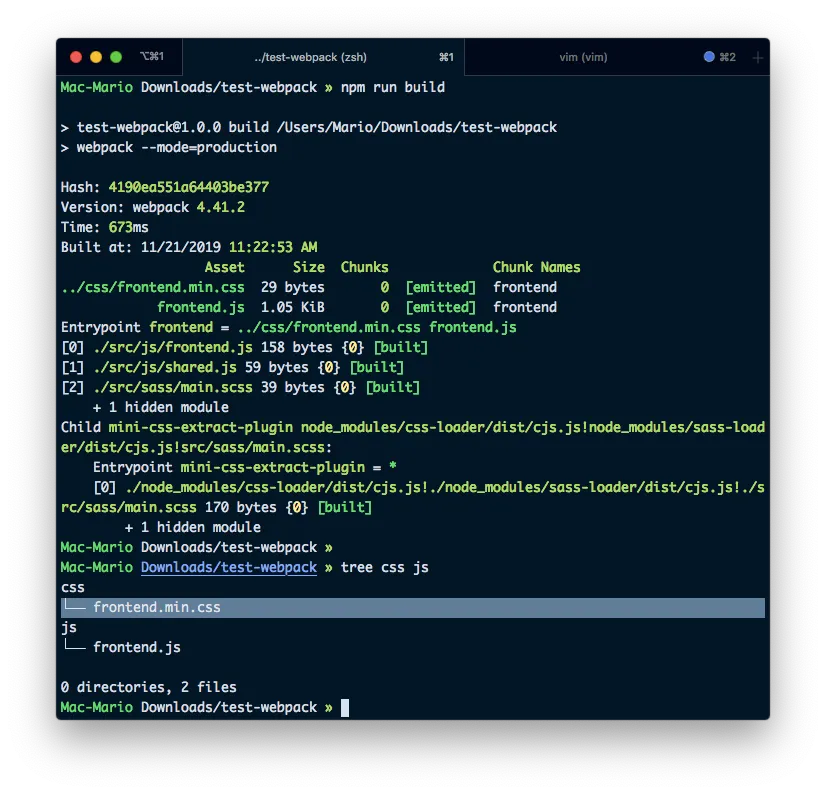
As you can see at the end, we now have a css/frontend.min.css file.
PostCSS
Lets push this SASS/CSS compiling a little further. Lets make the resulting CSS have browser prefixes for specific rules, let make the rem rules have equivalent in pixel, lets compress the css and import any other css into the resulting file.
For all that we need to use PostCSS plugins:
- https://github.com/postcss/autoprefixer : Add prefix with browser specific rules to the CSS generated rules from SASS.
- https://github.com/robwierzbowski/node-pixrem : Create alternate measurements in pixels to any measurement made in
rems. - https://github.com/cssnano/cssnano: Compress the Resulting CSS.
- https://github.com/postcss/postcss-import: Import locally any external css file (like google fonts).
To install the postcss-loader and its plugins, we have to execute:
npm install --save-dev postcss-loader postcss-import pixrem autoprefixer cssnano
We also have to add the loader in webpack.config.js:
// webpack.config.js
// ...
module.exports = {
  // ...
  module: {
    // ...
    rules: [
      // ...
      {
        test: /\.(sa|sc|c)ss$/,
        use: [
          {
            loader: MiniCssExtractPlugin.loader,
            options: {
              hmr: process.env.NODE_ENV == "development",
            },
          },
          "css-loader",
          "postcss-loader",
          "sass-loader", // loading order is inverse
        ],
      },
    ],
  },
  plugins: [
    // ...
  ],
};
And very importantly we have to configure PostCSS. Which can be done by creating a postcss section in package.json.
// package.json
{
  // ...
  "devDependencies": {
    // ...
  },
  "postcss": {
    "map": false,
    "plugins": {
      "cssnano": {},
      "autoprefixer": {},
      "pixrem": {},
      "postcss-import": {}
    }
  }
}
You can also use a
postcss.config.jsfile. More information on PostCSS configuration here
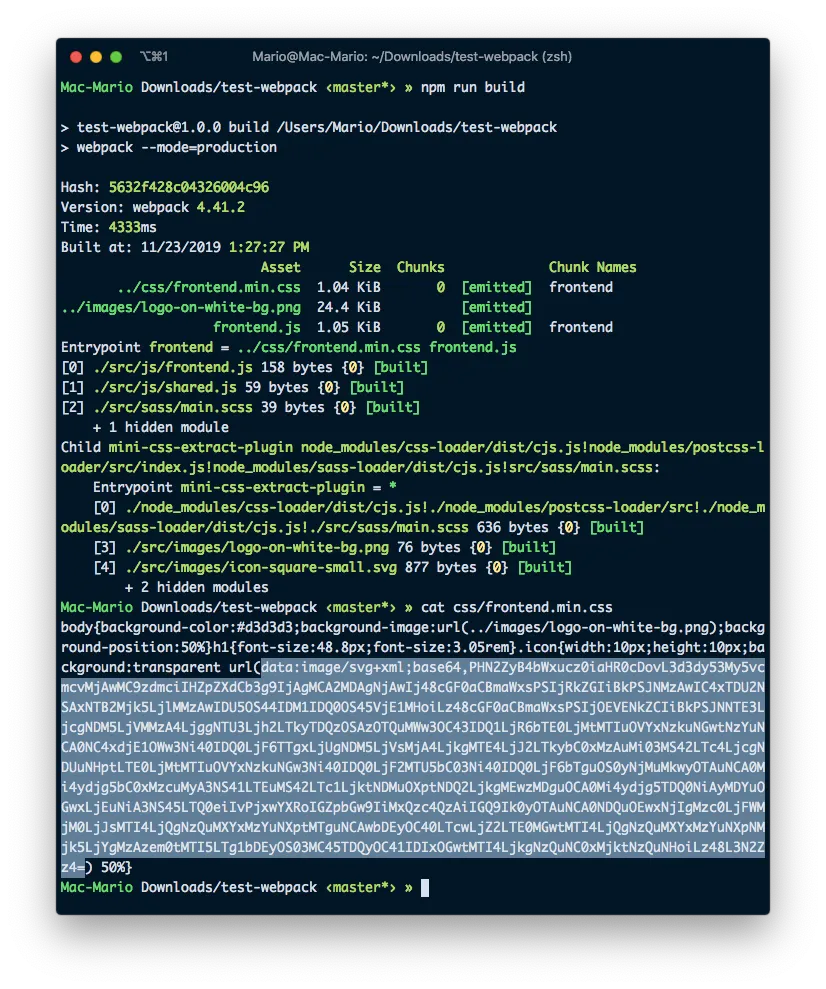
Again, execute npm run build and have a look at the resulting .css file in css/frontend.min.css and look how the rem measurements have px equivalents.
You can test even further by adding more rules in src/sass/main.scss that include transitions and @imports and look how they are now converted.
Using images
Images? … Yes, images.
Webpack also packs images. In this project we’ll be doing 2 things:
- Compress the images that are in
src/images - Embed any small image (less than 8k) used in the
.sassand.jsfiles inside the code as a base64 encoded string.
So lets start by installing the required modules:
npm install --save-dev url-loader file-loader image-webpack-loader
And just for for testing, lets download this image and this image
mkdir -p src/images/
wget https://raw.githubusercontent.com/webpack/media/master/logo/logo-on-white-bg.png
wget https://raw.githubusercontent.com/webpack/media/master/logo/icon-square-small.svg
Also, for testing. Let change the src/sass/main.scss file:
// src/sass/main.scss
$body-bg: lightgray;
body {
  background-color: $body-bg;
  background-image: url("../images/logo-on-white-bg.png");
  background-position: center center;
}
h1 {
  font-size: 3.05rem;
}
.icon {
  width: 10px;
  height: 10px;
  background: transparent url("../images/icon-square-small.svg") center center;
}
And finally, lets change the webpack.config.js file to include those modules.
// webpack.config.js
const path = require("path");
const MiniCssExtractPlugin = require("mini-css-extract-plugin");

module.exports = {
  // ...
  module: {
    rules: [
      // ...
      {
        test: /\.(gif|png|jpe?g|svg)$/i,
        use: [
          {
            loader: "url-loader",
            options: {
              limit: 8192, // Files smallers than 8k embed.
              name: "[name].[ext]", // Files bigger than 8k compress.
              outputPath: "../images",
            },
          },
          {
            loader: "image-webpack-loader",
            options: {
              disable: process.env.NODE_ENV == "development",
              mozjpeg: { quality: 50 },
              pngquant: { quality: [0.5, 0.7] },
            },
          },
        ],
      },
    ],
  },
  plugins: [
    // ...
  ],
};
The summary of what I did in webpack.config.init is to ask small files to be embedded, and big files to be compressed.
Awesome… We have finished our Webpack setup. No the only thing is to convert all this into a WordPress Plugin
WordPress Plugin
The only thing left to do is to add the files required to make this WordPress plugin and we’re done. Specifically we have to copy the package.json and webpack.config.js in the root of our plugin and we’ll be set.
Instead of showing you what that would look like, let me point you to my WebPack WordPress plugin starter in Github so you can take a look at the whole thing.
… And that’s it for this article. Hope you find it useful and you can use it in your projects.