Configure Eslint, Prettier and Husky for WordPress Development
Quoting the ESLint Getting Started Guide
ESLint is a tool for identifying and reporting on patterns found in ECMAScript/JavaScript code, with the goal of making code more consistent and avoiding bugs.
So, it basically analyzes JavaScript code, looking for errors or code-smells, without executing it. Which is great! This avoids many issues that other kind of linters have.
What about a Prettier?…
Well, Prettier is an Opinionated code formatter that ensures that the code of your project looks the same.
So if you are developing a JavaScript applications you should certainly use both of them.
But you might be asking yourself ¿Why would you want to use a command line tools for analyzing and formatting code if VS Code already does it out of the box?
Well, the reason is that by using ESLint and Prettier, you can add the linting and formatting configuration to your project and share it across your team. Also, you can include it in your Continuous Integration platform and ensure that your code is correct.
So lets see how to configure them one by one.
TOC
- The Caveat
- Preparing a project
- ESLint Setup
- A brief explanation of ESLint options
- Using ESLint with the new configuration
- Prettier configuration
- WordPress configuration
- Disabling rules
- Prettier local configuration
- Add npm script to run it
- Husky and lint-staged
- Stylelint
- Vim configuration
- Visual Studio
- Tips
- Final toughs
The Caveat
Even though all tools are excellent, its not all roses.
It turns out that ESLint has its own code formatter. Which is good, but it doesn’t do as good a job as Prettier. So its not a bad idea to use both tools at the same time. And that can bring some weird issues.
- ESLint formatter will make some changes that Prettier could revert
- If you use a watch function you could get and endless loop where one formatter fixes and then the other undoes the action
- You need to set up formatting rules on 2 places
So there are some simple steps that you can take to have both tools working together without stepping on each other toes.
Preparing a project
For this tutorial, we’re going to create a WordPress plug-in, and we’re going to have the .js files be linted by ESLint and formatted by Prettier.
So, just create a directory in your plug-ins dir and start git in it.
cd /path/to/wordpress/wp-content/plugins
mkdir wordpress-eslint-prettier-config
cd $_
Also create an empty package.json file since we’re going to add npm packages to it:
npm init -yIt’s a good idea to edit your package.json so the information about author, keywords and such is correct.
{
  "name": "wordpress-eslint-prettier-config",
  "version": "1.0.0",
  "description": "This is a basic repo that serves as a guide on how to configure eslint and prettier for a WordPress project.",
  "scripts": {},
  "repository": {
    "type": "git",
    "url": "git+https://github.com/marioy47/wordpress-eslint-prettier-config.git"
  },
  "keywords": ["eslint", "prettier", "wordpress", "editorconfig"],
  "author": "Mario Yepes <[email protected]>",
  "license": "MIT",
  "bugs": {
    "url": "https://github.com/marioy47/wordpress-eslint-prettier-config/issues"
  },
  "homepage": "https://github.com/marioy47/wordpress-eslint-prettier-config#readme",
  "devDependencies": {}
}
ESLint Setup
ESLint and Prettier are tools that can be run in the command line. That’s why some developers install them globally on their system:
### This can be useful but NOT RECOMMENDED
npm install -g eslint prettier
This is totally fine. But as the documentation suggests you should install eslint per project. And the reason is because having them locally in your project willl facilitate the code linting and code beautifying on your Continuous Integration step.
Personally, I never install them globally and I recommend you don’t also. That way there wont be any confusion on why the ”CI step is not working”.
To start the initial setup use npx to call eslint with the --init flag:
npx eslint --initThis will start a wizard asking you for you project preferences:

As you can see, the wizard asks you for pretty basic questions:
- Which standard to use
- If you use React, Vue or Angular
- If the current project uses Typescript
- Etc.
Here, you should be as agnostic as possible, since all the configuration will be done by editing init files.
The final question is if you want to install
eslintlocally. You should say Yes here.
The result of this command, is that you’ll get a .eslintrc.json file similar to this:
// .eslintrc.json
{
  "env": {
    "browser": true,
    "es2020": true
  },
  "extends": "eslint:recommended",
  "parserOptions": {
    "ecmaVersion": 11
  },
  "rules": {}
}
And that in your packages.json file you’ll have a new dev requirement called eslint.
This .eslintrc.json file is very important since ESLint wont work without it. It declares which rules you are going to apply to you project.
A brief explanation of ESLint options
A complete explanation of the configuration file can be found in the official documentation. But here is the gist of it:
parserOptions: How do you want to parse your code. Pe. The ECMAScript (ecmaVersion) version (ES6, ES2018, etc); If you want to use modules (sourceType). Etc.env: Defines which global environment variables you can use. Pe. if you declarejest: true, you can use thedescribe,itortestglobal variables. Usingbrowser: trueallows you to use thedocumentglobal. Settingnode: trueallows you to use theprocessvariable.global: Personalized globals. In the case of WordPress theajaxurlcan be very useful to be defined here.plugins: Imports sets of rules from other npm modules. More on that latterrules: This is the core of the configuration and can be very large if you don’ use plugins. For a list for rules refer to the official documentationextends: Allows you to make the current configuration an extension of an external one defined in another module.
Using ESLint with the new configuration
Now, lets create a test .js file with some bad formatted code and code-smells.

// src/js/test-file.js
var first_var
function aSimpleFunction() {
console.log("Hola mundo") }
function anotherFunction(event) {
console.log("This one is used");
}
let other =
document.getElementById("the-element-id")
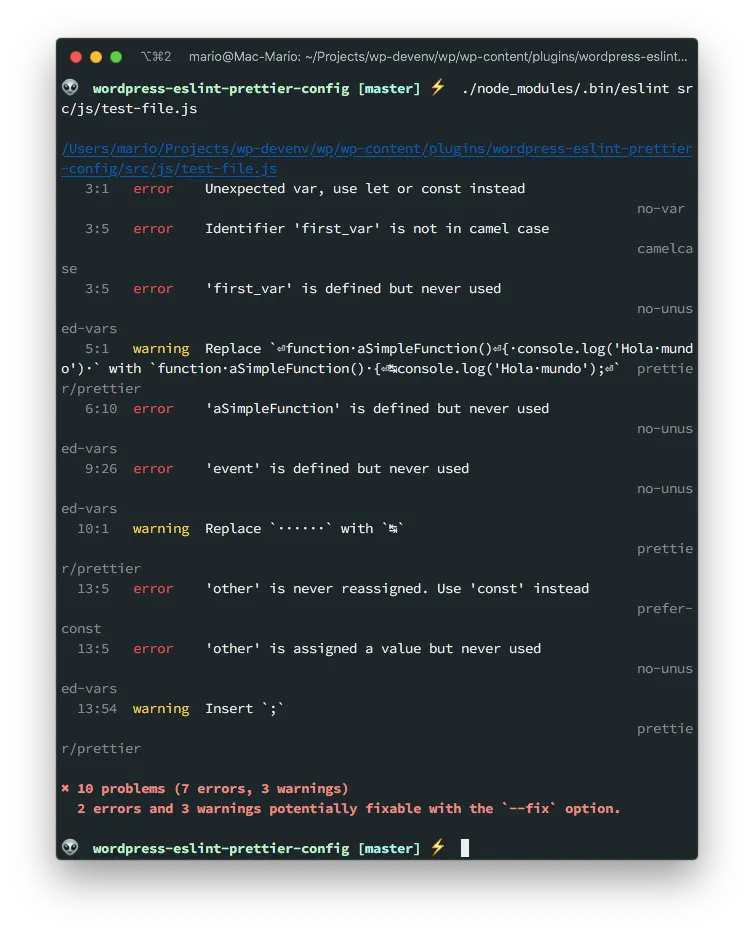
anotherFunction( null)And execute our local ESLint to figure out if it has any errors:
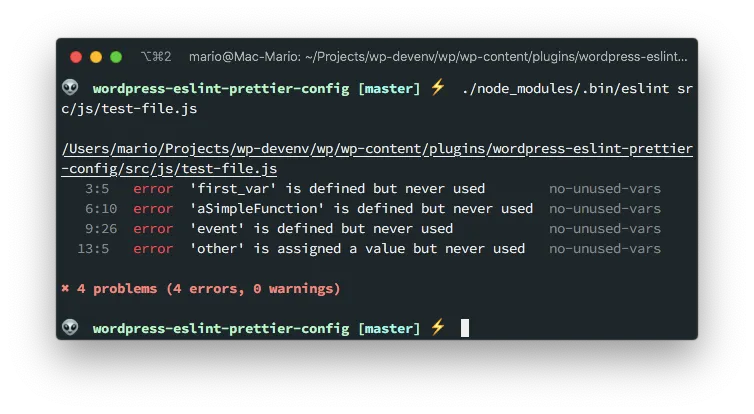
Great! We have a way to detect code errors but still no code styling.
A couple of things to note:
- I used the path
./node_modules/.bin/eslintto call theeslintcommand. That’s the path where our localeslintis placed. Latter we’ll make this more friendly. - On the configuration wizard I answered problems when it asked if “How would you like to use ESLint:“. That’s why is not reporting any code style issues.
Prettier configuration
With ESLint installed, we can now move to configuring Prettier so we can format our code.
The issue is that ESLint can do some formatting that can conflict with Prettier. So we have to make the them talk to each other.
Fortunately, Prettier has official support for ESLint so the process is not that complicated.
Lest continue by installing the prettier module and a couple of supporting modules so ESLint understands that it has to use prettier for the formatting:
npm install -D prettier eslint-config-prettier eslint-plugin-prettier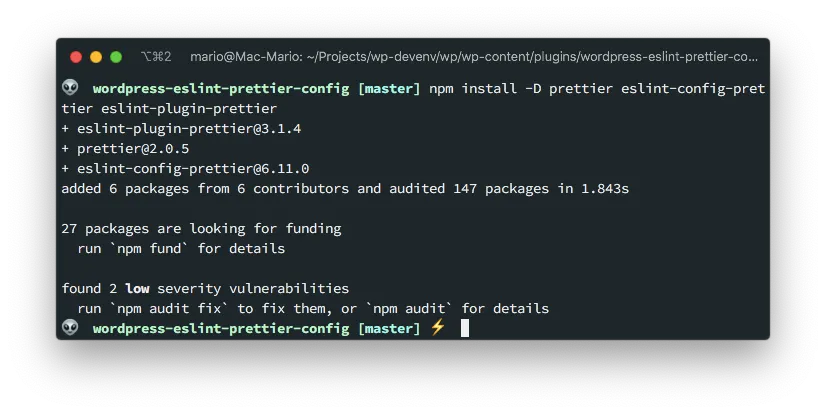
prettieris the Prettier command but on our project.eslint-config-prettierTurns off all rules that are unnecessary or might conflict with Prettier..eslint-plugin-prettierRuns Prettier as an ESLint rule and reports differences as individual ESLint issues.
Then we have to edit .eslintrc.json to add the prettier plugin and the prettier config.
// .eslintrc.json
{
  "env": {
    "browser": true,
    "es2020": true
  },
  "extends": ["eslint:recommended", "plugin:prettier/recommended"],
  "parserOptions": {
    "ecmaVersion": 11
  },
  "rules": {
    "prettier/prettier": "warn"
  }
}
As advised by the documentation, leave the prettier be the last extend configuration.
Now, when you issue eslint again, you’ll get some additional warnings about the code style:
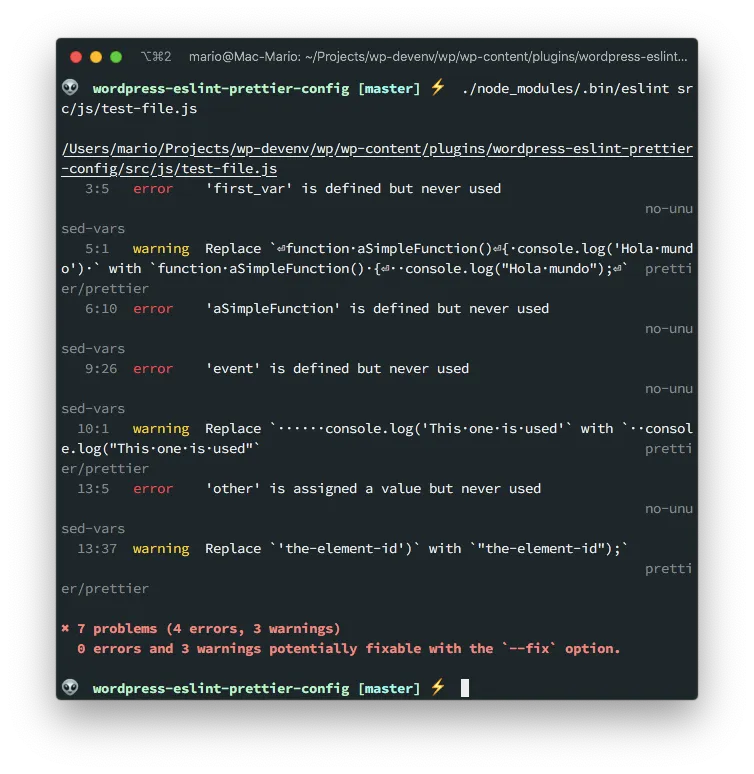
Awesome… We’re getting code errors and style errors at the same time.
WordPress configuration
If you take a look at the .eslintrc.json file in the Guetenberg Project, you can see that WordPress uses A LOT of rules.
Since we’re lazy, I’m going to use an already created ESLint WordPress Package
This package has configurations and custom rules for WordPress development. Which is exactly what we need.
So lets install it with
npm install @wordpress/eslint-plugin --save-devAnd again, edit the .eslintrc.json file adding this new package:
// .eslintrc.json
{
  "env": {
    "browser": true,
    "es2020": true
  },
  "extends": [
    "eslint:recommended",
    "plugin:@wordpress/eslint-plugin/recommended"
  ],
  "parserOptions": {
    "ecmaVersion": 11
  },
  "rules": {
    "prettier/prettier": "warn"
  }
}
Take into account that I’ve deleted the plugin:prettier/recommended since according to the documentation The recommended preset will include rules governing an ES2015+ environment, and includes rules from the eslint-plugin-jsx-a11y, eslint-plugin-react, and eslint-plugin-prettier projects.
And now take a look at the output when I run eslint again:
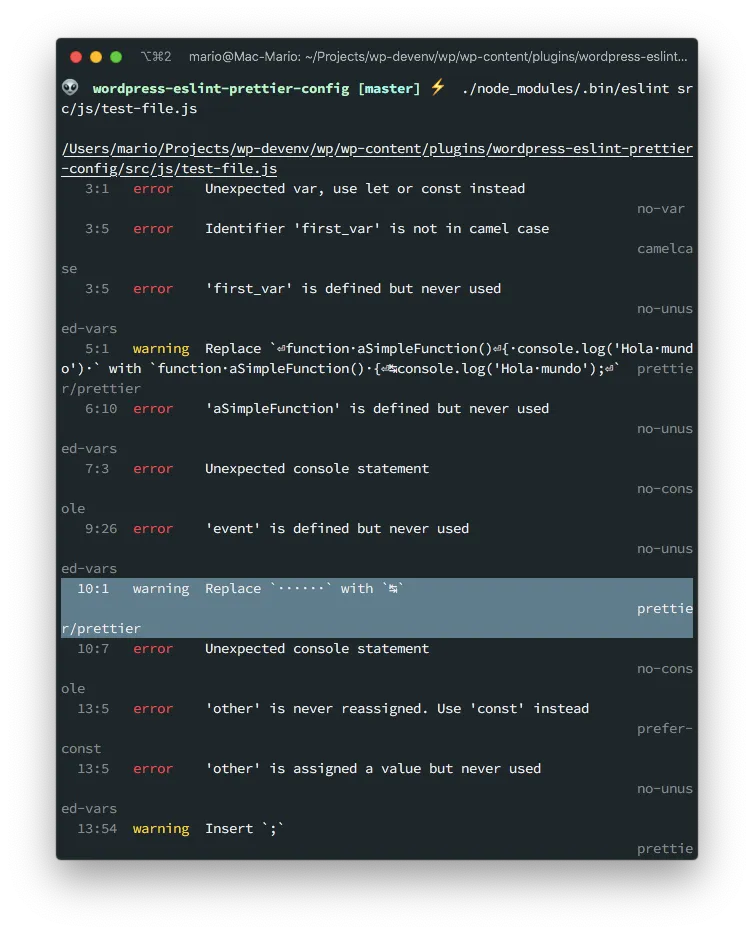
In the highlighted line you can see that its recommending to use Tabs instead of spaces which is what WordPress recommends.
Disabling rules
I don’t know about you, but when I’m developing I really need to use the console.log() function in my JavaScript code… But eslint complains about that all the time.
So if you want to temporary disable that check, add the following to your .eslintrc.json file:
// .eslintrc.json
{
  "env": {
    "browser": true,
    "es2020": true
  },
  "extends": [
    "eslint:recommended",
    "plugin:@wordpress/eslint-plugin/recommended"
  ],
  "parserOptions": {
    "ecmaVersion": 11
  },
  "rules": {
    "prettier/prettier": "warn",
    "no-console": "off"
  }
}
This way you wont get any errors about the no-console issue:
As you can see there are no no-console errors on that output.
Prettier local configuration
This part is completely optional, but I like to add some local prettier rules so the code is a close as the final product while I’m writing it. For instance, I want the code to use tabs over spaces as the WordPress coding standard recommends:
This rules are taken from the Jetpack Github site and are kind of redundant, but work as a fall-back.
So lets create the .prettierrc file, and add the following:
useTabs: true
tabWidth: 2
printWidth: 100
singleQuote: true
trailingComma: es5
bracketSpacing: true
parenSpacing: true
jsxBracketSameLine: false
semi: true
arrowParens: avoid
This way, we can have extra configurations in case we need them.
Add npm script to run it
Up until now, we’ve been executing eslint with the command:
./node_modules/.bin/eslint src/js/test-file.jsWhich is not practical or confortable by any means…
Also, we’ve just limited ourselves to find errors, but not fix them.
So lets fix both issues by adding 2 scripts in the packages.json file:
{
  ...
  "scripts": {
    "lint": "eslint src/js/**/*.js",
    "lint:fix": "eslint src/js/**/*.js --fix"
  }
  ...
}
The first command is going to find errors on all of our JavaScript files, and the second will fix them.
Let’s give them a try:
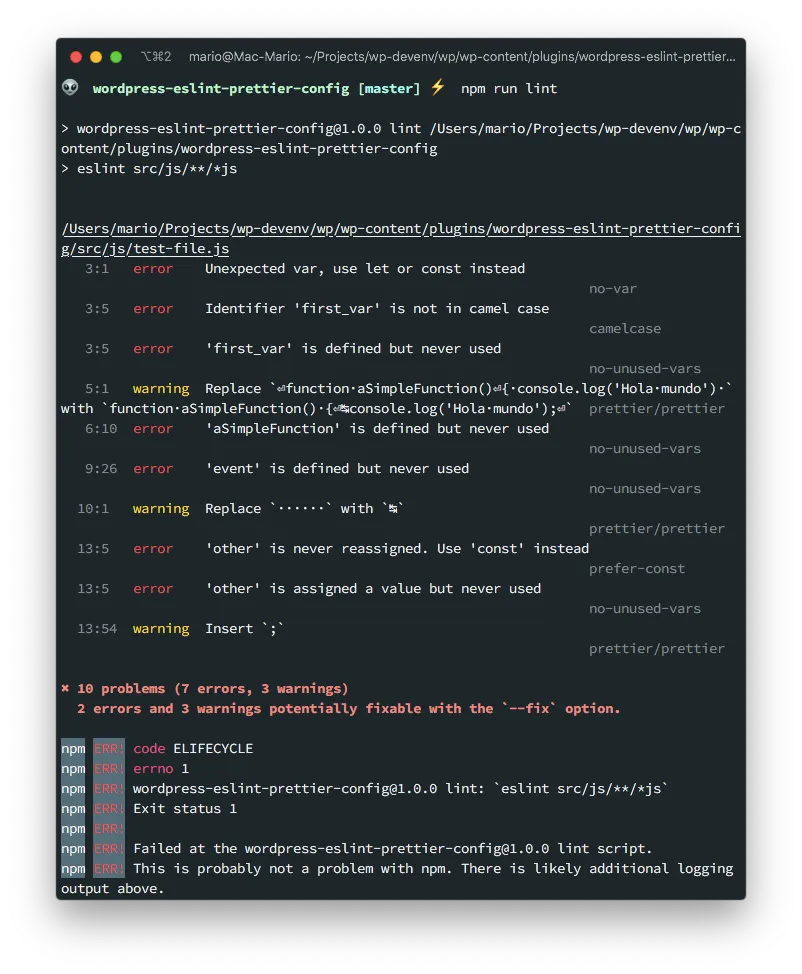
As you can see npm run lint will find errors.
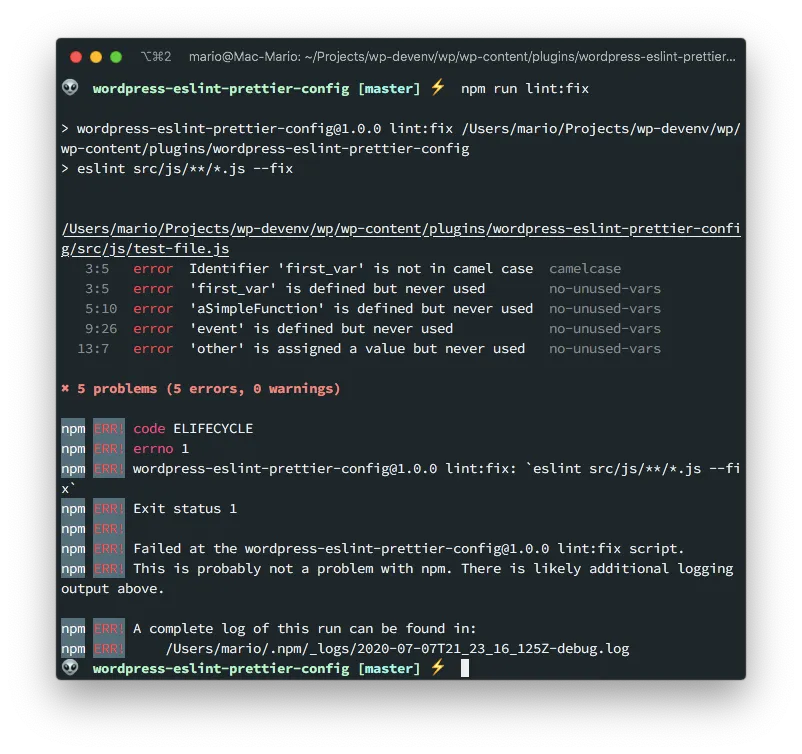
And npm run lint:fix will find and fix them.
Take into account that eslint wont fix some errors that will actually break your code. Errors like:
- Wrong case for names
- Unused vars or functions
- Empty functions
- etc.
Wont be fixed and its up to you to actually fix them without breaking your code.
Husky and lint-staged
We’re almost done with the environment configuration.
No, we’re going to add 2 tools that will execute the linting and formatting tools for us when we do a git commit.
The first one is going to be Husky, which is a tool that connects with Git to improve your commits by executing commands on the pre and post git hooks. Which is great if it wasn’t for the fact that by default Husky will lint and fix all of the files on our project.
That’s why we need the second tool; lint-staged. Lint-staged will executing the linting only on the committed files and will not touch any file that hasn’t been modified.
Installing them is pretty easy since lint-staged has a command that
- Will install all the required packages (
huskyandlint-staged) - Will check that we’re using
eslint - Will change the file
package.jsonadding the required configuration
The command is:
npx mrm lint-stagedThis will show a bunch of messages, but at end of the execution we’ll have the following changes on hour package.json:
{
  ". . .",
  "devDependencies": {
    "@wordpress/eslint-plugin": "^7.3.0",
    "eslint": "^7.11.0",
    "eslint-config-prettier": "^6.13.0",
    "eslint-plugin-prettier": "^3.1.4",
    "husky": "^4.3.0",
    "lint-staged": "^10.4.2",
    "prettier": "^2.1.2"
  },
  "husky": {
    "hooks": {
      "pre-commit": "lint-staged"
    }
  },
  "lint-staged": {
    "*.js": "eslint --cache --fix"
  }
}
The first batch of changes is pretty familiar: We just installed husky and lint-staged.
The second batch has 2 sections:
- The
huskysub-object is telling git which command to execute before committing - The
lint-stagedsub-object is telling git to executeeslint --cache --fixon the changed files.
We have the best of both worlds: We get linting before each commit but only on the changed files… Clean and fast!
Now, let’s test it. Let’s make a change on our bad formatted file and try to commit it to the repo:
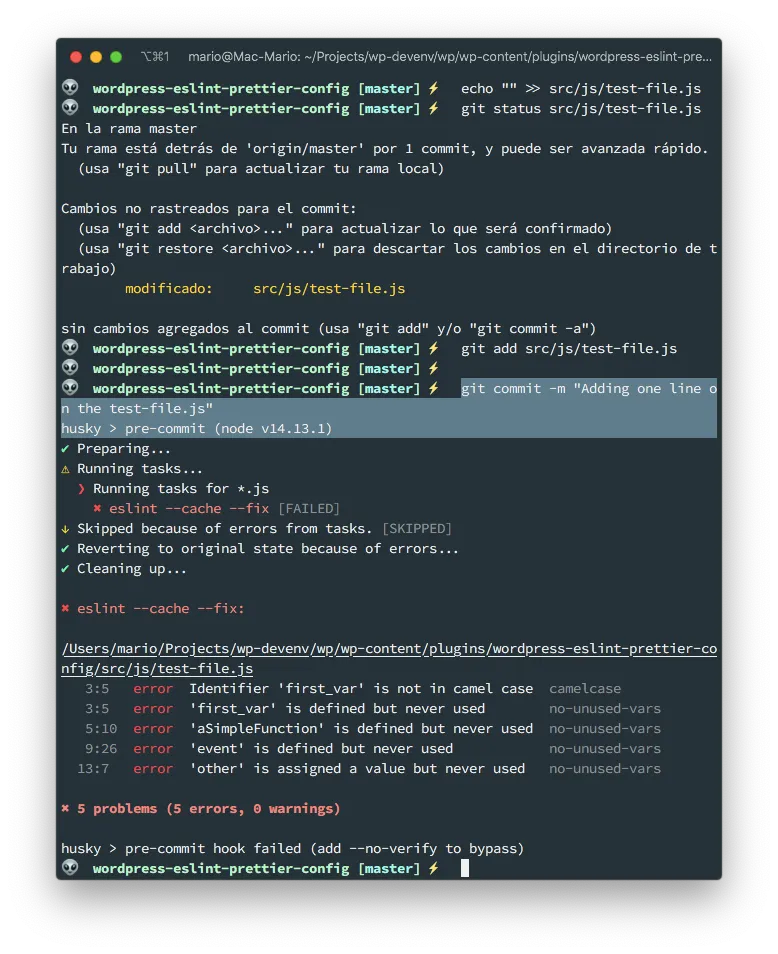
We get an error!!!
We cant commit unless we fix the errors that eslint could not fix (like camel case errors or unused functions errors). So we either…
- We ignore linting on the file by adding it to .eslintignore
- Or, we add exceptions on the file (more info on that here)
I opted for the second option. So I added the following at the top of the src/js/test-file.js:
// src/js/test-file.js

/* eslint-disable no-var, no-unused-vars, camelcase, prefer-const, prettier/prettier */
var first_var;

// ....
I really do not recommend this. Its always better to actually adhere to standards and write clean code.
Stylelint
I think this is a little bit overkill, but if you want to lint and fix CSS/SCSS errors, then you have to use Stylelint.
It works very simmilar to ESLint, where you have a program that does the linting (the eslint command) and you have a set of rules to apply.
To install it just issue
npm install stylelint stylelint-config-wordpress --save-devThe first package is the linter, and the second one is the set of rules we are going to use for WordPress.
After the packages are installed, you have to 2 to additional steps to execute:
- Create a
.stylelintrc.jsonfile that specifies which rules we are going to apply - Open the
pacakge.jsonfile and tellhuskyto also lint the.scssand.cssfiles
The .stylelintrc.json its pretty simple, it just configures which rules to apply. In our case where goint to apply the WordPress rules. After all that’s why we installed them:
{
	"extends": "stylelint-config-wordpress/scss"
}
The second step is in package.json lets configure Husky:
{
  "...",
  "husky": {
    "hooks": {
      "pre-commit": "lint-staged"
    }
  },
  "lint-staged": {
    "*.js": "eslint --cache --fix",
    "*.(sa|sc|c)ss": "stylelint --cache --fix"
  }
}
And now, when you commit a .css or .scss file, they will get linted.
At the time of this writing, the WordPress ruleset has some deprecated issues. Don’t worry, they will get ignored.
Vim configuration
To make it work with Vim you have to install Conquer of Completion vim plugin (You can see an article on how to configure it here). And then install the coc-eslint extension by executing this inside vim
:CocInstall coc-eslintThen, in your coc-config.json, add
"eslint.autoFixOnSave": true,This will make your files get auto fixed.
You can open your
coc-config.jsonfile in vim by issuing the:CocConfigcommand
After you’ve completed this steps, you’ll get warnings and fixes right in your editor like this:
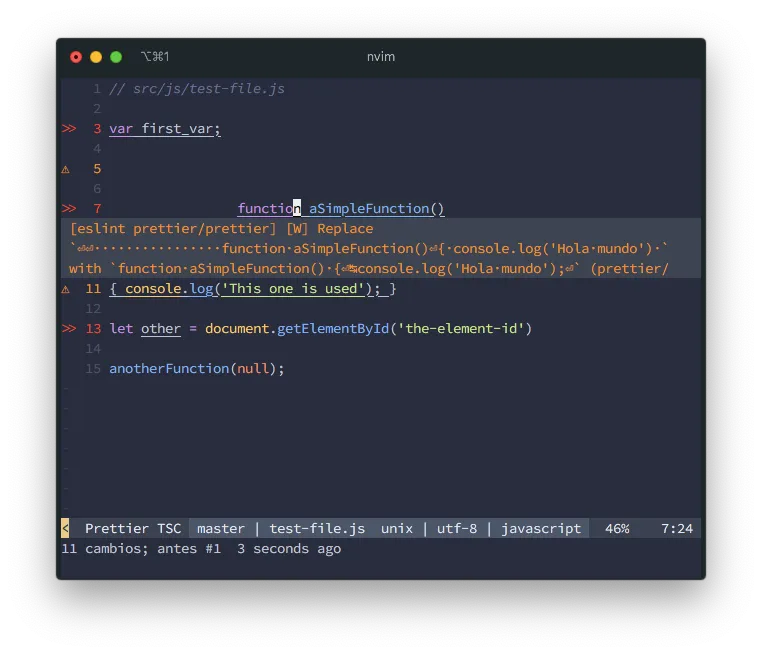
You can also issue the Vim command
:CocCommand eslint.executeAutofixto manually fix your files
Visual Studio
For visual studio you need to install 2 extensions:
You can install them both from the command line by issuing the code command like so:
code --install-extension dbaeumer.vscode-eslint esbenp.prettier-vscodeAnd that’s it. Your set up.
Tips
This are common solutions to recurring problems that happen from time to time in a WordPress project.
1. Allow CamelCase variables
Its probable that you’ll be passing variables from a WordPress PHP file, which uses snake_case standard. To JavaScript, that uses CamelCase syntax.
If that’s the case, you might want to add a rule to allow some snake_case variables by adding a camelcase rule in .eslintrc.json
// .eslintrc
{
  "...",
  "rules": {
    "prettier/prettier": "warn",
    "no-console": "off",
    "camelcase": ["warn", { "allow": ["element_id"] }]
  }
}
A complete explanation of camelcase options can be found here
2. Declare global variables
If you have to use an external JavaScript library from a CDN, that declares global variables, you’ll be getting a no-undef error on your scripts.
This is the case for instance if you are using the Google Maps JavaScript API. Where you include the library and you have a google.map variable available for your scripts.
To avoid eslint error about that variable not being declared, you have to create a globals section in your .eslintrc.json:
// .eslintrc.json
{
  "...",
  "globals": {
    "google": false
  }
}
There are options for declaring read only and read write global variables. You can take a look at those options here
Final toughs
One additional piece you can add to your development environment is editorconfig so your editor writes you code in the correct format from the get go. But its not really necessary.
Also, there is an excellent article about ESLint for React in the thomlom.dev blog.
And, if you want to take a look at the resulting files, you can see the final result in this Github Repo