Create a Developer Portfolio Site (with a blog) with Gatsby
Table Of Contents
Creating a Gatsby site is not an easy task when you compare it to creating a site with WordPress, Drupal, etc. And the reason is that to a certain point you are creating your own CMS.
To use Gatsby you should be familiar with a bunch of technologies like Graphql, React, Markdown, Mdx, etc. And then you need to research and test a bunch of plugins to get a minimal site up and running.
But after you pass the configuration steps and you have your site set up, you’ll have the more performant site you’ll ever create. So the advantages compensate the drawbacks.
Here I’ll list the steps I took to create my personal blog/portfolio site without going too much into detail since Gatsby already has an extensive tutorial and the docs are actually pretty good.
Wait… I don’t know what Gatsby is
To quote the Gatsby Site:
Gatsby is a free and open source framework based on React that helps developers build blazing fast websites and apps
The way I think of it is, Gatsby is a Site Generator as opposed to a Content Management System. But with the difference that the generated site is a React App.
Gatsby can do a lot more than to be just a Site Generator. But that’s what I’m using it for right now.
Create the site itself
This part is actually easy since its just executing the npx gatsby new command in the terminal:
mkdir blog-site
cd $_
npx gatsby new .
code --install-extension esbenp.prettier-vscode # Only if you use VS Code.
yarn start
If you know a little about Gatsby, notice that I didn’t provided an starter theme. That means that I’m using the default starter theme
The
codecommand is to install prettier for Visual Studio Code in case you don’t have it already.
I really fast test that you can make, to take a peek at what will be deployed, is to execute the npm run build command and then open a local http server (here I’m using python):
npm run build
cd build
python -m SimpleHTTPServer 9000
Then open a browser and point it to https://localhost:9000 and you’ll see the standard Gatsby’s welcome page.
Start the configuration
Configuring Gatsby is a long endeavor. And consists of editing the gatsby-config.js file constantly for every plugin or every change of behavior, and then restarting the development environment.
First, I’m going to configure the blog metadata to make it more SEO friendly by editing gatsby-config.js file and change the metadata sections:
- The
siteMetadata.title - The
siteMetadata.description - The
siteMetadata.author
Then, on the same file, in the plugins array, look for the gatsby-plugin-manifest section, and make this changes:
- Add a
name - Add a
short_name - Add a
icon
With this 3 changes, I made the the site metadata work with my own info.
// gatsby-config.js
module.exports = {
  plugins: [
    //...
    {
      resolve: `gatsby-plugin-manifest`,
      options: {
        name: `Mario's Personal Portfolio and Blog`,
        short_name: `Mario's Blog `,
        start_url: `/`,
        background_color: `#2962ff`,
        theme_color: `#2962ff`,
        display: `minimal-ui`,
        icon: `src/images/icon-developer.png`, // This image does not come with Gatsby.
      },
    },
  ],
}
Gatsby Plugins
I could start writing JSX files with content for the site right away, but I want to add some plugins and enable some features that will make it more performant and make my life easier as a writer. So I’ll be installing
- A plugin to write styles using
SCSS - A plugin the embeds
SVGfiles instead of referencing them - A plugin to convert
Markdownintohtmlso I can write my posts as.mdfiles - A plugin to make the images in the markdown posts more performant and SEO friendly
- A plugin that allows me to use
jxsinside markdown files (this files are calledmdxfiles)
The process to install and use Gatsby Plugins is almost the same:
- Install the plugin using
npm - Configure the plugin in
gatsby-config.jsby adding a new section in the plugins section of that file - Optionally create or modify an additional file (like
gatsby-browser.jsin the case of the prismjs plugin).
So lets start adding plugins.
SASS and Google Fonts
I’m going to use SASS instead of CSS to style the site.
For that I’ll need to install my first Gatsby extension: gatsby-plugin-sass, and for that extension to work, I need to install also node-sass.
To install both, issue the command:
npm install --save gastby-plugin-sass node-sass
Also, I’m going to use the Fira Sans font from google fonts, and for that, I need another extension: gatsby-plugin-web-font-loader. So I need to execute this in the terminal.
npm install --save gatsby-plugin-web-font-loader
And in gasby-config.js add the following in the plugins section
// gatsby-config.js
module.exports = {
  plugins: [
    // ...
    `gatsby-plugin-sass`, // For sass
    {
      resolve: "gatsby-plugin-web-font-loader",
      options: {
        google: {
          families: ["Fira Sans:300,500,700"],
        },
      },
    },
  ],
}
And finally rename the main CSS style file to have the .scss extension:
mv src/components/layout.css src/components/layout.scss
Bootstrap Mixins and Variables
I’m already pretty familiar with Boostrap, specially Bootstrap’s mixins and variables and how them can save me time by creating media queries and color pallets. So I need to install that package:
npm install --save boostrap
And I’ll replace the content of src/components/layout.scss with
// src/components/layout.scss
@import "~bootstrap/scss/functions.scss";
@import "~bootstrap/scss/variables.scss";
@import "~bootstrap/scss/mixins.scss";
@import "~bootstrap/scss/reboot.scss";
@import "~bootstrap/scss/type.scss";

html {
  font-size: 18px; // This will be the base font size
}
That will give me access to all the Boostrap mixins, reset the browser styles and also change the default font size.
Note: this is not the complete styling. This just shows the parts of bootstrap that I’ll be using.
SVG embed plugin
The gatsby-default-starter comes with gastsby-images-sharp plugin installed by default, which is great since it helps you to compress and manage images in a very SEO friendly way.
One thing that gatsby-plugin-sharp doesn’t manage is the inclusion of SVG images inside your content. It only manages .jpg and .png compression and conversion.
So, I’m going to use a new plugin that does just that… include svg images inside the content:
npm install --save gatsby-plugin-react-svg
And in gastby-config.js I have to add the following in the plugins section:
// gatsby-config.js
module.exports = {
  plugins: [
    // ...
    {
      resolve: "gatsby-plugin-react-svg",
      options: {
        rule: {
          include: /images\/svg\/.*svg$/,
        },
      },
    },
  ],
}
This way, every time I import an SVG file in a component, Gatsby will include the code of the SVG instead of referencing it using <img src="...">.
This takes care of styling the blog (which we haven’t started yet). Now lets make Gatsby understand Markdown.
Markdown support
JSX is pretty easy to use since is very similar to html, and if you are just adding content, its not far fetched to use it as the format for writing copy.
… Still
I prefer markdown since is much more easier to write, and most of all, it doesn’t have “syntax errors” (it does, but they are kind of hard to make).
So, I’ll install markdown support for Gatsby by issuing the following command:
npm install --save gatsby-transformer-remark
An in gastby-config.js in the plugins section I’ll add
// gatsby-config.js
module.exports = {
  plugins: [
    // ...
    {
      resolve: `gatsby-transformer-remark`,
      options: {
        plugins: [],
      },
    },
  ],
}
Notice that I left an empty array as the value for plugins in the configuration.
The reason for that is that I’ll be needing to configure additional Gastby plugins that extends the markdown one.
Note: This plugin requires some configuration in the
gatsby-node.jsfile. See the section about creating pages programmatically below
Add images to Markdown files plugin
The Gatsby’s gatsby-transformer-remark plugin, converts markdown files to html very efficiently. But it doesn’t take care of the images. Specially local images that the sharp plugin has compressed and make more SEO friendly.
So I’ll be using the gatsby-remark-images remark plugin to insert images in the blog posts.
npm install --save gatsby-remark-images
This is one of the more cool Gatsby plugins out there. Not only inserts images in markdown, but it compresses them and creates SVG equivalents for placeholder content. Also takes care of lazy loading and a bunch of stuff.
Take a look at the documentation here so you get a better idea of what you are getting.
With the plugins installed, lets configure it in the empty array we left in the previous step. That means that we have to edit gatsby-config.js again:
// gatsby-config.js
module.exports = {
  plugins: [
    //...
    {
      resolve: `gatsby-transformer-remark`,
      options: {
        plugins: [
          {
            resolve: `gatsby-remark-images`,
            options: {
              linkImagesToOriginal: false,
              maxWidth: 1000,
              withWebp: true,
            },
          },
        ],
      },
    },
  ],
}
A short explanation of what I did here is:
- Use
gatsby-remark-imageswhen processing markdown files - If an image is found that is more than
1024pxwide, then resize it - Disable auto linking images to the original one
- Make a copy of the image in
webpto make it even more performant
Adding Code Highlighting plugin
My site will focus on development, tutorials and how-tos. That means that I’ll be creating articles that will have source code inside it. So I’ll need a plugin that converts source code snippets into something nice to see.
The prismjs plugin does just that. Converts code snippets into colored content. Also I’ll need a decent theme for that highlighting.
The command to install the prism plugin and a series of highlighting themes is:
npm install --save gatsby-remark-prismjs prismjs prism-themes
And again, I have to do some configuration in gatsby-config.js by adding the following options INSIDE the gatsby-transformer-remark plugins array:
// gatsby-config.js
module.exports = {
  // ...
  plugins: [
    // ...
    {
      resolve: `gatsby-transformer-remark`,
      options: {
        plugins: [
          {
            resolve: `gatsby-remark-images`,
            options: {
              linkImagesToOriginal: false,
              maxWidth: 1000,
              withWebp: true,
            },
          },
          {
            resolve: `gatsby-remark-prismjs`,
            aliases: {
              zsh: "bash",
            },
          },
        ],
      },
    },
  ],
}
And I need to create a new file… Finally a new file!.
This Prismjs plugin requires css files to colorize the code. So we also need to modify the gatsby-browser.js file to include this css.
// gatsby-browser.js
require("prism-themes/themes/prism-material-oceanic.css")
require("prismjs/plugins/line-numbers/prism-line-numbers.css")
require("prismjs/plugins/command-line/prism-command-line.css")
We just need to add this 3 lines to the file, and that’s it.
Add MDX support plugin
So I’m lazy… Most of the developers are…
And I don’t want to use JSX for pages with a lot of copy (like the about page), I want something more simple and easier to write. That’s why I’m going to use MDX instead of JSX!
If you don’t know, MDX is JSX inside Markdown!. If you want to know more about MDX head to the official MDX site.
npm install --save gatsby-plugin-mdx @mdx-js/mdx @mdx-js/react
And configure it in gatsby-config.js inside the plugins array
// gatsby-config.js
module.exports = {
  // ...
  plugins: [
    // ...
    `gatsby-transformer-mdx`,
  ],
}
This plugin requires no configuration, so that only line is what’s needed.
Note: This plugin requires some configuration in the
gatsby-node.jsfile. See the section about creating pages programmatically below
Sitemaps
I want my site to be indexed by Google and the index should be fast. So I need a site-map creation plugin.
Also, I want to create a robots.txt file when I build the site…
The gatsby-plugin-sitemap and gatsby-plugin-robots-txt do just that. Create sitemaps and support robots.txt files
npm install --save gatsby-plugin-sitemap gatsby-plugin-robots-txt
And again… edit gatsby-config.js
// gatsby-config.js
module.exports = {
  // ...
  siteUrl: "https://marioyepes.com",
  // ...
  plugins: [
    // ...
    `gatsby-plugin-sitemap`,
    `gatsby-plugin-robots-txt`,
  ],
}
One important thing to note. The sitemap is NOT generated until you actually publish your page. So if you issue npm start you wont see a sitemap.
To see the sitemap you have to build and serve the page
npm run build
npm run serve
!!! We’re done!!!… (with the configuration). Now lets start with the development itself.
Creating pages programmatically
So I’ve finished the configuration. Its time to extend the Gatsby functionality by adding functions on the gatsby-node.js to create pages programatically.
But before I create pages programmatically, I have to decide where I’m going to put the blog posts files, which I’ll write in markdown. And where to put the portfolio pages, which I’ll write in mdx.
… So:
- The blog posts will reside en
src/posts. And I’ll list them in thesrc/pages/blog.jspage. - The portfolio pages will reside in
src/projects. And I’ll list them in thesrc/pages/portfolio.js
Just for testing. I created 2 blog posts and 2 project “pages” in src/posts and src/projects respectevly:
$ tree src/

src
├── components
│   ├── layout.js
│   └── seo.js
├── pages
│   ├── blog.js
│   ├── index.js
│   └── portfolio.js
├── posts
│   ├── this-is-my-first-blog-post
│   │   ├── index.md
│   │   └── joshua-rawson-harris-NSPPhHIJtkA-unsplash.jpg
│   └── this-is-my-second-blog-post
│       └── index.md
├── projects
│   ├── project-1
│   │   └── index.mdx
│   └── project-2
│       └── index.mdx
└── styles
    └── layout.scss
Now I have to make the files in src/posts/* be visible and accessible via a slug. The same goes for the files in src/projects/*, the have to be visible and accessible via a slug.
Create slugs for posts and portfolio
If I use GraphIQL I can see that both md and mdx files are accessible:
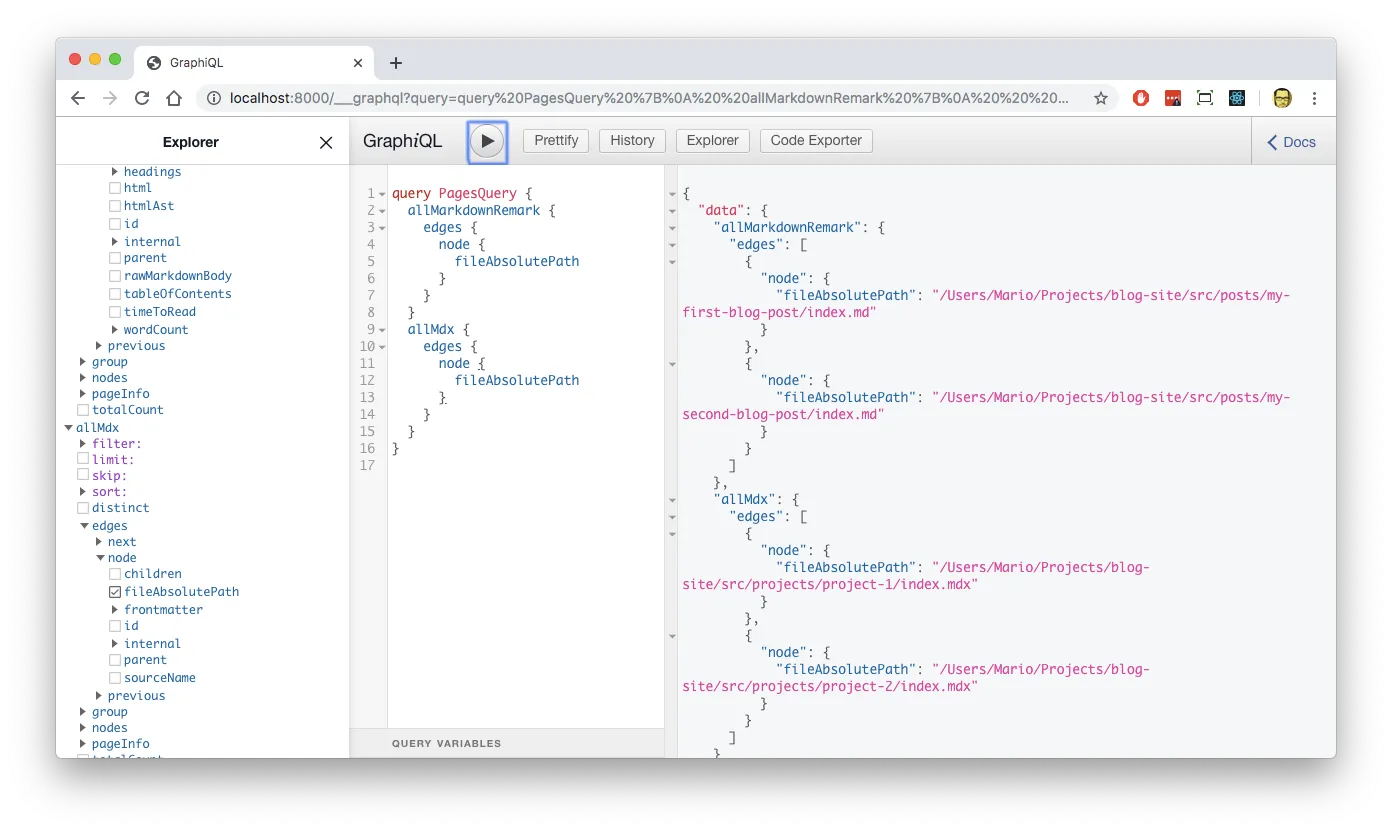
So I need to edit gastby-node.js and add the function onCreateNode asking Gatsby to add the slug field for those 2 type of nodes.
const { createFilePath } = require(`gatsby-source-filesystem`)
const path = require("path")

// Add fields to nodes.
exports.onCreateNode = ({ node, getNode, actions }) => {
  // Add the slug field to the MarkdownRemark nodes.
  if (node.internal.type === `MarkdownRemark`) {
    const relPath = createFilePath({ node, getNode })
    actions.createNodeField({
      node,
      name: `slug`,
      value: relPath.replace("/posts/", "/blog/"),
    })
  }

  // Add the slug field to the Mdx nodes.
  if (node.internal.type === `Mdx`) {
    const relPath = createFilePath({ node, getNode })
    actions.createNodeField({
      node,
      name: `slug`,
      value: relPath.replace("/projects/", "/portfolio/"),
    })
  }
}
Done… Now if I query the site again I’ll see those 2 nodes:
Create the list pages
As I said before. I want the list of blog posts to be in blog.js and the list of projects in the portfolio.js file.
So lest modify the blog.js page to list the blogs:
import React from "react"
import { Link, graphql } from "gatsby"

import Layout from "../components/layout"
import SEO from "../components/seo"

const BlogPage = ({ data }) => {
  return (
    <Layout>
      <SEO title="Some notes and articles" />
      <h1>Blog</h1>
      {data.posts.edges.map(({ node }) => (
        <div className="entry">
          <header>
            <Link to={node.fields.slug}> <!-- here is the slug -->
              <h2 className="entry-title" itemProp="headline">
                {node.frontmatter.title}
              </h2>
            </Link>
            <time itemprop="datePublished" datetime={node.frontmatter.date}>
              {node.frontmatter.date}
            </time>
          </header>
        </div>
      ))}
    </Layout>
  )
}

export const query = graphql`
  {
    posts: allMarkdownRemark(
      sort: { fields: frontmatter___date, order: DESC }
      filter: { fileAbsolutePath: { regex: "/src/posts/.+md$/" } }
    ) {
      edges {
        node {
          fields {
            slug
          }
          frontmatter {
            title
            tags
            date(formatString: "YYYY-MM-DD")
          }
        }
      }
    }
  }
`

export default BlogPage
Note: Is really important that each
mdblog file, has a frontmatter with thedatefield. Other wise the post’s ordering will be thrown off.
And now for the portfolio.js page:
import React from "react"
import { Link, graphql } from "gatsby"

import Layout from "../components/layout"
import SEO from "../components/seo"

const PortfolioPage = ({ data }) => {
  return (
    <Layout>
      <SEO title="Portfolio" />
      <h1>This are some of the projects I've worked on</h1>
      {data.allMdx.edges.map(({ node }) => (
        <div className="project">
          <div className="image">Image</div>
          <div className="content">
            <h2>{node.frontmatter.title}</h2>
            <div className="desc">{node.frontmatter.desc}</div>
            <div className="tags">{node.frontmatter.tags}</div>
            <div className="read-more">
              <Link to={node.fields.slug}>Read More</Link>
            </div>
          </div>
        </div>
      ))}
    </Layout>
  )
}

export const query = graphql`
  {
    allMdx {
      edges {
        node {
          id
          fileAbsolutePath
          frontmatter {
            title
            image
            desc
          }
          fields {
            slug
          }
        }
      }
    }
  }
`

export default PortfolioPage
Note: Is really important that each
mdxportfolio file, has a frontmatter with thedate,image,tagsanddescfield. Other wise the project’s ordering will be thrown off and Gatsby wont generate files.
Create the pages
On the last step I created the slugs, and a couple of pages to list them. The only thing left to do, is to create the pages itself and have them respond the the slugs I created.
For that I have to edit the gastby-node.js file again, adding the function createPage for the actual page creation:
// ....

// Create pages programatically.
exports.createPages = async ({ graphql, actions }) => {
  // Query Remark (md) and Mdx files
  const result = await graphql(`
    query PagesQuery {
      posts: allMarkdownRemark {
        edges {
          node {
            fields {
              slug
            }
          }
        }
      }
      projects: allMdx {
        edges {
          node {
            id
            fileAbsolutePath
            fields {
              slug
            }
          }
        }
      }
    }
  `)

  // Crate pages from markdown.
  result.data.posts.edges.forEach(({ node }) => {
    actions.createPage({
      path: node.fields.slug,
      component: path.resolve("./src/components/posts-template.js"),
      context: {
        slug: node.fields.slug,
      },
    })
  })

  // Create pages from mdx.
  result.data.projects.edges.forEach(({ node }) => {
    actions.createPage({
      path: node.fields.slug,
      component: node.fileAbsolutePath,
      context: {
        slug: node.fields.slug,
        id: node.id,
      },
    })
  })
}
3 Things to notice here:
- When creating a page programmatically you have to specify a
componentwhich is a template for the type of content. - For the projects, the
componentits themdxfile itself. - For blogs, I have to create a template.. Which is exactly what I did.
Here is the template (src/components/blog-template.js) for the blog posts:
import React from "react"
import { graphql } from "gatsby"
import Layout from "./layout"

const PostsTemplate = ({ data }) => {
  return (
    <Layout>
      <h1>{data.post.frontmatter.title}</h1>
      <article dangerouslySetInnerHTML={{ __html: data.post.html }} />
    </Layout>
  )
}

export const query = graphql`
  query($slug: String!) {
    post: markdownRemark(fields: { slug: { eq: $slug } }) {
      html
      frontmatter {
        title
      }
    }
  }
`

export default PostsTemplate
Now, when I visit a url like localhost:8000/portfolio/project-1 or localhost:8000/blog/my-first-blog-post/ I actually get a page with its content.
!!! WERE DONE!!!! (with the Gatsby development)… Now its time to add content and styling
Content and styling
The idea is to re-create this design, but in Gatsby:
Here are the steps to follow:
- Create the about page (
about.js) - Complete the
blog.jsandportfolio.jscontent so they can be styled - Add SASS styling to match the colors and placement of content in
layout.scss - Publish
Since this steps are not Gatsby related. I’ll finish this post here.
Thanks for going this far!