Adding linting, formatting, static code analysis to a Laravel project created with Sail
Table Of Contents
Laravel offers multiple ways to setup a new project. You have Herd, you have composer create-project laravel/laravel ..., you have lavarel new ..., and you have Laravel Sail which is a wrapper over the docker-compose and docker commands.
Personally, I prefer Sail for my projects since I already use Docker extensively and is very easy to distribute your setup with other developers.
But one thing that is common to all of this options is that they don’t make too many decisions on which tools you should use for developing, linting, formatting, code analysis, etc. And that’s actually great!
Here I’m going to describe how I setup my Laravel projects so they have linting, formatting, follow a commit message standard, and makes sure that almost no mistakes are submitted to the repo.
The sail Command
One thing to keep in mind when using Laravel Sail is that you no longer need to prefix with php any artisan command. And that you can execute the composer, pint, pest and phpunit commands, that reside inside your containers, directly if you prefix them with sail:
# Create a model with sail artisan
./vendor/bin/sail artisan make:model Task
And if you add the sail alias, like the documentation recommends, in your ~/.bashrc, ~/.zshrc or ~/.fishrc:
# ~/.zsrc or ~/.bashrc
alias sail=[ -f sail ] && sh sail || sh vendor/bin/sail
… You can execute the previous artisan command like this:
sail artisan make:model Task
No need to specify the sails installation path.
A Note About artisan api:install and Missing package.json File
If you have enabled Laravel API Backend installation with
sail artisan api:install
The you might have noticed that the package.json file gets removed.
A quick fix would be to re-create the package.json file and add the correct values for type and private:
npm init -y
npm pkg set type=module
npm pkg set private=true --json
Startup the Project
Before we start, we need an actual Laravel project. So make sure that you have Docker up and running, also that you have the curl command available (in MacOS you have to install it manually). And execute the following:
cd /path/to/projects/dir/
curl -s "https://laravel.build/learn-laravel-lint-format-analyze?with=mariadb" | bash
cd learn-laravel-lint-format-analyze
nano .env # Update the APP_PORT variable. I used 9090
sail up -d
By default laravel.build will use MySQL as a Database. I prefer to use MariaDB since the Docker Image is much smaller
And to prevent collisions with other projects, I add the following line to the .env file so I can access the local dev environment in http://localhost:9090
# .env file
# ...
APP_PORT=9090
Note: To destroy the docker environment just execute sail down -v. The -v is to remove volumes (data)
Install PhpStan
The first tool to add to the repo is going to be PhpStan. Which is a tool that analyses you code statically, (without executing it), allowing you to catch bugs very early and even inside your IDE
If you where to install PhpStan directly in your project, you would need to create a configuration file with hundreds of rules and exceptions. Fortunately the project Larastan has already done that for us. That’s why we only need to install that package, create a phpstan.neon configuration file, and reference the rules of Larastan in the configuration file:
First we install Larastan with composer…
sail composer require larastan/larastan:^2.0 --dev
And then we create the phpstan.neon file referencing the Laravel Rules:
# phpstan.neon

includes:
  - ./vendor/larastan/larastan/extension.neon

parameters:
  level: 5
  paths:
    - app/
Now, to execute static analysis on your project you would need to execute something like sail ./vendors/bin/phpstan analyze --memory-limit=2G -v which is very cumbersome. So, to makes things simpler let’s just create a new script in composer.json with all the required parammeters:
// composer.json
{
    // ...
    "scripts" : [
        // ...
        "phpstan": [
            "phpstan analyze --memory-limit=2G -v"
        ]
    ]
}
To test that PhpStan is working correctly, create an error in the app/Models/User.php and execute the sail composer phpstan command:

Configure Php Code linting
When it comes to linting, there are 2 tools that I use:
Of this 2 I almost always use PHPCS since is more strict (and that’s configurable), which is better for teams of multiple developers
Linting and Formatting with PHPCS
Configuring phpcs requires that you
- Install the
php_codesnifferpackage - Create a
phpcs.xmlfile with the rules you want to enforce in your project - Modify the
composer.jsonfile so the correct command gets executed when you want to lint or format.
So let’s install PHPCS:
sail composer require "squizlabs/php_codesniffer=*" --dev
Create a configuration file with the rules we want to use in our project.
<!-- .phpcs.xml -->

<?xml version="1.0"?>
<ruleset name="Laravel Linting and Formatting">
    <!-- Configure here the paths you want to check -->
    <file>.</file>

    <config name="testVersion" value="8.3-"/>

    <!-- Coding standards and rules to check -->
    <rule ref="PEAR" />
    <rule ref="PSR1" />
    <rule ref="PSR2" />
    <rule ref="PSR12" />

    <!-- Exceptions -->

    <!-- Tailwind uses very long lines so better to have this here -->
    <rule ref="Generic.Files.LineLength">
        <properties>
            <property name="lineLimit" value="120"/>
            <property name="absoluteLineLimit" value="0"/>
        </properties>
    </rule>

    <!-- Commenting EACH file is not that useful (unless you are worried about copyrights) -->
    <rule ref="PEAR">
        <exclude name="PEAR.Commenting.FileComment.Missing" />
    </rule>

    <!-- Allow CamelCase in tests. If you are using Pest you might want to remove this rule exception -->
    <rule ref="PSR1.Methods.CamelCapsMethodName.NotCamelCaps">
        <exclude-pattern>/tests/</exclude-pattern>
    </rule>

    <!-- Since `public/index.php` is the entry point we can forgive this error just in that file -->
    <rule ref="PSR1.Files.SideEffects.FoundWithSymbols">
        <exclude-pattern>/public/index.php</exclude-pattern>
    </rule>

    <!-- A blade template might NOT have `<?php ?>` code blocks -->
    <rule ref="Internal.NoCodeFound">
        <exclude-pattern>./resources/views/</exclude-pattern>
    </rule>

    <!-- End Exceptions -->

    <!-- Show sniff codes in all reports -->
    <arg value="sp"/>
    <!-- Show sniff and progress -->
    <arg name="parallel" value="8"/>
    <!-- Enables parallel processing when available for faster results. -->
    <arg name="colors"/>
    <arg name="extensions" value="php"/>

    <!-- Configure here the paths you want to IGNORE -->
    <exclude-pattern>/node_modules/*</exclude-pattern>
    <exclude-pattern>/vendor/*</exclude-pattern>
    <exclude-pattern>/bootstrap/cache/*</exclude-pattern>
</ruleset>
And finally, add a script in composer.json for easier execution:
// composer.json
{
  // ...
  "scripts": {
    // ...
    "phpcbf": ["phpcbf"],
    "phpcs": ["phpcs"],
    "lint": ["phpcbf"],
    "format": ["phpcs"]
  }
}
To execute a quick test, just execute the script:
sail composer phpcs # To lint all files

# or

sail composer phpcbf # To format all files
Linting with Pint
If you don’t need the flexibility of PHPCS, and don’t want to install additional software, you can just configure pint. After all, it comes installed default on every new project.
In our case we just need to update the composer.json file with the lint script that will execute the pint command
{
  // ...
  "scripts": {
    // ...
    "lint": ["pint --test"],
    "format": ["pint"]
  }
}
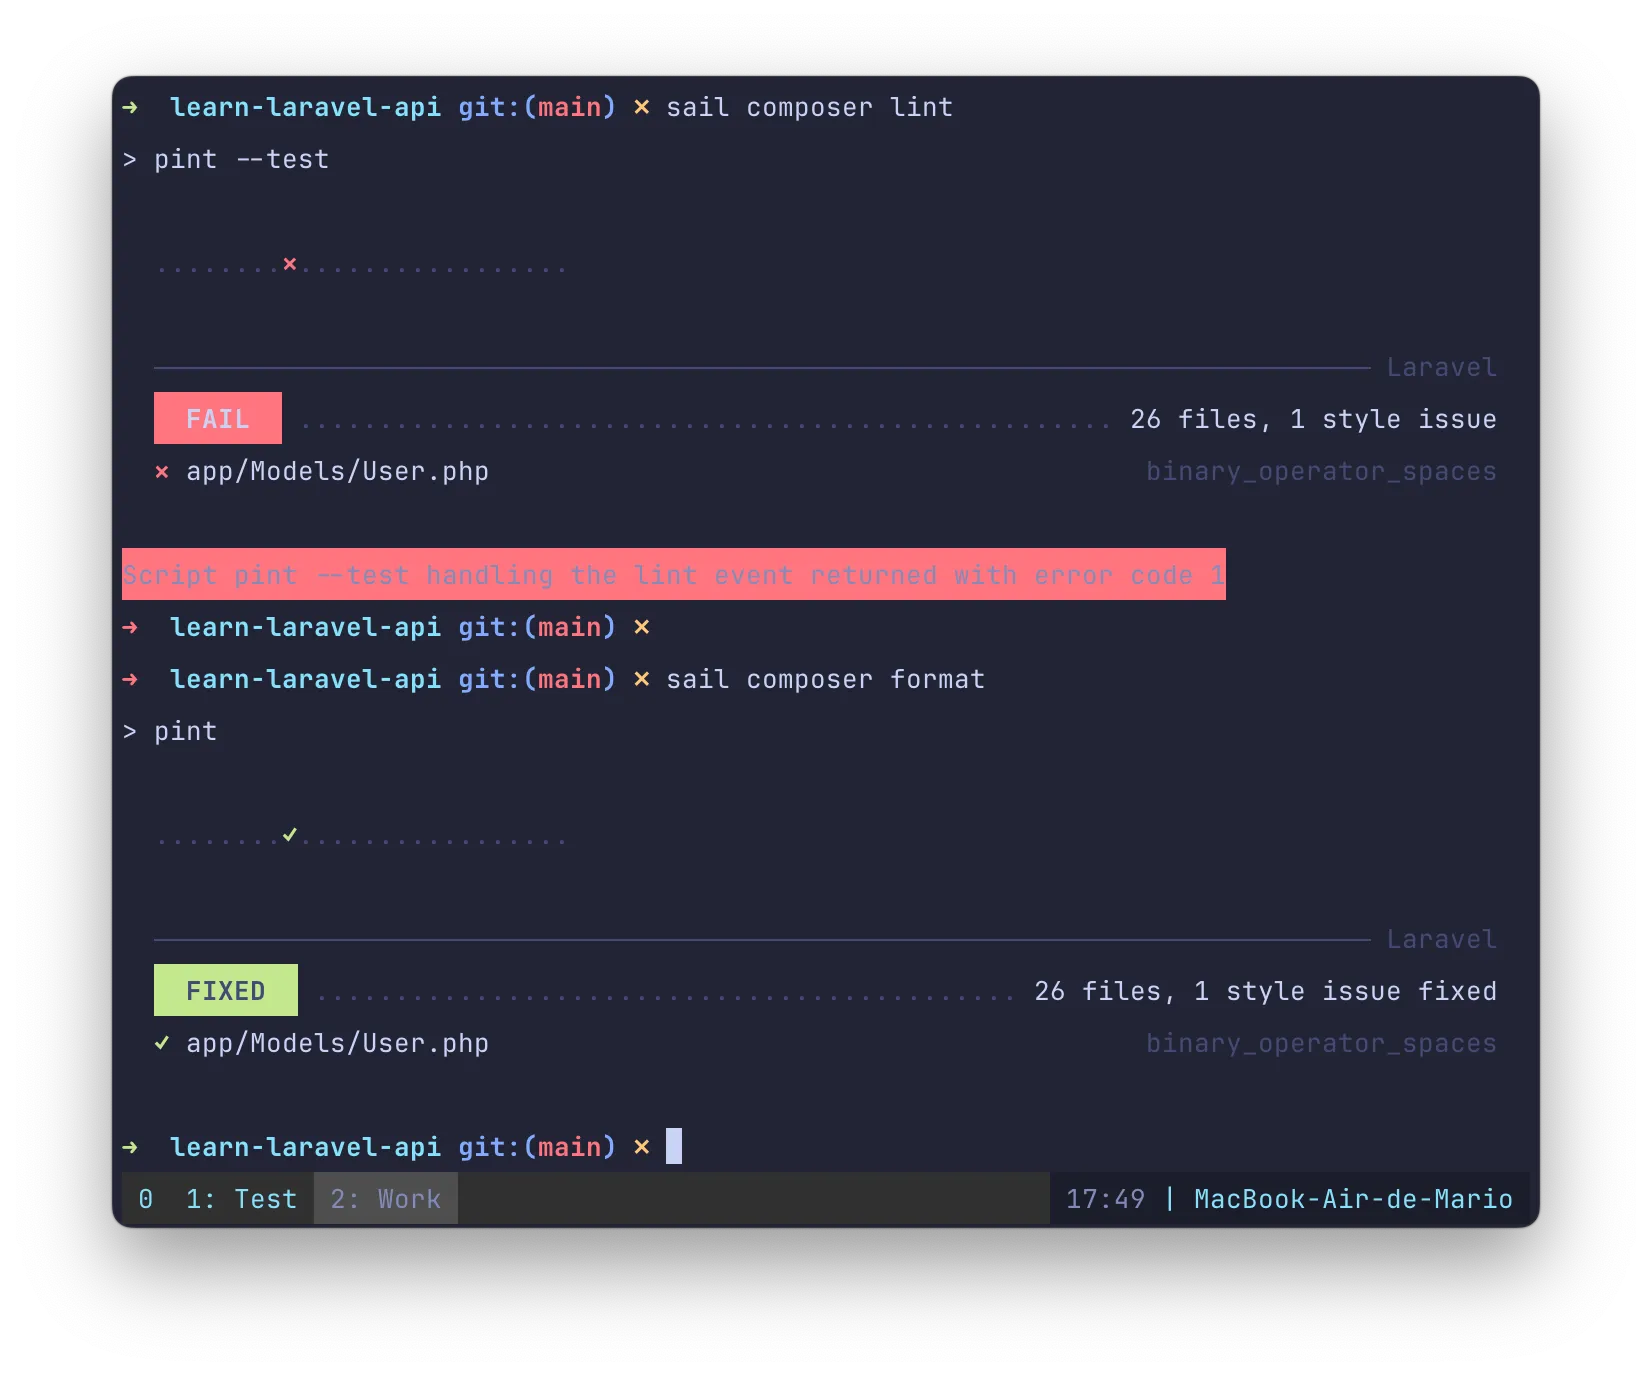
Testing linting and formatting
To test it out, un-indent a line (or any other linting error) in the app/Models/User.php file and then execute sail composer lint to find it. To fix it, just execute sail composer format
Composer Normalize
I like to have ALL my files linted and formatted. So I also use a tool that takes care of my composer.json file. It’s called composer-normalize, and can be installed using composer:
sail composer require "ergebnis/composer-normalize=*" --dev
In a similar fashion to phpstan, the tools requires a couple of flags to function correctly, that’s why the best way to execute it trough composer. But instead of adding 2 new scripts, let’s modify the lint and format script so the linting of php files and composer.json gets executed at the same time:
// composer.json
{
  // ...
  "scripts": {
    // ...
    "composer-normalize": [
      "@composer normalize --indent-size=4 --indent-style=space --quiet"
    ],
    "format": ["phpcbf", "@composer-normalize"],
    "lint": ["phpcs", "@composer-normalize --dry-run"]
  }
}
This means that when you execute sail composer lint you would be linting your .php files AND the composer.json file. The same happens with the format command:
sail composer lint # Lint both *.php and composer.json file
sail composer format # Format both *.php and composer.json file
Configure cspell
I love good spelling in my projects, that’s why I install cSpell in all of my projects.
the cSpell package is an npm package. And since we will be executing it locally, before we submit files to the repo, we can install it locally using npm:
npm install -D cspell
echo "# Laravel linting and formatting scaffold application" > README.md
Not that I re-wrote the README.md file! The reason is that there are a lot of names there that drives cSpell nuts. So we might as well remove any spelling issues from that file.
Additionally to installing the package, you need to create the file .cspell.json with the words you want to ignore as the paths you don’t want to check for spelling
// .csspell.json
{
  "version": "0.2",
  "language": "en",
  "words": [
    "EHLO",
    "autoload",
    "autoloader",
    "beanstalkd",
    "endauth",
    "envoyer",
    "failer",
    "figtree",
    "laracasts",
    "laravel",
    "mailgun",
    "mario",
    "nesbot",
    "nuno",
    "nunomaduro",
    "papertrail",
    "phpactor",
    "phpredis",
    "phpunit",
    "roundrobin",
    "ruleset",
    "sasl",
    "sslmode",
    "symfony",
    "termwind",
    "uncompromised",
    "vite",
    "yepes"
  ],
  "ignorePaths": [
    ".cspell.json",
    ".git/",
    ".gitattributes",
    ".gitignore",
    ".gitignore",
    ".phpactor.json",
    ".vscode/**",
    "artisan",
    "composer.json",
    "database/*.sqlite",
    "docker-compose.yml",
    "node_modules/**",
    "phpstan.neon",
    "phpunit.xml",
    "storage/**",
    "vendor/**"
  ]
}
And you can test your configuration with:
npx cspell --relative --dot --no-progress --show-suggestions --show-context .
And, as we did with phpstan let’s create a script, but this time in package.json, with all the required parameters:
npm pkg set scripts.cspell-with-flags="cspell --relative --dot --no-progress --show-suggestions --show-context"
And to test that it works you can execute the following command to spell check your project files:
npm run cspell-with-flags .
Install and Configure Markdownlint
Every piece of software that you write, needs some sort of documentation. You should include at least instructions to your fellow teammates on how to setup a development environment and the requirements of the software you are writing.
Most of the time you will include this documentation in your project, and most of the time you’ll write this documentation in Markdown. And to make sure that your documentation follows the correct format we are going to use markdownlint.
To install it you just use npm:
npm install -D markdownlint-cli
After installing it, you need to create the ./.markdownlintrc.json file with at least a default directive, and optionally a list of rules you want to override:
// .markdownlintrc.json
{
  "default": true,
  "heading-style": {
    "style": "atx"
  },
  "line-length": false,
  "no-inline-html": {
    "allowed_elements": ["figure", "video"]
  }
}
To avoid markdownlint-cli to examine EVERY folder, we should create a .markdownlintignore file with the paths we don’t want it to examine:
vendor/**
node_modules/**
To test it out, just execute
npx markdownlint .
Lint the package.json file with npm-package-json-lint
If we want to be thorough, we need to make sure that our package.json follows some conventions, also, we need to make sure that our package.json has the private and type keys present always. So let’s use the npm-package-json-lint package to make sure that everything is correct.
npm install -D npm-package-json-lint npm-package-json-lint-config-default
And as with most other tools, you need to create a dotfile, in this case .npmpackagejsonlintrc.json, with a list of rules you want to enforce:
// .npmpackagejsonlintrc.json
{
  "extends": "npm-package-json-lint-config-default",
  "rules": {
    "require-private": "error",
    "require-type": "error",
    "prefer-property-order": ["error", []]
  }
}
To test all of your package.json files (if you have more than one) you just need to execute:
npx npm-package-json-lint .
Faster Execution of npm Script with npm-run-all
If you where to execute all of the linting and formatting commands before committing, you would need to type A LOT in your terminal.
One option would be then to create a script in package.json that executes everything. But better yet it would be that this script executed everything in paralell !!!
To execute all of the linting and formatting commands in paralell we are going to use the npm-run-all package:
npm install -D npm-run-all
And to use it we just need to create the following scripts in package.json
// package.json
{
  // ...
  "scripts": {
    "cspell-with-flags": "cspell --relative --dot --no-progress --show-suggestions --show-context --quiet",
    "lint:php": "vendor/bin/sail composer lint",
    "lint:md": "markdownlint .",
    "lint:cspell": "npm run cspell-with-flags -- .",
    "lint:package-json": "npmPkgJsonLint .",
    "lint": "run-p lint:*",
    "format:php": "vendor/bin/sail composer format",
    "format:md": "markdownlint --fix .",
    "format:package-json": "npmPkgJsonLint .",
    "format": "run-p format:*"
  }
  // ...
}
Note that all commands use the format prefix:something. That’s a requirement from npm-run-all.
And because we used the npm-run-all format. We can execute lint or format and have all the linting and formatting commands execute in paralell.
npm run lint # Will execute all the linting commands

npm run format # Will run all format commands
Install and Configure lint-staged
Up until now, we have to execute the linting and formatting scripts manually, and they will lint and format ALL THE PROJECT FILES. And if your project is large, this could take a lot of time.
Fortunately, the lint-staged npm command can execute the linting and formatting commands we specify only to the files that are staged by Git.
Installing it is as easy as always:
npm install -D lint-staged
And to configure it, we need to instruct it which linting or formating command has to be executed depending on the file extension. This is done trough the .lintstagedrc.json file:
// .lintstagedrc.json
{
  "*.php": [
    "./vendor/bin/sail composer phpstan",
    "./vendor/bin/sail composer phpcbf",
    "npm run cspell-with-flags --"
  ],
  "*.md": ["npm run cspell-with-flags --", "npx markdownlint --fix"],
  "package.json": ["npmPkgJsonLint ."],
  "composer.json": ["./vendor/bin/sail composer composer-normalize"]
}
To test it out, let’s create an error, add it to the list of files to commit, execute lint-staged and check that commitlint actually gets executed.
# Create an error on app/Model/User.php
git add app/Model/User.php
npx lint-staged --relative
# check that it catches the error
Note the --relative flag. Is needed since we are using a command inside docker
To reset the file to the previous state just do:
git reset app/Models/User.php
git checkout HEAD -- app/Models/User.php
Install and Configure commitlint
With commitlint we can verify that the git commit messages follows the “Commit Conventions”
Since commitlint changes a lot over time, it might be a good idea to follow the official documentation installation steps instead of the following. But anyway, here they are:
npm install -D @commitlint/{cli,config-conventional}
echo "export default { extends: ['@commitlint/config-conventional'] };" > .commitlintrc.js
To test out that commitlint enforces the config-conventional convention, lest do a small test:
echo "BAD commit message" | npx commitlint
echo "chore: good commit message" | npx commitlint
The first commit should output a warning, the second should output nothing
Bring it all together with husky
To wrap everything up, make lint-staged and commitlint be executed automatically before any file gets committed to git. For that we need to install and configure husky.
npm install -D husky
npx husky init
echo "npx --no -- commitlint --edit \$1" > .husky/commit-msg
echo "npx lint-staged --relative" > .husky/pre-commit
As you can see we created 2 new files: .husky/commit-msg and .husky/pre-commit. This are bash scripts that will be executed automatically every time we make a new commit. The first one will execute commitlint and make sure that the commit message follows the selected standard. The second one will execute lint-staged which in place will execute the lint and format commands only on staged files.
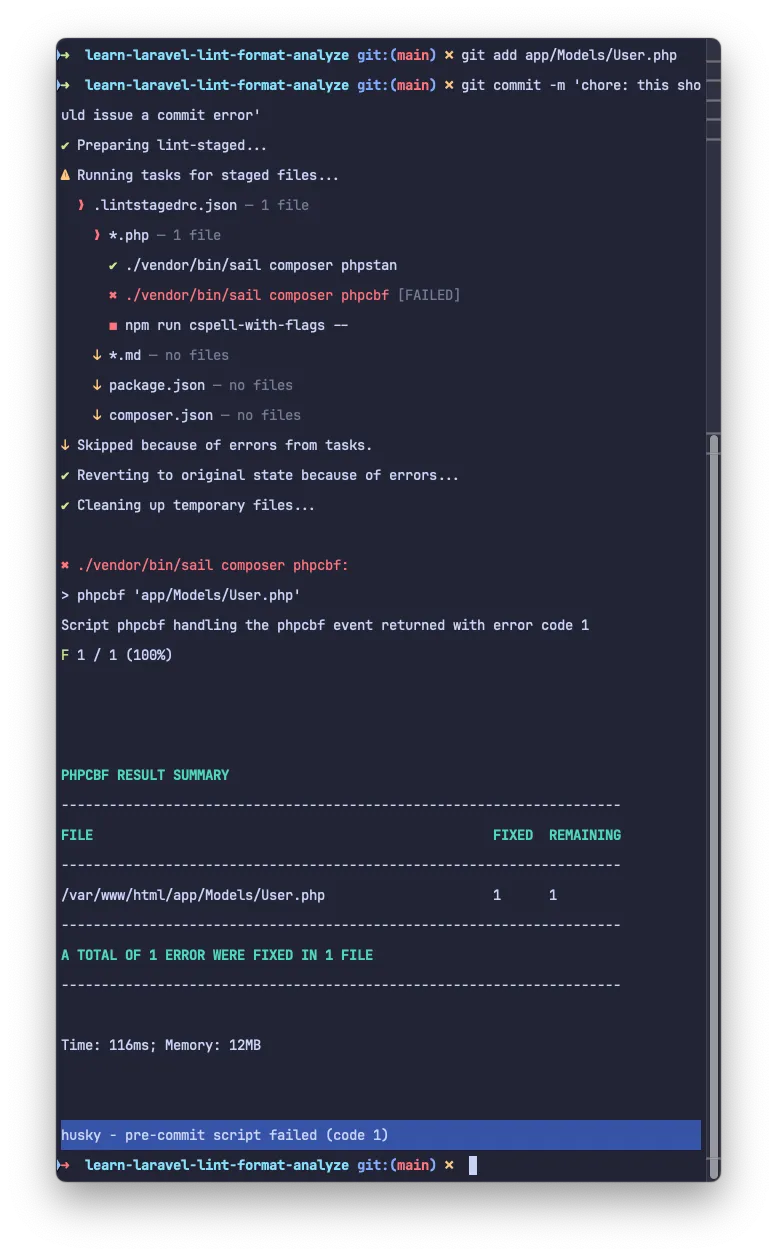
To test it out, modify the app/Models/User.php adding a class variable with a bad name:
// This should trigger a cspell error
protected $lksdjlfjldjf = '';
This should be enough to fire a linting error that can not be auto fixed… Then:
git add app/Models/User.php
git commit -m "feat: configure pre-commit linting"
This should issue an error
Future Steps and Resources
One thing that we didn’t do for this project is execute any new tests after they are added. Also, we didn’t performed any linting and formatting for JavaScript or (S)CSS files.
If you want to take a look at a simple project with all the files, you can visit this GitHub repo.