Using Lando to develop a Bedrock based site and publish it on Fortrabbit
Table Of Contents
Bedrock is regarded as the gold standard of Modern WordPress Development. The reason being that it uses a file structure that favors separation of concerns and leverages composer for installing plugins and themes.
If you are want to know more about Bedrock, I suggest you take a look at it’s documentation
In this article I’m just going to show how to setup Bedrock in a Lando development environment, and then push that environment into production using Fortrabbit.
To follow along you just need to have a working installation of Lando (and Docker since Lando works on top of Docker) and know a little about SSH.
Development environment setup
Create a Lando/Bedrock Dev Environment
Let’s start by creating a local development environment. Which means to create a work directory, and there create a .lando.dist.yml file
mkdir learn-bedrock-lando
cd $_
# .lando.dist.yml

# Create a .lando.yml file if you need to override any value: https://docs.lando.dev/services/lando-3.html#overrides

name: learn-lando-bedrock
recipe: wordpress

config:
  # https://docs.lando.dev/plugins/wordpress/config.html
  php: "8.2"
  composer_version: "2"
  via: "nginx"
  webroot: web
  database: "mariadb:11.3"
  xdebug: true

services:
  appserver:
    overrides:
      environment:
        COMPOSER_CACHE_DIR: "/app/.cache/composer" # Saves a lot of time you need to rebuild
        WP_CLI_CACHE_DIR: "/app/.cache/wp-cli" # Saves a lot of space
    sslExpose: false # To avoid port scanning issues at startup https://docs.lando.dev/core/v3/proxy.html#using-https
  redis:
    type: redis
  phpmyadmin:
    type: phpmyadmin:5.0
    ssl: true
    sslExpose: false
    hosts:
      - database
  mail:
    type: mailhog
    hogfrom:
      - appserver
    ssl: true
    sslExpose: false # To avoid port scanning issues at startup https://docs.lando.dev/core/v3/proxy.html#using-https
  node:
    type: node:20
    run:
      - npm config set cache /app/.cache/npm
    command: tail -f /dev/null # Keep it running for faster command execution

proxy:
  phpmyadmin:
    - learn-lando-bedrock-pma.lndo.site

  mail:
    - learn-lando-bedrock-mail.lndo.site

tooling:
  wp:
    service: appserver
    dir: /app/web
  npm:
    service: node
  npx:
    service: node
Let’s go over that .lando.dist.yml file:
- I use the WordPress recipe as starting point
- I change the configuration to use Nginx instead of Apache, and MariaDB instead of MySQL
- I install 4 additional Lando plugins: Redis for object caching, PhpMyAdmin to view and manage the database content directly, Mailhogto catch outgoing mails and NodeJs.
- I create 3 Lando tooling commands to be able to execute
wp(wp-cli),npmandnpxfrom the terminal without the need to log in into the containers
You can start Lando now:
lando start
Initialize Bedrock
Now lets initialize Bedrock and move it’s contents in the project file:
lando composer create-project roots/bedrock -d . # Lando tooling command
mv bedrock/{*,.*} . # Don't forget the dot at the end
rmdir bedrock
cp .env.example .env
NOTE
We don’t require a local composer command since we are using the one present in the Lando environment
Configure Bedrock (change the .env file)
Bedrock derives all it’s configuration from the root .env file. That’s we created one by copying the .env.example on in the last step.
All the information we need in the .env file we can get in 2 places:
- The output of the
lando infocommand - Visiting the site https://roots.io/salts.html
$ lando info
[ { service: 'appserver_nginx',
    urls:
     [ 'http://learn-lando-bedrock.lndo.site/',
       'https://learn-lando-bedrock.lndo.site/' ],
    type: 'wordpress-nginx',
    webroot: 'web',
    config:
     { vhosts: '/Users/mario/.lando/config/wordpress/default.conf.tpl',
       php: '/Users/mario/.lando/config/wordpress/php.ini' },
    version: '1.25',
    api: 3,
    hostnames: [ 'appserver_nginx.learnlandobedrock.internal' ] },

...
]
Here is some help with some default values:
- The database values (username, password, database name) are
wordpress. That’s what Lando uses by default - The
DB_HOSTvariable isdatabase - The
WP_HOMEthis comes from executinglando info - Replace the auth salts with what’s in https://roots.io/salts.html
At the end, your .env file should look something like this:
DB_NAME='wordpress'
DB_USER='wordpress'
DB_PASSWORD='wordpress'

# Optional database variables
DB_HOST='database'

WP_ENV='development'
WP_HOME='https://learn-lando-bedrock.lndo.site' # This comes from the lando info command
WP_SITEURL="${WP_HOME}/wp"


# Generate your keys here: https://roots.io/salts.html
AUTH_KEY='Zh4s+3K(5{icvM>MJo*`+_Z^)`I{J$![,{wu{2xh(?+{.7vRX[o2[pw^oL[iRI}F'
SECURE_AUTH_KEY='x)@jPV?axl7jPsk1I8&7|l#BI7qRtW;H|6e[SEqYrB7.IorXj7PRPk_b:-OYRD/P'
# Additional "salt" variables ...
NOTE
We use single quotes here since the \ char can appear in the salts and in passwords.
Install WordPress with Lando
If we open https://learn-lando-bedrock.lndo.site we’ll get the second step screen of the WordPress installation wizard. That’s because Bedrock installs the files, configures the database, but does not create the first user.
We could follow the installation wizard, but why do it if we can use the CLI:
lando wp core install --title="Learn Lando Bedrock" --admin_user=admin --admin_password=password [email protected] --url=https://learn-lando-bedrock.lndo.site/wp
NOTE
This command can be added to the .lando.dist.yml file in the appserver section to have them automatically executed on first run.
   services:
     appserver:
+       run:
+           - |
+           mkdir -p /app/web/wp # In case I'm doing a rebuild
+           composer install
+           sleep 3
+           wp --path=/app/web/wp core download # For a rebuild
+           wp --path=/app/web/wp core install --title="Learn Lando Bedrock" --url="https://learn-lando-bedrock.lndo.site/wp" --admin_user=admin --admin_password=password [email protected]
+           wp --path=/app/web/wp option update siteurl https://learn-lando-bedrock.lndo.site
WARNING
Bedrock installs WordPress files in the wp/ path, that’s why we need to update the siteurl option
This is also the reason that your dashboard will be in /wp/wp-admin/
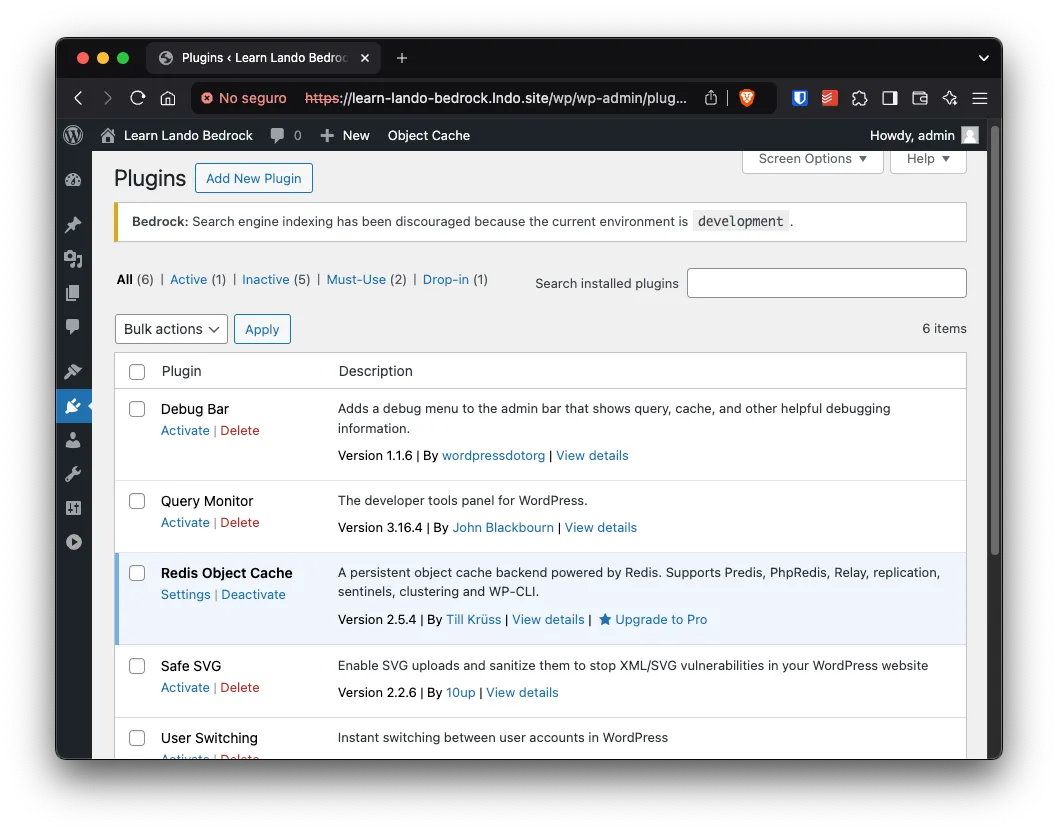
Install Development Plugins
This is absolutely optional, but it’s recommended you install some plugins that will help with the development and debuggin:
lando composer require wpackagist-plugin/debug-bar --dev
lando composer require wpackagist-plugin/query-monitor --dev
lando composer require wpackagist-plugin/wp-hooks-finder --dev
lando composer require wpackagist-plugin/user-switching --dev
Note that we used the --dev flag. This is so it does not get installed in production.
Redis Object Cache in development
It’s also suggested that you install a Redis Object Cache locally. This will speedup the WordPress dashboard significantly.
This is a multi-step process. First install the plugin:
lando composer require wpackagist-plugin/redis-cache --dev
Then we need to change config/environments/development.php file so WordPress knows where to find the object cache server:
// ./config/environments/development.php

// Enable Redis in dev for faster reloading.
Config::define('WP_REDIS_HOST', 'redis');
Next we need to activate the Redis Object Cache using lando wp
lando wp plugin activate redis-cache
lando wp redis enable
Finally, we need to update .gitignore adding web/app/object-cache.php in the list of ignored files (redis enable created this file)
NOTE
We are done with the Development Environment configuration
Setup Github
Create SSH Deployment Keys
The connection between your computer and Fortrabbit, as the connection between GitHub and Fortrabbit, is done trough SSH… But there is one caveat: Since we are connecting 3 systems, it’s unavoidable that you configure a secret key either in GitHub or in Fortrabbit.
This is why it’s highly recommended that you create a new set of keys only for this project.
To create a new set of keys you can use ssh-keygen:
ssh-keygen -t ed25519 -C "learn-lando-bedrock" -f ~/.ssh/id_ed25519_fortrabbit
-Cis a comment- You will get a new private key in
~/.ssh/id_ed25519_fortrabbit - Also there is a new public key in
~/.ssh/id_ed25519_fortrabbit.pub
When you execute this command you’ll get an output similar to this:
Generating public/private ed25519 key pair.
Enter passphrase (empty for no passphrase):
Enter same passphrase again:
Your identification has been saved in /Users/mario/.ssh/id_ed25519_consueloc_cloudways
Your public key has been saved in /Users/mario/.ssh/id_ed25519_consueloc_cloudways.pub
The key fingerprint is:
SHA256:eOZU6S/WACYJEqRepS5BcLHqsqliH3pGMgAI1l7Kxnk consueloc-github-cloudways-deplyment
The key's randomart image is:
+--[ED25519 256]--+
|*+Bo..           |
|=o +oo .   .     |
|o.=o+ o o o      |
|o.+B E + +       |
|oo... . S o      |
|.o..   =   +     |
|..+.    . o o    |
|o+.o.    . .     |
|B.+.             |
+----[SHA256]-----+
Repository Configuration
In GitHub we have to do 2 things:
- Create a new repository
- Configure the secrets for deployment
To copy the key:
pbcopy < ~/.ssh/id_ed25519_fortrabbit
To configure the secret:
In GitHub > Repo > Settings > Secrets and Variables > Actions > Secrets > New Repository Secret paste your the key with the name SSH_PRIVATE_KEY
NOTE
Remember the SSH_PRIVATE_KEY name since you’ll need it for the GitHub actions section further below.
Setup Deployment in Fortrabbit
We are going to use Fortrabbit for multiple reasons:
- Allows git-based deployments
- You configure your environment trough Environment Variables
- It detects Composer Based (there is a
composer.jsonfile) projects and execute any installations automatically - It has a free tier
So, go ahead and create an account in Fortrabbit and then create a “WordPress” App.
Fortrabbit Environment Vars
Then get into the just create App and:
In Settings > Env Vars change the database configuration, the URL and the environment:
DB_HOST=${MYSQL_HOST}
DB_NAME=${MYSQL_DATABASE}
DB_PASSWORD=${MYSQL_PASSWORD}
DB_USER=${MYSQL_USER}
WP_ENV=production
WP_HOME=https://learn-bedr-lando.frb.io
WP_SITEURL=${WP_HOME}/wp
# ... Salts configuration
2 things to note:
- Fortrabbit already provides a series of “salts”
- We can leverage the
MYSQL_bash variables
Root Path
Bedrock places WordPress inside the web/ directory.
So in Settings > RootPath add /web so the final value is htdocs/web
SSH Deployment Key
Note that in Fortrabbit we need to configure our public key.
So in your computer copy your newly created public key:
pbcopy < ~/.ssh/id_ed25519_fortrabbit.pub
And in Fortrabbit go to you Your Account > Code Access. > Add a new SSH key and paste the copied key.
First Code Push to Fortrabbit
As said before, Fortrabbit allow git deployments, this means that it proves a complete GitHub repo where you can push from your computer.
So go to Fortrabbit dashboard > YourApp > Access > Git and copy the Git URL.
And in your local local Git repo add a new remote:
git add remote fortrabbit [email protected]:learn-bedr-lando.git
NOTE
I called this remote fortrabbit. This is important for the next step.
Also, since we are using a custom key for deployment, add the private key to your SSH agent with ssh-add
ssh-add ~/.ssh/id_ed25519_fortrabbit
And then push the code:
git push fortrabbit main
❯ git push fortrabbit main
Enumerating objects: 23, done.
Counting objects: 100% (23/23), done.
Total 23 (delta 0), reused 0 (delta 0), pack-reused 0 (from 0)

–––––––––––––––––––––––  ∙ƒ  –––––––––––––––––––––––
Checksum:
  c520733248dfb0c4b3628faaa445d12b728102c3

Pre-script:
  not found
  0ms

Composer:
  - - -
   Installing dependencies from lock file (including require-dev)
   Verifying lock file contents can be installed on current platform.
   Package operations: 23 installs, 0 updates, 0 removals
     - Downloading roots/wordpress-core-installer (1.100.0)
     - Downloading composer/installers (v2.3.0)
     - Downloading symfony/polyfill-ctype (v1.30.0)
 ...
     - Installing wpackagist-plugin/wp-hooks-finder (1.3.1): Extracting archive
     - Installing wpackagist-theme/twentytwentyfour (1.2): Extracting archive
   Generating optimized autoload files
   15 packages you are using are looking for funding.
   Use the `composer fund` command to find out more!

  - - -
Uploading:
  227ms

Build & release done in 2s 885ms from branch main, now queued for final distribution.
–––––––––––––––––––––––  ∙ƒ  –––––––––––––––––––––––
To deploy.us1.frbit.com:learn-bedr-lando.git
 * [new branch]      main -> main
[!info] What we just did is call manual deployment
Install WordPress in Fortrabbit
As you already know from the Lando setup, Bedrock does not install WordPress. We need to do that manually. But since we already have in our SSH Agent the deployment key and we have access with SSH, we can do that using SSH:
First, go to Fortrabbit > Apps > YourApp > SSH Tab copy the SSH server
Then get the MySQL access credentials. Fortrabbit can give that to use trough the CLI secrets:
ssh [email protected] secrets
Now you can install WordPress using the remote wp command trough SSH:
ssh [email protected] "wp --path=web/wp core install --url=https://learn-bedr-lando.frb.io --title=LearnBedrockLando --admin_user=admin --admin_password=password [email protected]"
CI/CD With GitHub Actions
To tie all together, we need to create a new Github Action:
mkdir -p .github/workflows
# .github/workflows/deploy-to-fortrabbit.yml

name: Deploy to Fortrabbit

# Trigger this workflow on push (could also be in pull or merge) on a specific branch
on:
  push:
    branches: [main]

# A workflow is made of multiple jobs that can run sequentially or in parallel
jobs:
  # First (and in this case only) job
  build:
    runs-on: ubuntu-latest

    # Task to be executed with this runner
    steps:
      # Checkout the repo into $GITHUB_WORKSPACE
      - uses: actions/checkout@v3

      # Sync the repo with Fortrabit
      - name: Sync Repo
        uses: wei/git-sync@v3
        with:
          source_repo: "marioy47/learn-bedrock-lando" # GitHub project
          source_branch: "main"
          destination_repo: "[email protected]:learn-bedr-lando.git" # Get it from Fortrabbit panel for the App
          destination_branch: "main"
          destination_ssh_private_key: ${{ secrets.SSH_PRIVATE_KEY }}
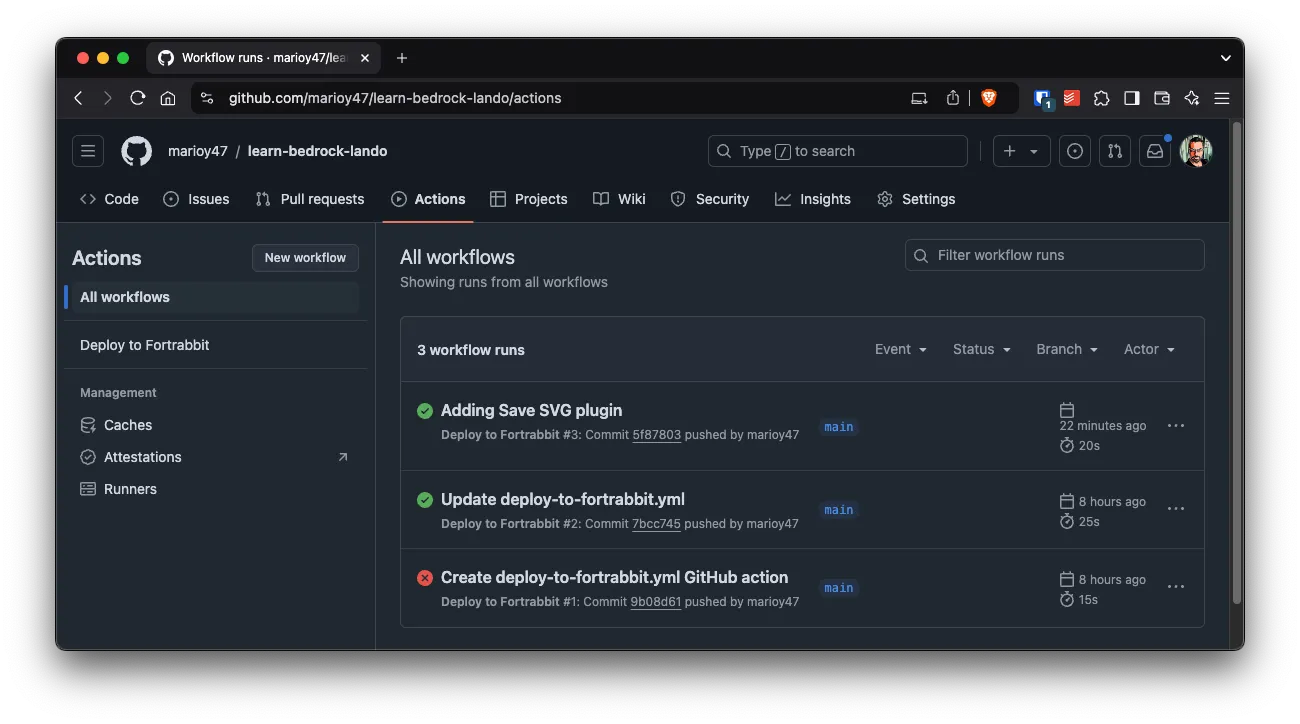
You can review your deployments in GitHub Repo > Actions
Workflow: Installing a plugin
Plugins and themes are installed trough composer
lando composer require wpackagist-plugin/safe-svg -q
git add composer.*
git commit -m "Adding Save SVG plugin"
git push origin main
Resources
Bedrock with Lando: https://www.youtube.com/watch?v=NTWTIx-VYEc
Bedrock with Lando in Forttrabit: https://www.youtube.com/watch?v=BUTMzGBC-H4&t=2889s