How to comment your JavaScript code with JSDoc
Table Of Contents
So I just been tasked with documenting a fairly large JavaScript project where almost none of it’s functions or clases have any comments and there is no information on what the function’s parameters do.
I took this opportunity to learn more about JSDoc and its ability to document elements so the IDE recognizes them in a better way. Also, wanted to create API documents and tutorials right from the source code, without the need of creating a separate project for it.
What is JSDoc?
In case you don’t know, JSDoc is the standard for JavaScript code documentation. With it you can an achieve 2 very practical things:
- You can “train” your IDE to understand what each function, variable or class is or needs
- You can create API docs in the form of an static HTML site for other developers
To understand what training your IDE means, take for instance the following code:
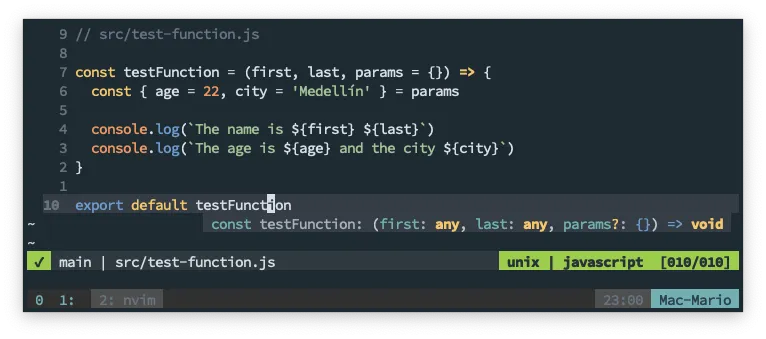
- Hovering over a JavaScript function with no JSDoc documentation
Notice how when I hover the mouse over the function testFunction, the IDE (in this case NeoVim) only tells you the obvious. That there are 3 parameters and that the last one is optional.
Compare that with the following:
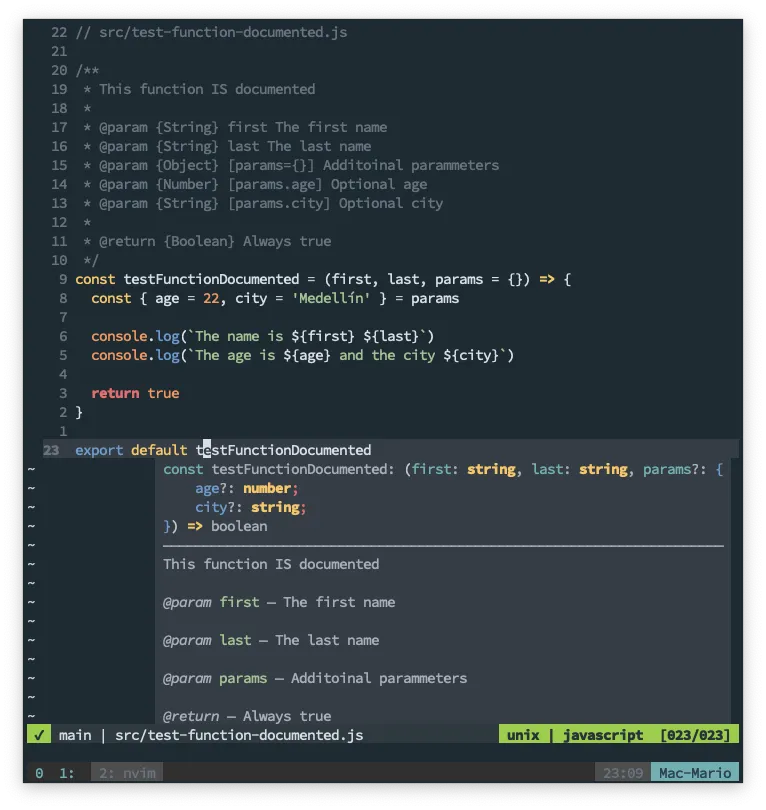
- Hovering over a JavaScript function that has JSDoc documentation
As you can see, when the function is documented I get the information on the function, the number and type of parameters and the return value of the function by just hovering it. It even tells you the components of the third parameter which is an object.
This way, every time I need to find out which parameters a function needs or what does a function do, I just have to hover over the function in Visual Studio Code or press Shift+k on NeoVim to get the function documentation and an explanation of the parameters.
How to document an element
Let’s start with the basics, how to document any element.
As with Java, to document a function, variable or class. You just have to create a comment before the element you want to document. The only thing you have to keep in mind is that the comment needs to start with /** and end with */, like so:
/**
 * This is a JSDoc comment
 * ...
 */
function myFunc() {
  // ...
}
That will tell the IDE (and the jsdoc command line) that this is an special comment.
Documenting a variable
Documenting a variable whether is a global variable or a local variable, just needs the @type directive.
/**
 * @type {String}
 */
var myStringVariable

/**
 * This is the description of the variable
 *
 * @type {String[]}
 */
let myArrayVariable = []
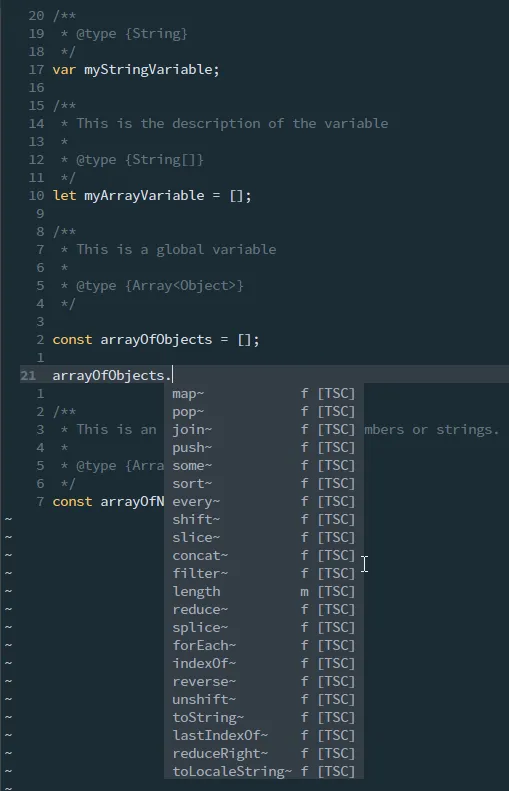
There are cases where you need to create arrays and specify that the arrays should only be composed of a certain type. You can use something like the following for those cases:
/**
 * This is a global variable
 *
 * @type {Array<object>}
 */
const arrayOfObjects = []
Now, take a look how the IDE will now understand this variables:
What about if the array should support strings and numbers:
/**
 * This is an array that can contain numbers or strings.
 *
 * @type {Array<number|string>}
 */
const arrayOfNumbersOrStrings = []
Whith the | symbol you can specify more than one possible type. This also applies for documenting function parameters that we’ll describe next.
Documenting parameters
Now let’s see how to document function parameters with the @param directive. Take the following documented function for instance:
/**
 * This is the test function.
 *
 * @param {String} name - This it the `name` parameter
 * @param {Number} [age=21] - This is the `age` parameter
 */
function myFunction(name, age = 21) {
  console.log(`Parameter 1 is ${name} and Parameter 2 is ${age}`)
  return true
}
Notice that:
- Each parameter requires a
@paramdirective in the spacial JSDoc comment - After
@paramcomes the type of the variable between brackets, then an optional dash and then the explanation or additional comments - Non obligatory parameters have their names enclosed between
[and] - The default values are added using
=valuenext to the variable name
Let’s keep working with functions since that’s where you’ll be spending most of your time documenting.
Object parameters
Take the following function:
function requieresAndObject(obj1) {
  obj1.city = "undefined" === typeof obj1.city ? "Medellín" : obj1.city
  console.log(
    `The name is ${obj1.name}. The age is ${obj1.age}. And the city ${obj1.city}`
  )
}
Notice that the function receives an object. That the object requires a name and an age values. And if the city value is not passed, the value Medellín is assigned to it.
How do you document that obj1 object parameter? Unfortunately not very obviously:
/**
 * Function with an object parameter
 *
 * @param {Object} obj1 This explains that the parameter is an object
 * @param {String} obj1.name This explains there should be a `name` value on the object
 * @param {Number} obj1.age This explains that there should be an `age` value
 * @param {Number} [obj1.city=Medellín] And the **optional** 3rd parameter can be also documented.
 */
function requieresAndObject(obj1) {
  obj1.city = "undefined" === typeof obj1.city ? "Medellín" : obj1.city
  console.log(
    `The name is ${obj1.name}. The age is ${obj1.age}. And the city ${obj1.city}`
  )
}
You need to specify that there is an Object parammeter, and then specify the required/optional fields of this object.
As I said, not so obvious, but extremely useful.
Documenting return values
Return values are pretty simple too:
/**
 * Just a function that returns a string
 *
 * @return {String} Always return `Hello World!`
 */
const returnAString = () => {
  return "Hola Mundo!"
}
But when you are returning a dictionary things are not so simple:
/**
 * This returns a dictionary with a `table` _key_ and a `database` _key_.
 *
 * @param {Array} params - An array of 2 elements
 * @return {{table: string, database: string}} - The database and table to query
 */
function parseTableAndDb = (params) =>  {
  return { table: params[0], database: params[1] };
}
It’s a good practice to explain what the return function means in term of it’s inputs values.
Documenting Exceptions
If you’ve read the book Clean Code by Robert C. Martin, you know that you should be throwing exceptions instead of returning false or null on error.
If you are, then you really need to specify which exceptions you throw in your code with @throws:
/**
 * A function that throws an error
 *
 * @param {Boolean} input If `true` trows a simple error
 *
 * @throws {Error} If `input` is `true`
 * @throws {TypeError} If the `input` is `false`
 *
 * @returns {void}
 */
const throwErrorOnInput = input => {
  if (input) {
    throw new Error(`This is an Error`)
  }
  throw new TypeError(`This is a TypeError`)
}
It’s pretty simple actually, the only gotcha is that you have to specify all the Exceptions your function throws.
Documenting types with @typedef
In the section Object parameters we saw how to document an Object parameter on a function.
But what about the case when we have multiple functions that receive an object that’s supposed to have the same fields.
Let’s say that we have 3 functions that receive the same type of parameter:
function registerPerson(person) {
  /* ... */
}
function updatePerson(person) {
  /* ... */
}
function deletePerson(person) {
  /* ... */
}
And lets say that this functions require a PersonObject with the following structure:
// The `person` object for the previous functions:
{
  name: "Fist Name", // string
  laset: "Last Name", // string
  isDeveloper: true, // boolean
  city: "Users City" // string
}
How do specify that object and how do the document the functions that use that object?
Well, you create a @typedef and then specify that this type is the input element.
This sounds kind of complicated, so lets just do an example:
/**
 * Tell JSDoc and the IDE that there is an `object` called `PersonObject`
 *
 * @typedef {Object} PersonObject
 * @property {String} name The persons name
 * @property {String} last The persons last name
 * @property {Boolean} [isDeveloper=true] Set to `true` is the person is a developer
 * @property {Number} city City code for the person
 */

// No need to create a PersonObject

/**
 * Function that uses the `PersonObject` defined with `@typedef`
 *
 * @param {PersonObject} person The person to register
 * @return {void}
 */
function registerPerson(person) {
  console.log(person.isDeveloper)
}
First, notice how to document an object it doesn’t has to exists. You just need to create a comment section with a @typedef at the top. Also, notice how we set the name of the object PersonObject right after declaring of the @typedef.
Second, notice how each element is documented by using the @property directive.
Third, notice how we can use the new type definition in the @param section of the function by specifying that person is of type PersonObject.
And fourth, take a look at this:
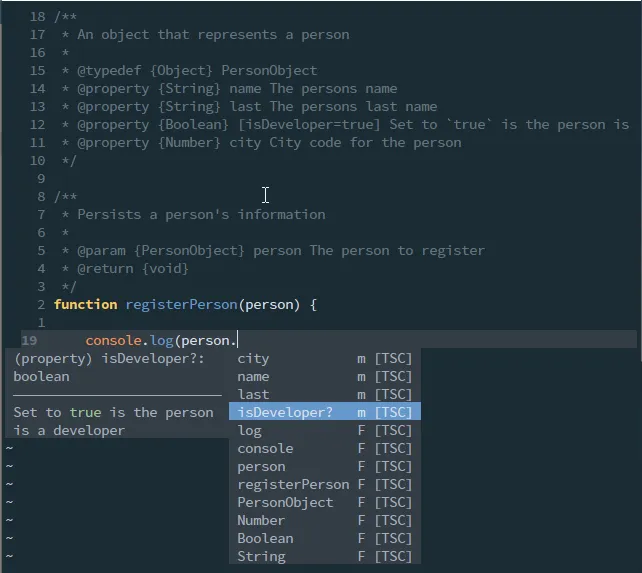
Because of the @typedef definition, the IDE understands that the person object has a city, name, last, and isDeveloper fields.
Is that cool or what!
Documenting class properties
I bet you’ve come across classes with instance variables that you just have no idea that they exists or don’t have any idea what they do.
Well, for that you can use the @property directive, very much like when we used in the @typedef section
/**
 * A class representing a car
 *
 * @property {String} brand - The cars brand
 * @property {Number} model - The cars model
 * @property {String[]} colors - The available colors
 */
class MyCarClass {
  /** @constructor */
  constructor() {
    this.brand = "Mustang"
    this.model = 1965
    this.colors = ["Red", "Black", "White"]
  }
}
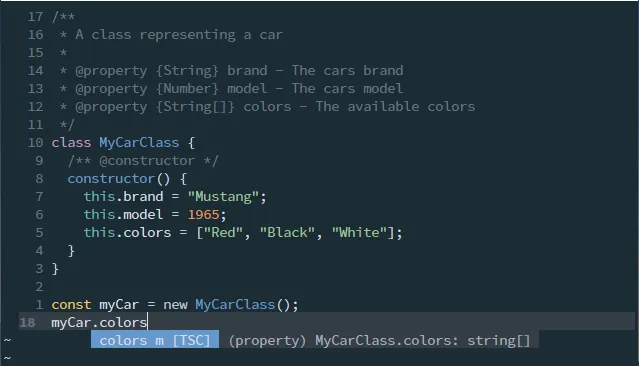
The cool thing is that the IDE will show which elements are part of the class:
VisualStudio Code and jsconfig.json
There is a very useful option in Visual Studio Code where you can force it to type check your code if it’s commented.
The function is called Implicit Project Config: Check JS and its inside the JavaScript group.
If you want to enable this option for your project without the need to check that option manually. You can create a jsconfig.json in the root of your project with something like this:
{
  "compilerOptions": {
    "checkJs": true,
    "jsx": "preserve"
  },
  "exclude": ["node_modules", "docs"]
}
This not only makes VS Code type check your code from your JSDoc comments, but it allows you to configure where and how to make those checks.
Generating API documentation
OK, we’ve seen how to document functions, variables, classes and objects so our IDE understands our code better. But we haven’t created API documentation to publish in a website. Well, that’s what the jsdoc command is for.
jsdoc -u path/to/tutorials -c jsdoc-config.json -d path/to/destination path/to/sourcode
You can install it globally with npm i -g jsdoc but since I don’t like cluttering my environment with commands. What I do is that I install it as a Dev dependency:
npm init -y # If you haven't done so already
npm install -D jsdoc
And then, in the package.json file, create the following script:
{
  "...",
  "scripts": {
    "jsdoc": "jsdoc -d docs-output/ -u tutorials/ src/"
  }
}
Here I’m creating the npm command jsdoc with the following parameters:
- Output the documentation files (the html) in
docs-output/ - Look for tutorials in
tutorials/ - Document the files that are in
src/
And to generate the documentation just have to execute this in the root of my project:
npm run jsdoc
That will output a bunch of files that can be viewed using a browser:
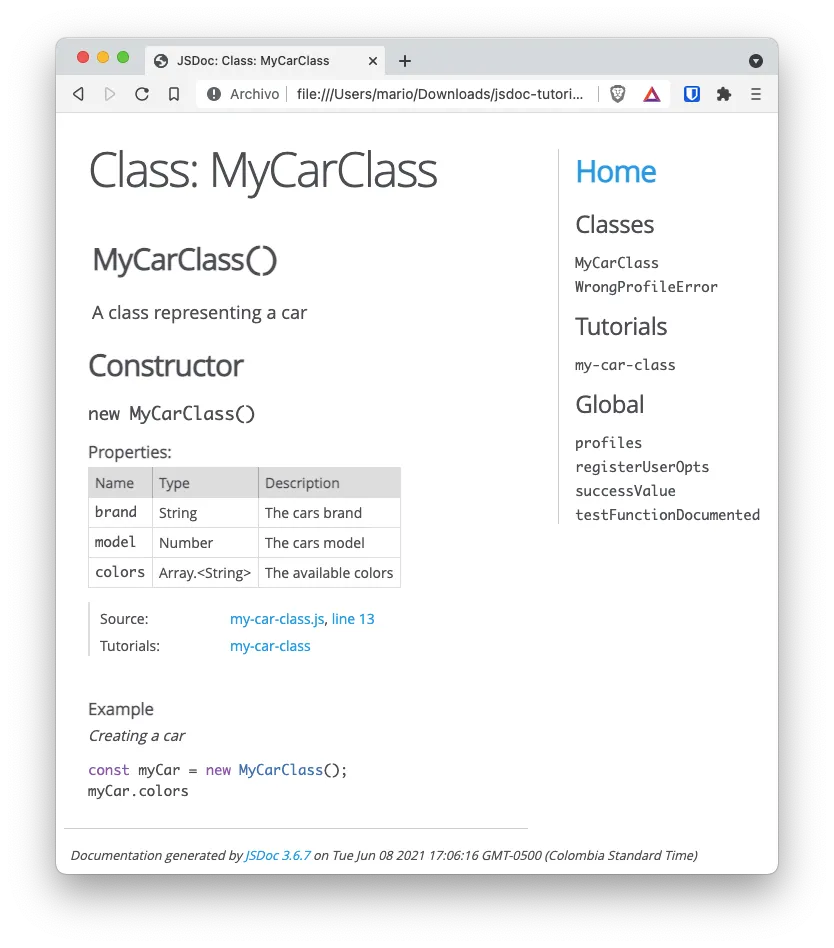
Now, don’t worry about the “tutorial” part. I’ll explain that very soon.
JSDoc configuration file
In the previous section, we saw how to use the jsdoc command with just 3 parammeters:
- Where the source code is
- Where to output the documentation
- Where the tutorial files where storeed
The fact is that there are a ton of configuration options to specify the supported file extensions, which files to exclude, information logging, etc. You can see the complete set of parammeters here
If you require very explicit or complex set of parameters to generate you documentation, you can create a config file in your projects folder and execute jsdoc like:
jsdoc -c path/to/jsdoc-config.json
You can change the name of the
jsonfile of course
Where jsdoc-config.json is something like
{
  "plugins": ["markdown"],
  "recurseDepth": 10,
  "source": {
    "includePattern": ".+\\.js(doc|x)?$",
    "excludePattern": "(^|\\/|\\\\)_"
  },
  "sourceType": "module",
  "tags": {
    "allowUnknownTags": true,
    "dictionaries": ["jsdoc", "closure"]
  },
  "templates": {
    "cleverLinks": false,
    "monospaceLinks": false
  }
}
For a list of configuration options, you can visit this url
Creating tutorials and examples
I left this part for last since it has to do with the generation of API docs. And that requires de execution of the jsdoc command.
But the fact is that you can create from small in-line examples of how your functions can be used. To full blown tutorials in markdown files.
Let’s use the MyCarClass to show how an example and a tutorial can be embedded:
/**
 * A class representing a car
 *
 * @property {String} brand - The cars brand
 * @property {Number} model - The cars model
 * @property {String[]} colors - The available colors
 * @example <caption>Creating a car</caption>
 * const myCar = new MyCarClass();
 * myCar.colors
 *
 * @tutorial my-car-class
 *
 */
class MyCarClass {
  /** @constructor */
  constructor() {
    this.brand = "Mustang"
    this.model = 1965
    this.colors = ["Red", "Black", "White"]
  }
}
Now, this is very important, the file my-car-class.md or my-car-class.html should be present in the folder you specified for storing the tutorials (we used tutorials/ from the previous example).
Remember, the folder for the tutorial is specified by the
-uparameter
Additional documentation
JSDoc has much, much more options, you can review them here
Also, I created a very, very small GitHub repo with some functions and classes documented here. You can use it ti get inspiration on how to configure your development environment if you want.