Create your own Astro starter with Tailwind, Custom Fonts, Pagefind and Astro SEO using Code Quality tools and TypeScript
Table Of Contents
I create developer websites with Astro once in a while, and one of the annoyances is that I find is that most of the starters either do too much or not enough for my needs. So I decided to create my own starter with the following items:
- Use Code Quality tools for catching code and spelling errors before the code gets to the repository
- Uses a supported CSS framework (Tailwind) for styling pages
- Supports multiple collections for archive content like blog posts
- Content is created in Markdown
- Supports syntax highlighting in code blocks
- Has local search
TL;DR
If you don’t want to read this whole article, and just want to use this starter, you can just execute astro@create like this:
npm create astro@latest my-new-website -- --template=marioy47/astro-developer-website-starter
cd my-new-website
echo "SITE_NAME=My Blog" >> .env
echo "SITE_URL=https://my-site-domain.com" >> .env
npm start
Just change my-new-website with the name of your site
Starter Setup
The first step is to install Astro without a template obviously
npm create astro@latest learn-astro-developer-website -- --install --git --typescript strict --no
You’ll get is if you want sample files or an empty site. I opted for empty.
This will render the following structure:
learn-astro-developer-website
├── README.md
├── astro.config.mjs
├── package-lock.json
├── package.json
├── public
│   └── favicon.svg
├── src
│   ├── env.d.ts
│   └── pages
│       └── index.astro
└── tsconfig.json

4 directories, 8 files
As you can see, the only “real” source file is src/pages/index.astro. The rest are configuration files (and an icon).
Code Quality Setup
The idea is that any code issue or spelling errors are catch locally before it even hits the repository in GitHub. In my case I’ll be installing and configuring
- Editor Config
- Prettier
- ESLint
- Markdownlint
- StyleLint
- Commit Lint
Editor Config
If your IDE supports EditorConfig configuration (most IDEs do), this is the one the official project uses:
# ./.editorconfig

# top-most EditorConfig file
root = true

[*]
charset = utf-8
end_of_line = lf
indent_size = 2
indent_style = tab
insert_final_newline = true
trim_trailing_whitespace = false

[{.*,*.md,*.json,*.toml,*.yml,*.json5}]
indent_style = space
Prettier Setup
Lest’s continue by adding Prettier to the project. But take into account that we need formatting for JavaScript/TypeScript and Astro code. That’s why we have to install 2 Prettier plugins:
prettier-plugin-astro. Which adds support for.astrofiles and does code formatting in the Front Matter sectionprettier-plugin-organize-imports. Which will sort imports in JavaScript/TypeScript files
npm i -D prettier prettier-plugin-astro prettier-plugin-organize-imports
After the installation, we need to create a .prettierrc.mjs file with the following configuration as prettier-plugin-astro recommends:
Note: The m in .mjs is to force the use of modules without the need of updating pacakge.json
// .prettierrc.mjs

/** @type {import("prettier").Config} */
export default {
  plugins: ["prettier-plugin-astro", "prettier-plugin-organize-imports"],
  overrides: [
    {
      files: "*.astro",
      options: {
        parser: "astro",
      },
      printWidth: 1200, // because tailwind uses VERY long lines
    },
  ],
};
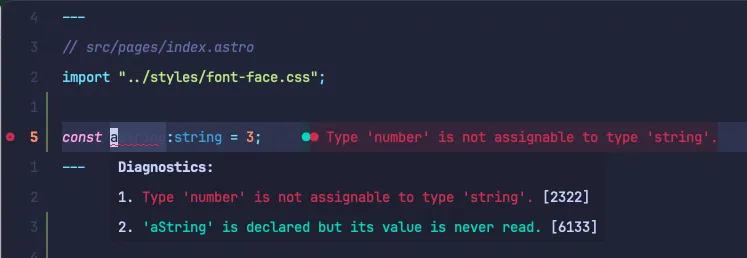
A little test we can do would be to use execute prettier agains a couple of test files:
npx prettier src/scripts/test-prettier.ts src/pages/test-prettier.astro
// src/scripts/test-prettier.ts (BEFORE)
function testFunction() {
  return "a string";
}
// src/scripts/test-prettier.ts (AFTER)
function testFunction() {
  return "a string";
}
---
// src/pagest/test-prettier.astro (BEFORE)

let a: string;
---

<div><p>A Test</p></div>
---
// src/pagest/test.astro (AFTER)
let a: string;
---

<div><p>A Test</p></div>
ESLint
For code linting I’ve chosen ESLint even though there are some faster tools now. The reason being that ESLint is the only linting tool mature enough to handle such an heterogeneous configuration.
To install it you can use the @eslint/config package like so:
npm init @eslint/config@latest
This will start a wizard, to which I answer in the following fashion:
✔ How would you like to use ESLint? · problems
✔ What type of modules does your project use? · esm
✔ Which framework does your project use? · none
✔ Does your project use TypeScript? · typescript
✔ Where does your code run? · browser
The config that you've selected requires the following dependencies:
    [email protected], globals, @eslint/js, typescript-eslint
    ✔ Would you like to install them now? · Yes
✔ Which package manager do you want to use? · npm
Since at the time of this writing, ESLint 9.5 was fairly new, I got this warning:
Note that some plugins currently do not support ESLint v9 yet.
You may need to use '--force' when installing, or add the following to your package.json:
"overrides": { "eslint": "^9.5.0" }
I recommend you add that overrides in your package.json to avoid any “conflict” errors in the next steps.
Also, to avoid any TypeScript issues in the future, I renamed the config file to make it a module:
mv eslint.config.js eslint.config.mjs
You can execute npx eslint src/scripts/test-eslint.ts to tes that it works on JavaScript errors:
/Users/mario/Projects/learn-astro-developer-website/src/scripts/test-eslint.ts
  2:10  error  'testFunction' is defined but never used  @typescript-eslint/no-unused-vars

✖ 1 problem (1 error, 0 warnings)
Now, npx eslint src/pages/index.astro will render errors because eslint doesn’t know how to handle *.astro files:
/Users/mario/Projects/learn-astro-developer-website/src/pages/index.astro
  0:0  warning  File ignored because no matching configuration was supplied

✖ 1 problem (0 errors, 1 warning)
Let’s fix that by installing and configuring eslint-plugin-astro:
npm i -D eslint-plugin-astro @typescript-eslint/parser
Note: The “parser” is to detect TypeScript errors in Astro files
To also catch and fix format errors, we need to install Prettier’s ESLint plugin and rules:
npm i -D eslint-plugin-prettier eslint-config-prettier
With all plugins installed, lets modify the default eslint.config.mjs file:
// eslint.config.mjs

import pluginJs from "@eslint/js";
import globals from "globals";
import tseslint from "typescript-eslint";

// Additional plugins
import eslintPluginAstro from "eslint-plugin-astro";
import eslintPluginPrettierRecommended from "eslint-plugin-prettier/recommended";

/** @type {import("typescript-eslint").Config} */
export default [
  { files: ["**/*.{js,mjs,cjs,ts,astro}"] }, // Add the astro extension
  { languageOptions: { globals: globals.browser } },
  pluginJs.configs.recommended,
  ...tseslint.configs.recommended,
  // Add the following plugin rules
  ...eslintPluginAstro.configs.recommended,
  eslintPluginPrettierRecommended,
  {
    settings: { react: { version: "detect" } }, // in case you install React latter
  },
  {
    rules: {
      "prettier/prettier": "warn", // Code style as "errors" and not "warnings" seem like an overkill to me.
    },
  },
];
Now your IDE should be able to catch errors.
Also, you can test it out by executing eslint directly on files:
npx eslint src/scripts/test-eslint.ts src/pages/test-prettier.astro
/Users/mario/Projects/learn-astro-developer-website/src/pages/test-prettier.astro
   4:4    warning  Replace `⏎a:string` with `·a:·string;`                                                                                   prettier/prettier
   5:1    error    'a' is defined but never used                                                                                            @typescript-eslint/no-unused-vars
   6:4    warning  Insert `⏎`                                                                                                               prettier/prettier
   7:305  warning  Delete `⏎⏎↹↹`                                                                                                            prettier/prettier
  12:1    warning  Replace `#id_and_underscores·{·text-transform:·uppercase;` with `↹#id_and_underscores·{⏎↹↹text-transform:·uppercase;⏎↹`  prettier/prettier
  13:1    warning  Insert `↹`                                                                                                               prettier/prettier
  14:1    warning  Insert `↹↹`                                                                                                              prettier/prettier
  15:1    warning  Insert `↹`                                                                                                               prettier/prettier

/Users/mario/Projects/learn-astro-developer-website/src/scripts/test-eslint.ts
  3:10  error    'testFunction' is defined but never used                     @typescript-eslint/no-unused-vars
  3:26  warning  Replace `·return·"a·string";·` with `⏎↹return·"a·string";⏎`  prettier/prettier

✖ 10 problems (2 errors, 8 warnings)
  0 errors and 8 warnings potentially fixable with the `--fix` option.
Since Astro is changing so much lately, you might need to read ESLint configuration document to add or remove rules from your config.
Markdownlint
A developer blog will most likely be written in Markdown. So lets install configure a linter for it:
npm i -D markdownlint-cli
To configure it, create the file .markdownlint.json configuration file with the errors you want to catch and/or ignore:
// .markdownlint.json
{
  "default": true,
  "heading-style": {
    "style": "atx"
  },
  "line-length": false,
  "no-inline-html": {
    "allowed_elements": ["iframe", "video", "source"]
  },
  "no-hard-tabs": {
    "code_blocks": false
  }
}
This configuration basically says:
- Apply the
defaultrules - Force ATX heading style. This marks as errors heading created with underlined
=signs for instance - Disable the
line-lengthrule since a blog can have very long prose lines - Allow “some” HTML tags that I normally use
- And do not reformat “tabs” in blocks of code since I write a lot about WordPress and WordPress uses tabs.
The easiest way to test this is executing
npx markdownlint README.md
If you get errors of the line-length being more 80, then you have an error in your configuration file.
Stylelint
When it comes to Stylelint, we need to make sure the configuration supports Astro. That’s why we need to add the styelint-config-astro package.
npm i -D stylelint stylelint-config-standard stylelint-prettier stylelint-config-astro
And in the configuration file we need to enable both the recommended and astro configurations:
// .stylellintrc.mjs

/** @type {import('stylelint').Config} */
export default {
  extends: [
    "stylelint-config-standard",
    "stylelint-config-astro",
    "stylelint-prettier/recommended",
  ],
};
Now you can have formatting for your *.astro, *.css and *.scss files:
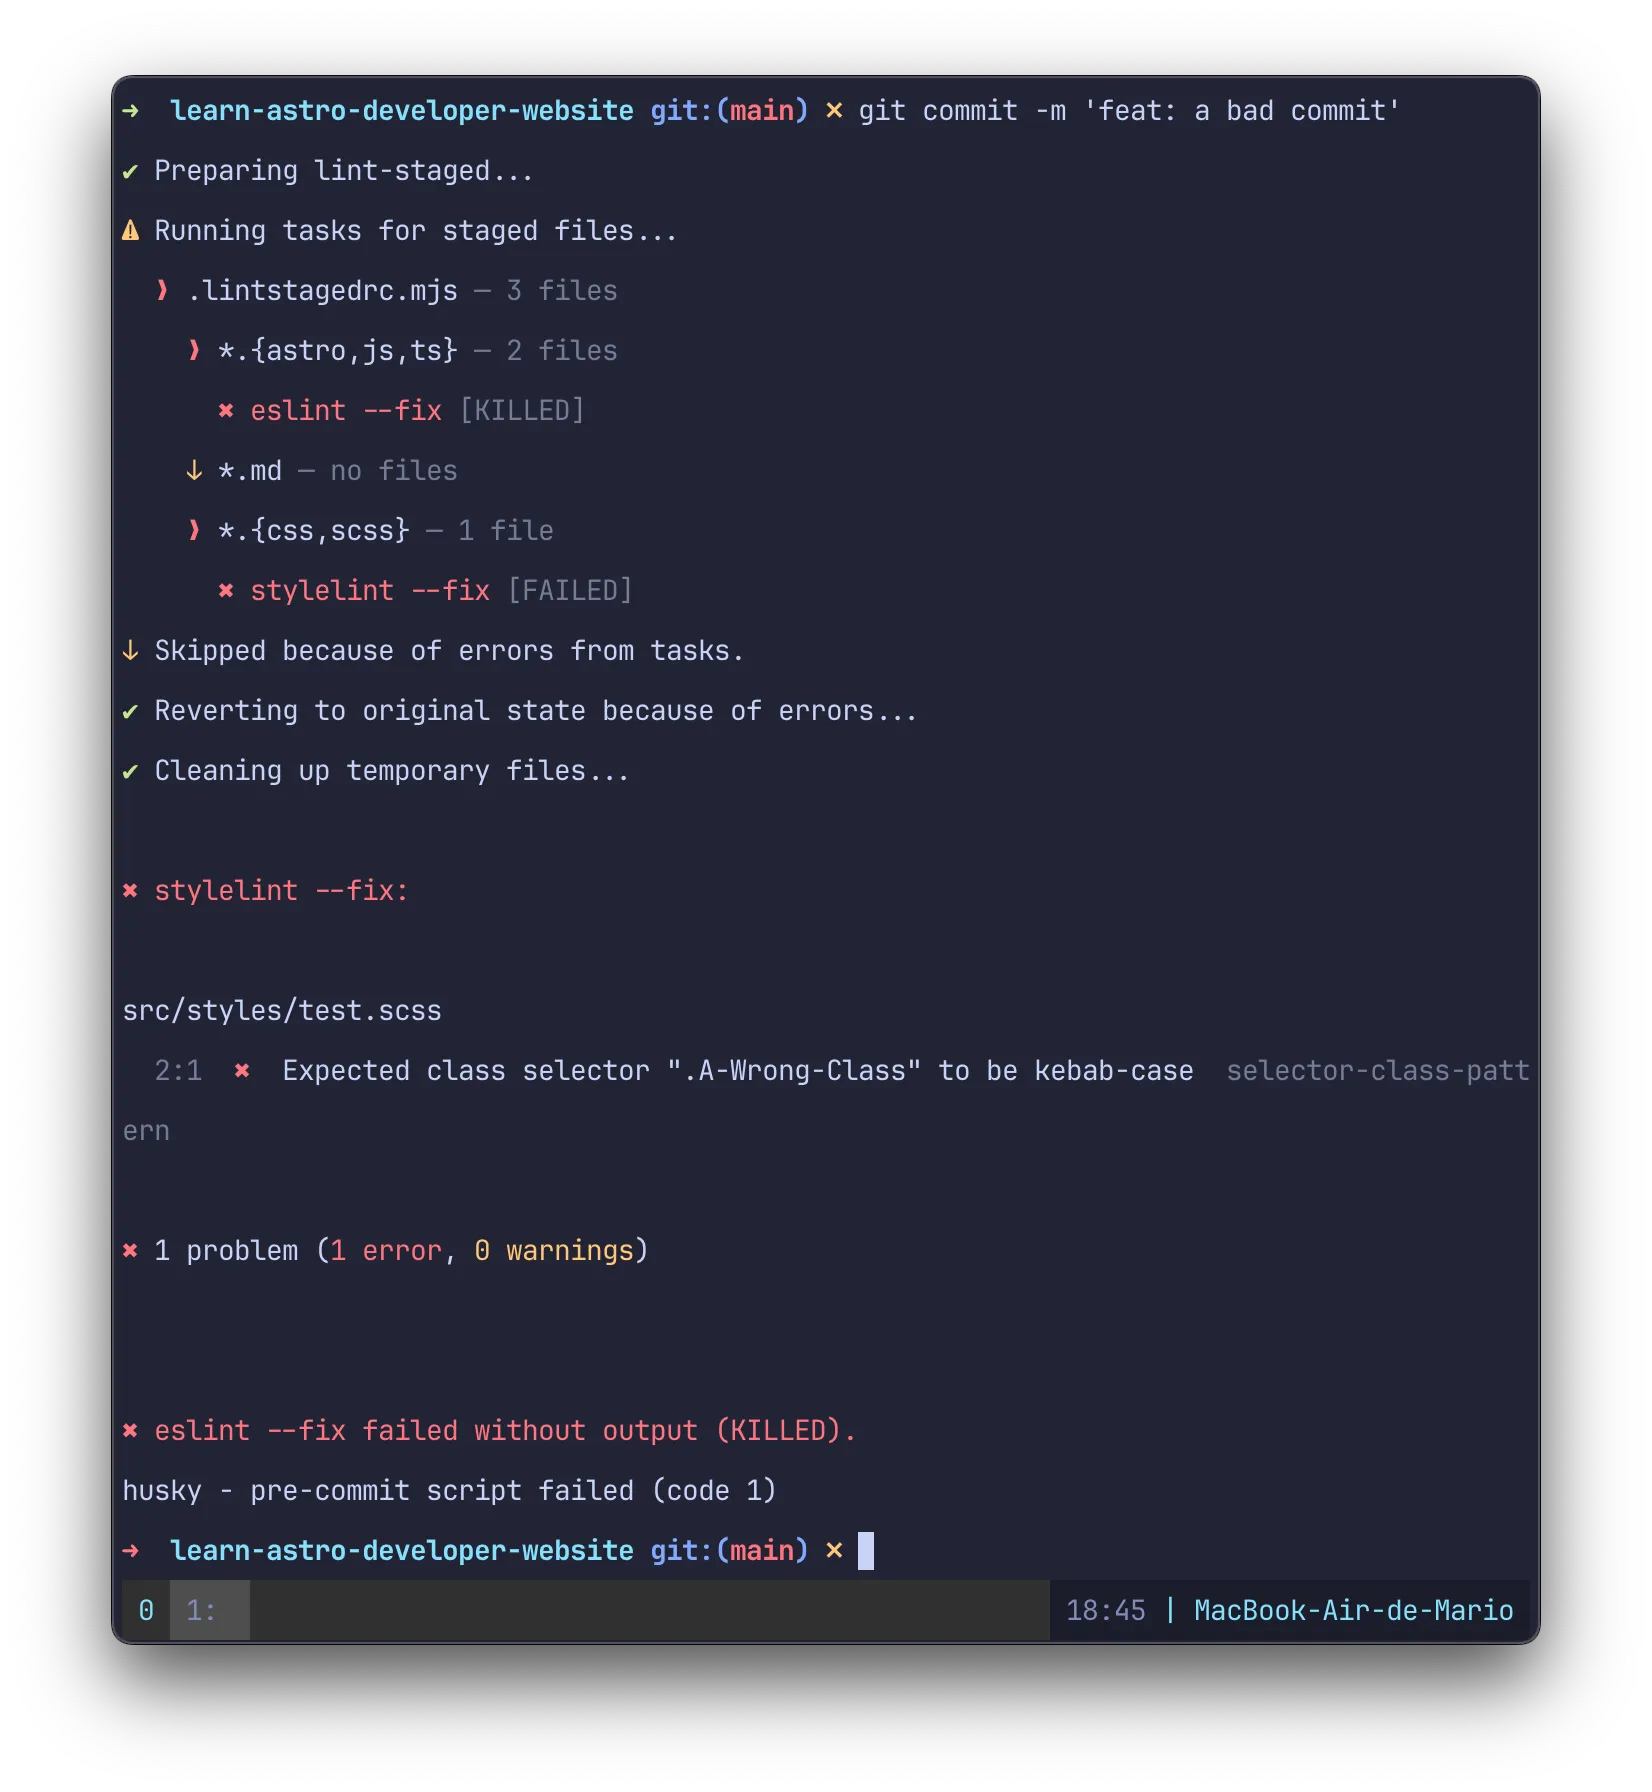
npx stylelint src/styles/test-stylelint.scss src/pages/test-prettier.astro
src/styles/test-stylelint.scss
  1:1  ✖  Replace "⏎.A-Wrong-Class·{·background-color:·red;·" with ".A-Wrong-Class·{⏎↹background-color:·red;"  prettier/prettier
  2:1  ✖  Expected class selector ".A-Wrong-Class" to be kebab-case                                            selector-class-pattern
  3:2  ✖  Expected empty line before at-rule                                                                   at-rule-empty-line-before
  4:1  ✖  Delete "⏎"                                                                                           prettier/prettier
  6:1  ✖  Delete "⏎"                                                                                           prettier/prettier

src/pages/test-prettier.astro
  13:1  ✖  Expected id selector "#id_and_underscores" to be kebab-case  selector-id-pattern
  14:1  ✖  Expected empty line before rule                              rule-empty-line-before
  14:1  ✖  Expected class selector ".A-WRONG_NAME" to be kebab-case     selector-class-pattern

✖ 8 problems (8 errors, 0 warnings)
  2 errors potentially fixable with the "--fix" option.
cSpell
You wan to have good spelling in your articles, right? Let’s configure cSpell then:
npm install -D cspell
And the configuration file is basically which source code paths and which words we want to ignore:
// .cspell.json
{
  "version": "0.2",
  "language": "en",
  "words": [
    "astro",
    "astrojs",
    "fira",
    "mario",
    "pagefind",
    "tsconfigs",
    "tseslint",
    "yepes"
  ],
  "ignorePaths": [
    ".cspell.json",
    ".git/",
    ".gitattributes",
    ".gitignore",
    ".gitignore",
    ".vscode/**",
    "node_modules"
  ]
}
To test it out, just execute cspell with npx:
npx cspell .
In my case, the README.md file was giving me a lot of issues because of astro related terminology. So I remove most of it’s contents.
An finally a small tip: You can add a custom dictionary to a file to limit the number of errors. For instance, in the src/pages/index.astro, I added the lorem-ipsum dictionary to prevent any errors because of that:
---
// src/pages/test.astro

// cSpell:dictionaries lorem-ipsum
---

<html lang="en">
  <!-- ... -->
  <body>
    <h1>Astro</h1>
    <p>
      Lorem ipsum dolor sit amet consectetur, adipisicing elit. Mollitia
      repudiandae illo blanditiis! Aperiam officiis, placeat repellat architecto
      nihil amet! Nobis dolorem dicta beatae maiores aspernatur officia libero
      nam inventore accusantium.
    </p>
  </body>
</html>
<!-- ... -->
Commitlint, Lintstaged and Husky
I’ve discussed multiple times how to configure this tools. So I’m just going to add here the install commands and the configuration files:
npm i -D @commitlint/{cli,config-conventional} lint-staged husky
To configure commitlint we just need to tell it that we are going to use the conventional rules:
// .commitlintrc.mjs

/** @type {import("@commitlint/config-conventional").Config} */
export default {
  extends: [
    "@commitlint/config-conventional", // scoped packages are not prefixed
  ],
};
To configure lint-staged is just a matter of specifying the “format” or “lint” command we want to run when a file is staged:
// .lintstagedrc.mjs

/** @type {import("@commitlint/config-conventional").Config} */
export default {
  "*.{astro,js,ts}": "eslint --fix",
  "*.md": "markdownlint --fix",
  "*.{css,scss}": "stylelint --fix",
};
To configure Husky use the init wizard and then add the commitlint and lint-staged commands to the scripts:
npm init husky

echo "npx --no -- commitlint --edit \$1" > .husky/commit-msg
echo "npx lint-staged --relative" > .husky/pre-commit
Now, every time you try to commit, you’ll get linting and formatting automatically:
Adding Tailwind CSS Framework
With the Code Quality section finished, we can focus on configuring a CSS framework. In my case I opted for Tailwind.
The process we are going to follow is:
- Install the Astro Tailwind integration
- Create a global CSS file
- Install a custom font family
- Configure the custom font family in Tailwind
- Configure the “dark” mode to work with a toggle instead of the OS preferences
- Configure the code quality tools to recognize Tailwinds syntax
Installing and Configuring Tailwind
Since we will use a custom font, we are not only going to install the Astro Tailwind integration, but also the Tailwind’s Typhography plugin
npx astro add tailwind
# You can safely say Yes to all
This will:
- Add the
tailwind()integration inastro/config/mjs - Create the
tailwind.config.mjsin the root of the project - Automatically inject Tailwind CSS to all pages
You can test that you have tailwind by looking at the source code of the index.astro page in your browser:
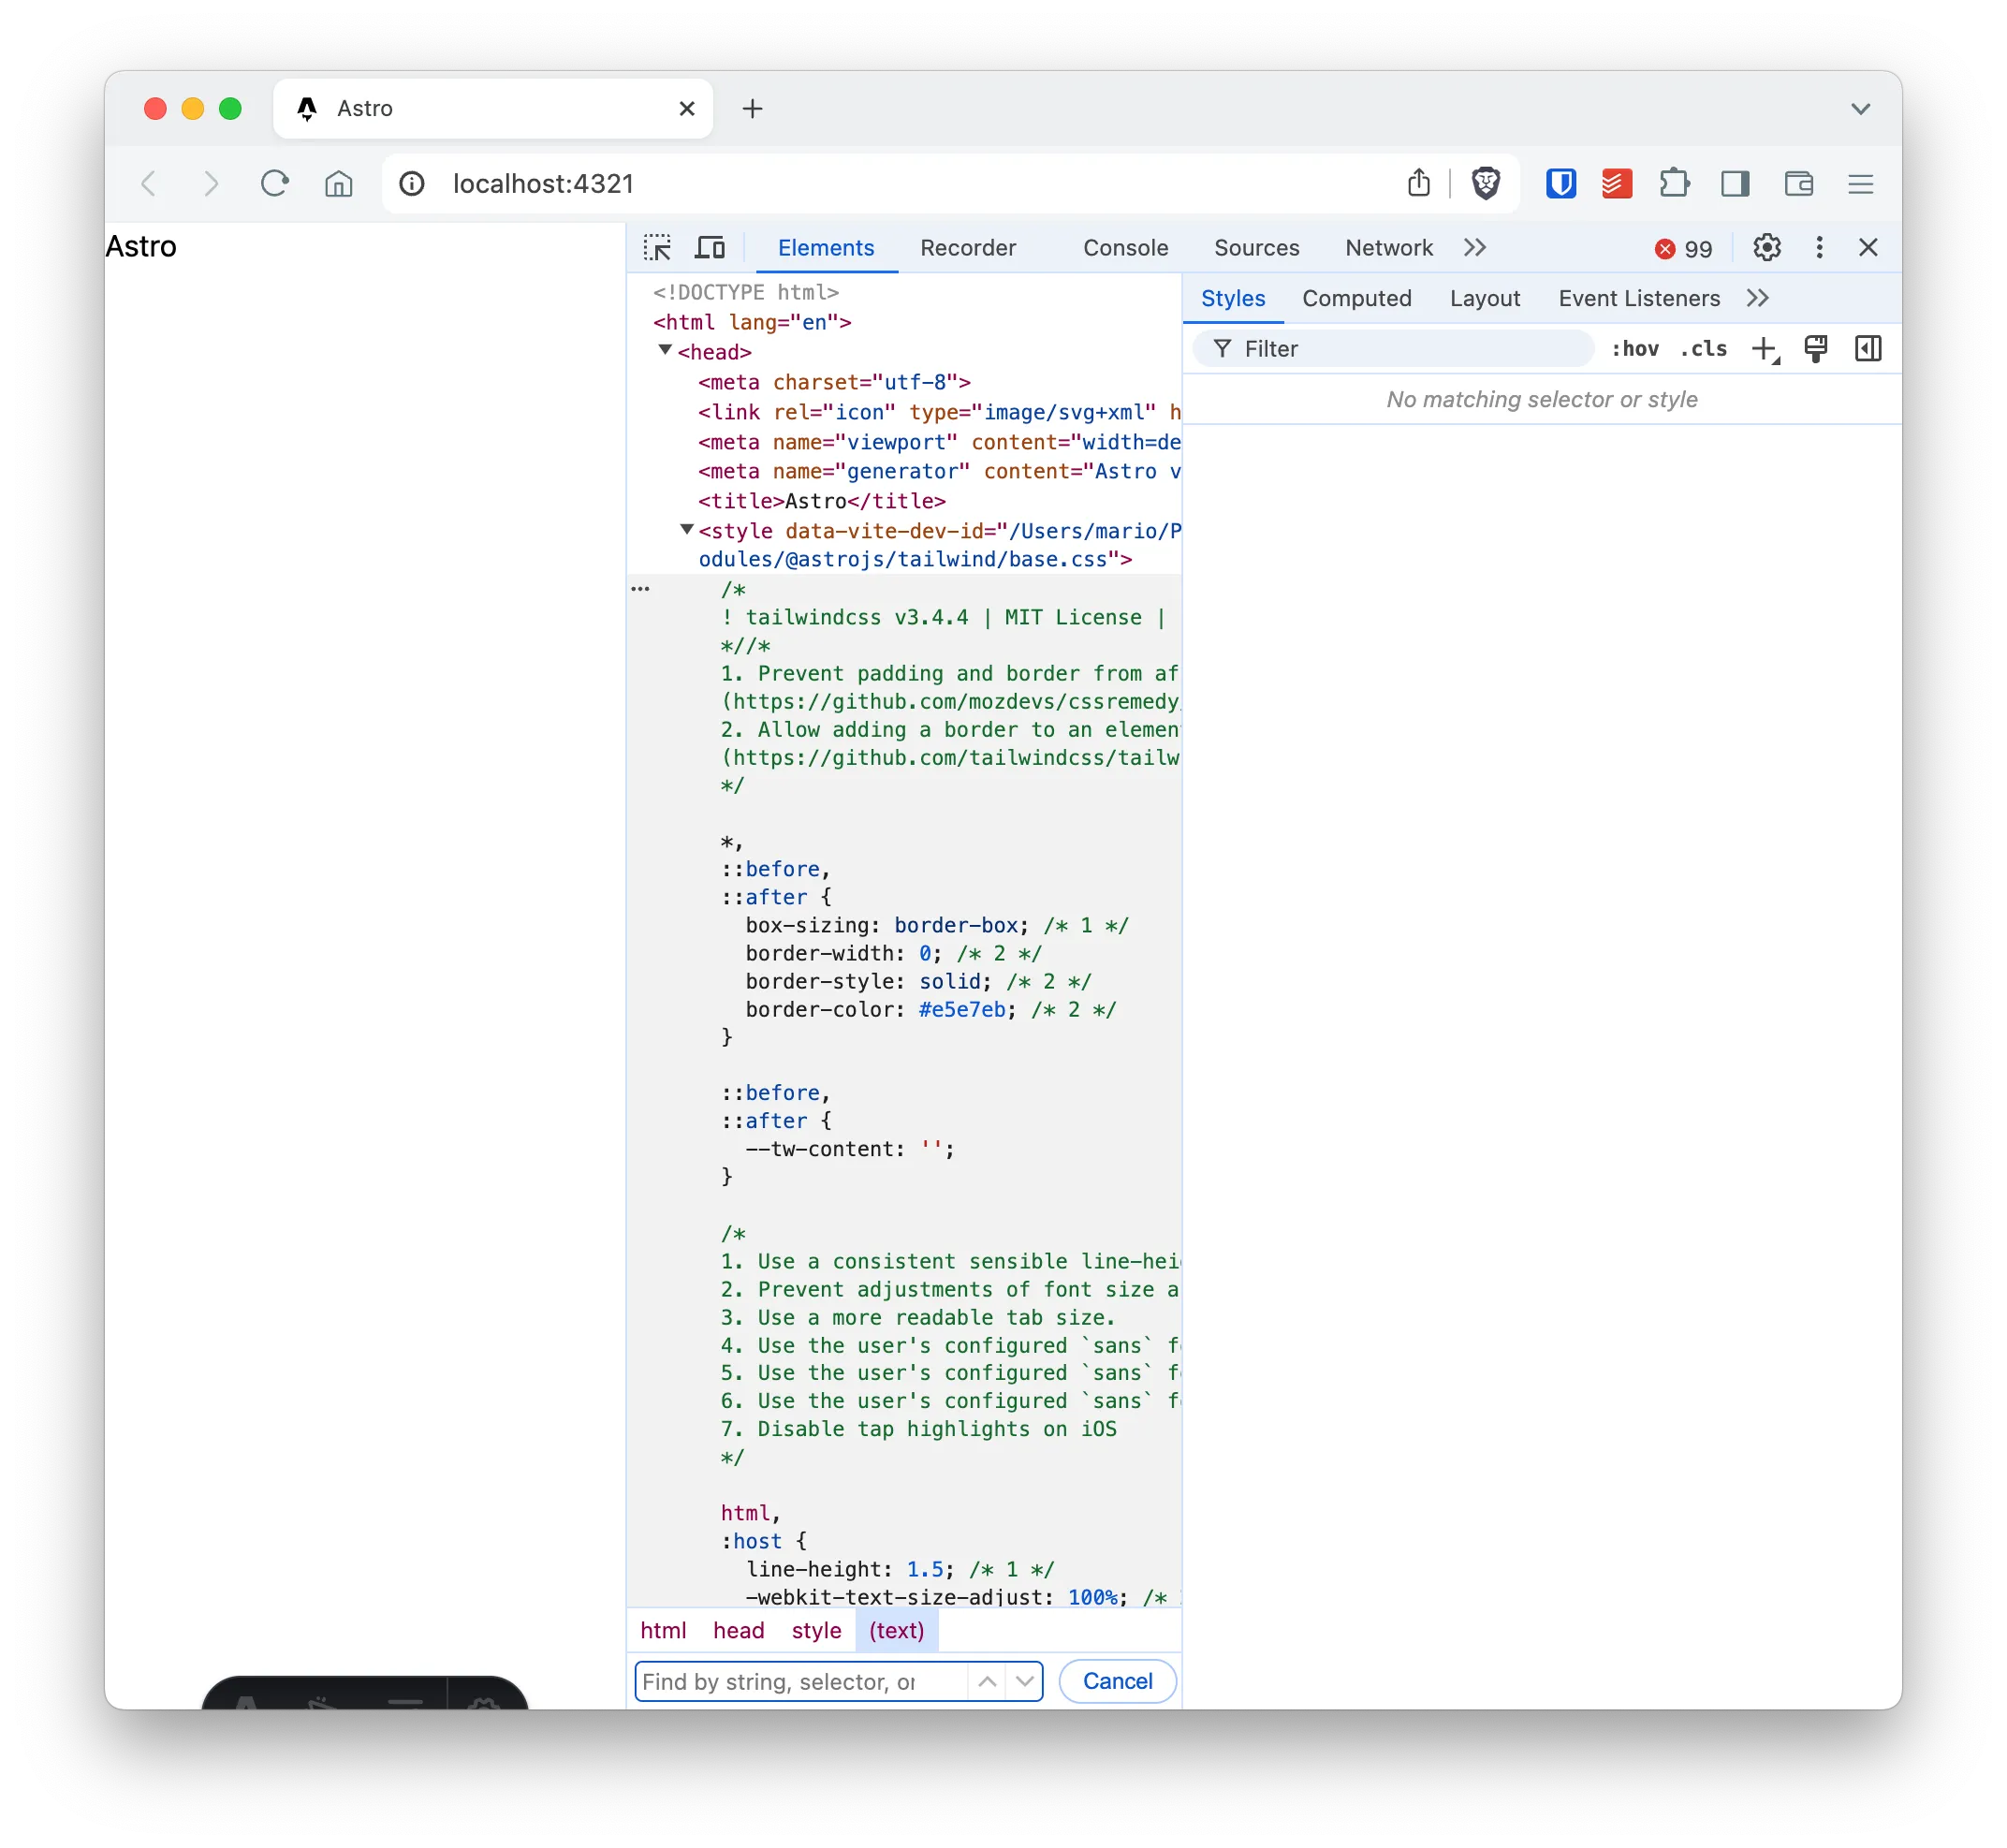
If you are curious on what astro npx astro add tailwind does, you can review this documents with the steps that the command executes.
Create a global.css file to add CSS
Easy:
mkdir src/styles/
touch src/styles/global.css
Then add the following contents to that file:
/* src/styles/global.css */

@tailwind base;
@tailwind components;
@tailwind utilities;
And in import that file in all the .astro files:
---
// src/pages/index.astro
import "../styles/global.css";
---
Customize Tailwind’s Font Family
In my case (and almost every case) you want to change the default sans font in Tailwind. This requires the following:
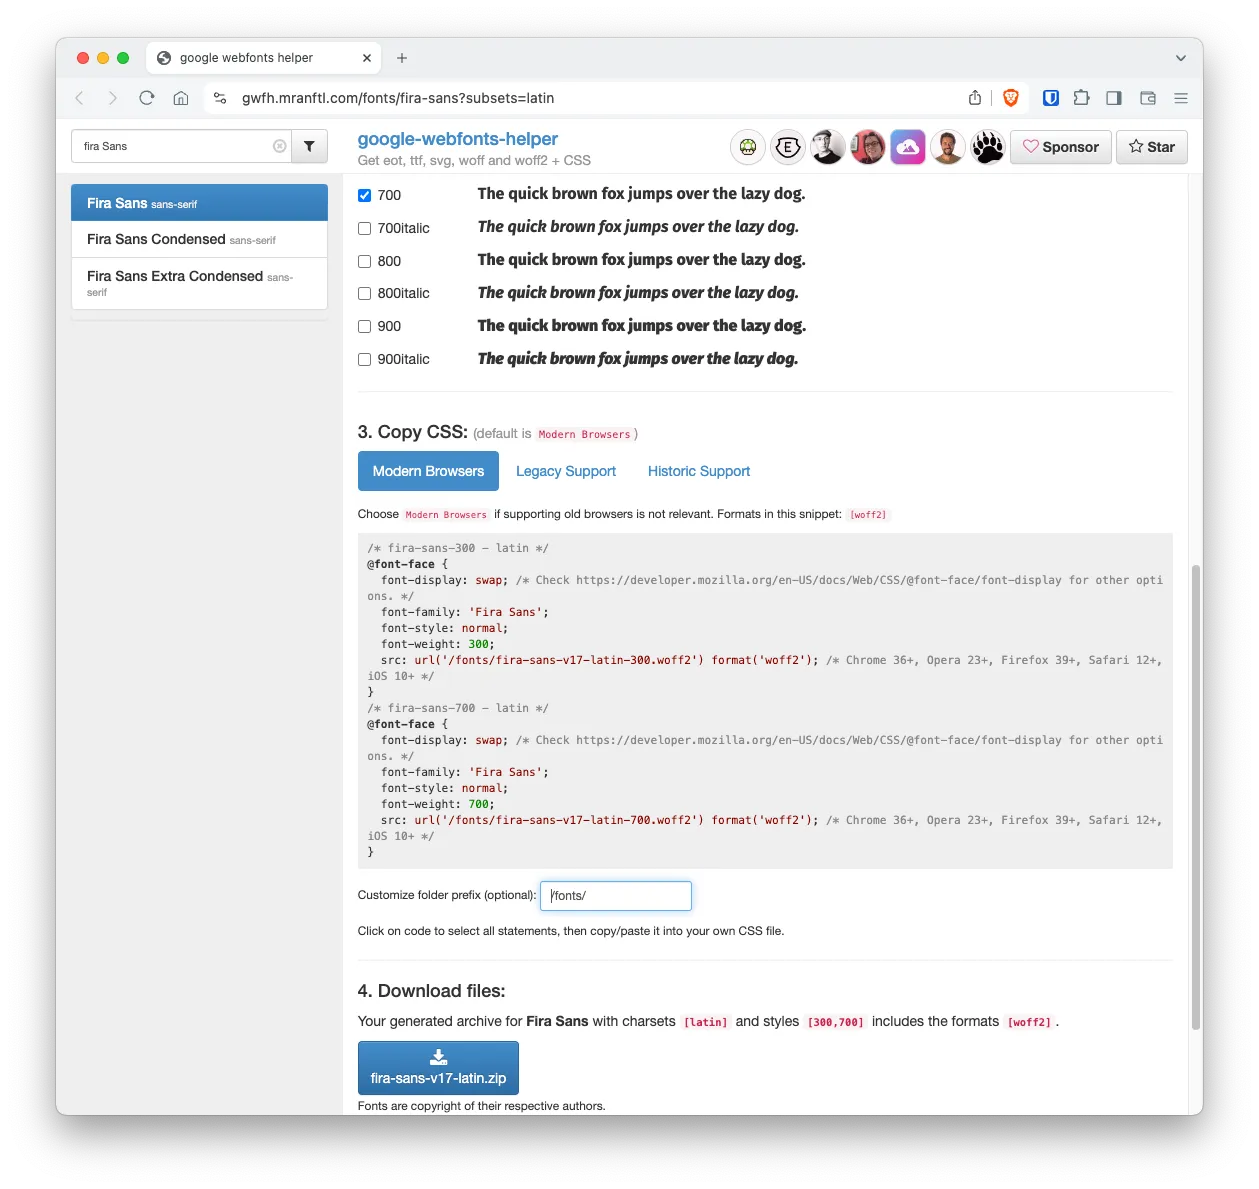
- Download the correct
woff2font files and place them in thepublic/fonts/folder. - Create a CSS file (I created min in
src/styles/font-face.css) with the correct@font-faceCSS declarations for this font - Use the font in an
.astrofile trough theimportstatement
An easy way to achieve the first 2 goals is to use the Google-Webfonts-Helper tool. This will create a .zip file with the required fonts, and create the correct @font-face CSS code that you can copy & paste.
Just as a reference, my font-face.css file looks like this:
/* src/styles/font-face.css */

/* fira-sans-300 - latin */
@font-face {
  font-display: swap; /* Check https://developer.mozilla.org/en-US/docs/Web/CSS/@font-face/font-display for other options. */
  font-family: "Fira Sans";
  font-style: normal;
  font-weight: 300;
  src: url("../fonts/fira-sans-v17-latin-300.woff2") format("woff2"); /* Chrome 36+, Opera 23+, Firefox 39+, Safari 12+, iOS 10+ */
}
/* fira-sans-300italic - latin */
@font-face {
  font-display: swap; /* Check https://developer.mozilla.org/en-US/docs/Web/CSS/@font-face/font-display for other options. */
  font-family: "Fira Sans";
  font-style: italic;
  font-weight: 300;
  src: url("../fonts/fira-sans-v17-latin-300italic.woff2") format("woff2"); /* Chrome 36+, Opera 23+, Firefox 39+, Safari 12+, iOS 10+ */
}
/* fira-sans-700 - latin */
@font-face {
  font-display: swap; /* Check https://developer.mozilla.org/en-US/docs/Web/CSS/@font-face/font-display for other options. */
  font-family: "Fira Sans";
  font-style: normal;
  font-weight: 700;
  src: url("../fonts/fira-sans-v17-latin-700.woff2") format("woff2"); /* Chrome 36+, Opera 23+, Firefox 39+, Safari 12+, iOS 10+ */
}
/* fira-sans-700italic - latin */
@font-face {
  font-display: swap; /* Check https://developer.mozilla.org/en-US/docs/Web/CSS/@font-face/font-display for other options. */
  font-family: "Fira Sans";
  font-style: italic;
  font-weight: 700;
  src: url("../fonts/fira-sans-v17-latin-700italic.woff2") format("woff2"); /* Chrome 36+, Opera 23+, Firefox 39+, Safari 12+, iOS 10+ */
}
/* jetbrains-mono-regular - latin */
@font-face {
  font-display: swap; /* Check https://developer.mozilla.org/en-US/docs/Web/CSS/@font-face/font-display for other options. */
  font-family: "JetBrains Mono";
  font-style: normal;
  font-weight: 400;
  src: url("/fonts/jetbrains-mono-v18-latin-regular.woff2") format("woff2"); /* Chrome 36+, Opera 23+, Firefox 39+, Safari 12+, iOS 10+ */
}
After placing your fonts in public/fonts and creating the font loading code in src/styles/font-face.css, we have to change the theme.fontFamily value in Tailwinds conf file:
// tailwind.config.mjs
import tailwindTypography from "@tailwindcss/typography";
import defaultTheme from "tailwindcss/defaultTheme";

/** @type {import('tailwindcss').Config} */
export default {
  content: ["./src/**/*.{astro,html,js,jsx,md,mdx,svelte,ts,tsx,vue}"],
  theme: {
    extend: {},
    fontFamily: {
      sans: ["Fira Sans", ...defaultTheme.fontFamily.sans],
    },
  },
};
You can revisit the index.astro page in your browser and verify that the default font is now your custom font (in my case Fira Sans).
Finally, you need to include this file in the global.css file:
/* src/styles/global.css */
@import url("font-face.css") layer(base);

@tailwind base;
@tailwind components;
@tailwind utilities;
Install Tailwind’s “typography” Plugin
From the Tailwind’s Typography page
The
@tailwindcss/typographyplugin adds a set ofproseclasses that can be used to quickly add sensible typographic styles to content blocks that come from sources like markdown or a CMS database.
npm i @tailwindcss/typography
To install it. Then we need to add one line to the Tailwind’s configuration:
// tailwind.config.mjs
import tailwindTypography from "@tailwindcss/typography";
import defaultTheme from "tailwindcss/defaultTheme";

/** @type {import('tailwindcss').Config} */
export default {
  content: ["./src/**/*.{astro,html,js,jsx,md,mdx,svelte,ts,tsx,vue}"],
  theme: {
    extend: {},
    fontFamily: {
      sans: ["Fira Sans", ...defaultTheme.fontFamily.sans],
    },
  },
  plugins: [tailwindTypography], // Adds the `prose` class
};
To test it, the easiest would be to create a test page and visit it with the browser:
---
// src/pages/test-fonts.astro

// cSpell:dictionaries lorem-ipsum
import "../styles/font-face.css";
---

<html lang="en">
  <head>
    <title>Astro</title>
  </head>
  <body class="bg-orange-50 text-lime-300">
    <div class="prose">
      <h1 class="prose text-6xl font-bold">Astro</h1>
      <p>
        Lorem ipsum dolor, sit amet consectetur adipisicing elit. Eius dolores
        beatae dicta nobis est natus eaque dolorum nisi porro impedit at,
        suscipit, perspiciatis quod! Obcaecati sunt nesciunt asperiores
        recusandae illo!
      </p>
    </div>
  </body>
</html>

<style>
  .prose {
    margin-inline: auto;
    @apply text-lime-950;
  }
</style>
Note that the prose class is provided by the Tailwind Typography project
(Optional) Enable Tailwind’s “Manual” light/dark Mode
An in my case, I wanted to support Tailwind’s manual dark mode. So I did a small change in tailwind.config.mjs file
// tailwind.config.mjs

/** @type {import('tailwindcss').Config} */
export default {
  // ...
  darkMode: "selector",
};
And to enable dark mode in a page or component, just add the dark class to the top-most level element and then style the <body> to have a dark option:
---
// src/pages/test-dark-mode.astro
---

<!doctype html>
<html lang="en" class="dark">
  <body class="bg-gray-200 text-gray-900 dark:bg-gray-800 dark:text-gray-200">
    <p>This should be in dark mode</p>
  </body>
</html>
Add Tailwind Support to Stylelint and Prettier
If we want to apply tailwind’s linting recommendations, like the recommended class oder we need to install a couple of packages and update the .prettierrc.mjs and the .stylelintrc.mjs configuration files.
npm i -D prettier-plugin-tailwindcss stylelint-config-tailwindcss
And add the prettier-plugin-tailwindcss to the .prettierrc.mjs file:
// .prettierrc.mjs

export default {
  plugins: [
    "prettier-plugin-astro",
    "prettier-plugin-organize-imports",
    "prettier-plugin-tailwindcss",
  ],
  // ...
};
Now, you’ll get warnings about the class not being in the correct order:
npx eslint src/pages/test-prettier-tailwind.astro
/Users/mario/Projects/learn-astro-developer-website/src/pages/test-prettier-tailwind.astro
   5:13  warning  Replace `font-light·mt-3·p-3` with `mt-3·p-3·font-light`  prettier/prettier
  11:10  warning  Replace `pt-2·mb-3·` with `mb-3·pt-2`                     prettier/prettier

✖ 2 problems (0 errors, 2 warnings)
  0 errors and 2 warnings potentially fixable with the `--fix` option.
The Stylelint configuration is very simple also:
// .stylellintrc.mjs

/** @type {import('stylelint').Config} */
export default {
  extends: [
    "stylelint-config-standard",
    "stylelint-config-astro",
    "stylelint-prettier/recommended",
    "stylelint-config-tailwindcss",
  ],
};
Now, when you try to lint a *.{s,}css file, you get errors:
npx stylelint src/styles/test-stylelint.scss
src/styles/test-stylelint.scss
  3:9  ✖  Replace "dark:font-bold·mt-5·font-sans" with "mt-5·font-sans·dark:font-bold"                         prettier/prettier
  4:1  ✖  Delete "⏎"                                                                                           prettier/prettier
  6:1  ✖  Delete "⏎"                                                                                           prettier/prettier

✖ 6 problems (6 errors, 0 warnings)
  1 error potentially fixable with the "--fix" option.
Content Collections
To display a list of blog posts (and eventually a list of projects), you have to create a content collection. This involves:
- Add content to
./src/content/blogas Markdown, Astro or MDX files (I opted for Markdown). - Define the collection and the the schema (the frontmatter elements) that have to be present.
- Create an
index.astroand a[...slug].astrofiles to display the list of elements and a single element
Create Content
I created 3 Markdown files in src/content/blog:
$ tree src/content/blog
src/content
├── blog
│   ├── first
│   │   └── index.md
│   ├── second
│   │   └── index.md
│   └── third
│       └── index.md
└── config.ts

5 directories, 4 files
Note that ALL the Markdown files in the .src/content/blog subfolder require a complete and valid Front-matter.
This is the contents of the src/content/blog/first/index.md file:
---
title: First Post
author: Mario Yepes
date: 2024-06-25
tags: [tag1, tag2]
---

Intro...

## A heading

Lorem ipsum `dolor sit amet consectetur` adipiscing elit quam nostra, lectus platea lacus habitant vivamus a nam velit tristique aliquam, quisque mauris viverra pharetra aenean nisi aliquet placerat. Magnis sollicitudin himenaeos lobortis nam quisque odio metus risus ridiculus, fringilla cursus quis fames suscipit tristique senectus curabitur, convallis ac faucibus class inceptos fermentum lacinia nunc.
Define Schemas Using Zod
You define a collection by creating the src/content/config.ts file and there call the defineCollection function with the type of the collection(s) and how the schema gets validated. Note that Astro uses Zod for the validation
// src/content/config.ts

import { defineCollection, z } from "astro:content";

const blog = defineCollection({
  type: "content",
  schema: ({ image }) => {
    return z.object({
      title: z.string(),
      date: z.coerce.date(),
      update: z.coerce.date().optional(),
      tags: z.array(z.string()),
      cover: image().optional(),
      draft: z.boolean().optional().default(false),
    });
  },
});

export const collections = { blog };
Define a “index” File to List the Collection
You need to create a .astro file that implements the getCollection function and lists the contents:
---
// src/pages/blog/index.astro
import { getCollection, type CollectionEntry } from "astro:content";
type YearlyPosts = {
[year: string]: CollectionEntry<"blog">[];
};
const posts = await getCollection("blog", ({ data }) => {
return import.meta.env.PROD ? !data.draft : true;
});
posts.sort((a, b) => b.data.date.valueOf() - a.data.date.valueOf());
/**
* Array of array of posts. The keys are the posts years.
*/
const postsByYear = posts.reduce((accum: YearlyPosts, post) => {
const year = post.data.date.getFullYear().toString();
if (!(year in accum)) {
accum[year] = [];
}
accum[year].push(post);
return accum;
}, {});
/**
* Years where there are posts, sorted descending.
*/
const years = Object.keys(postsByYear).sort(
(a, b) => parseInt(b) - parseInt(a),
);
---
<ul>
{
years.map((year) => (
<li>
<h2 class="text-2xl font-bold">{year}</h2>
<ul>
{postsByYear[year].map((post) => (
<li>
<a href={`/blog/${post.slug}`}>
→ {post.data.title} - {post.data.date.toDateString()}{" "}
</a>
</li>
))}
</ul>
</li>
))
}
</ul>
<style>
a {
@apply hover:underline;
}
</style>
Define Dinamic Routing
It’s pretty simmilar to NextJS: You need to crete a file with the special name [...slugh].astro that implements the getStaticPaths function and formats the content of one entry.
---
import type { MarkdownHeading } from "astro";
import "../../styles/global.css";
import { getCollection, type CollectionEntry } from "astro:content";

type Props = CollectionEntry<"blog">;

export const getStaticPaths = async () => {
	const entries = await getCollection("blog");
	return entries.map((entry) => ({
		params: { slug: entry.slug, title: entry.data.title },
		props: entry,
	}));
};

const entry = Astro.props;
const { Content, headings } = await entry.render();
console.log(headings);
---

<main class="prose">
  <h1>{entry.data.title}</h1>
  {headings.reduce((prev: string, curr: MarkdownHeading) => prev + "|" +
  curr.slug, "Table of contents: ")}
  <content />
</main>
RSS
Defining a RSS feed involves the following:
- Install the
@astrojs/rsspackage - Create the
src/pages/rss.xml.tsfile to generate the RSS code - Optionally, if you are going to include the post content in the feed, sanitize the XML
Install Required Packages
We install sanitize-html and markdown-it since we are going to output the post content in the feed:
npm i @astrojs/rss sanitize-html markdown-it
npm i -D @types/markdown-it  @types/sanitize-html
The “@types” modules are required because we are using strict TypeScript in the src/pages/rss.xml.ts file.
Create the Endpoint in TypeScript
You create an endpoint by creating a page with the name you want, but give it an .ts extension. This tells Astro that we are taking care of the rerun ourselves
Make sure that you have the site key configured in astro.config.mjs. This is because the RSS standard requires a site key that should be your URL and that’s a value that resides in astro.config.mjs:
// src/pages/rss.xml.ts

import rss from "@astrojs/rss";
import { type AstroConfig } from "astro";
import { getCollection } from "astro:content";
import MarkdownIt from "markdown-it";
import sanitizeHtml from "sanitize-html";
const markdownParser = new MarkdownIt();

export const GET = async (context: AstroConfig) => {
  const entries = await getCollection("blog", (entry) => {
    return import.meta.env.PROD ? !entry.data.draft : true;
  });
  return rss({
    title: "Mario's Blog",
    description: "Mario Yepes Portfolio and Blog",
    site: context.site || "https://astro.config.mjs/not/configured/yet",
    items: entries
      .map((entry) => ({
        title: entry.data.title,
        pubDate: entry.data.date,
        description: "No desc",
        link: `/${entry.collection}/${entry.slug}`,
        content: sanitizeHtml(markdownParser.render(entry.body), {
          allowedTags: sanitizeHtml.defaults.allowedTags.concat(["img"]),
        }),
      }))
      .sort((a, b) => b.pubDate.valueOf() - a.pubDate.valueOf()),
  });
};
Note that we are converting the original Markdown to HTML with markdown-it and then remove any invalid tags with snitize-html.
Enabling Auto-discovery on a Page
If you want to help RSS readers to find your feed, then you should add the <link type="application/rss+xml" ... tag in the head of at least your homepage file:
---
// src/pages/index.astro
---

<html lang="en">
	<head>
        <!-- ... -->
		<link rel="alternate" type="application/rss+xml" title="My Blog Site" href={new URL("rss.xml", Astro.site)} />
        <!-- ... -->
	</head>
	<body>
		<h1>Astro</h1>
	</body>
</html>
Table of Contents Component
This component creates a very simple table of contents if you provide the headings of your post:
---
// src/components/table-of-contents.astro

import type { MarkdownHeading } from "astro";

interface Props {
	headings: MarkdownHeading[];
	title?: string;
	open?: boolean;
}
type MarkdownSubHeading = MarkdownHeading & {
	subheadings: MarkdownHeading[];
};

const { headings, title = "Table Of Contents", open = true } = Astro.props;

/**
 * @link https://gist.github.com/maciejpedzich/000da5c6b3a91290d49a91c9fe940ca3
 */
const grouppedHeadings = headings.reduce((accum, heading) => {
	if (2 === heading.depth) {
		accum.push({ ...heading, subheadings: [] });
	} else {
		accum.at(-1)?.subheadings.push(heading);
	}
	return accum;
}, [] as MarkdownSubHeading[]);
---

<details open={open}>
	<summary>{title}</summary>
	<nav>
		<ol>
			{
				grouppedHeadings.map((heading) => (
					<li>
						<a href={`#${heading.slug}`}>{heading.text}</a>
						{heading.subheadings.length > 0 && (
							<ol>
								{heading.subheadings.map((subheading) => (
									<li>
										<a href={`#${subheading.slug}`}>{subheading.text}</a>
									</li>
								))}
							</ol>
						)}
					</li>
				))
			}
		</ol>
	</nav>
</details>
To use it, you have to place it in your src/pages/blog/[...slug].astro file wherever you want the TOC to be:
---
// src/pages/blog/[...slug].astro

import "../../styles/global.css";
import { getCollection, type CollectionEntry } from "astro:content";
import Toc from "../../components/table-of-contest.astro";

type Props = CollectionEntry<"blog">;

export const getStaticPaths = async () => {
	const entries = await getCollection("blog");
	return entries.map((entry) => ({
		params: { slug: entry.slug, title: entry.data.title },
		props: entry,
	}));
};

const entry = Astro.props;
const { Content, headings } = await entry.render();
---

<main class="prose">
	<h1>{entry.data.title}</h1>
	<Toc headings={headings} />
	<Content />
</main>
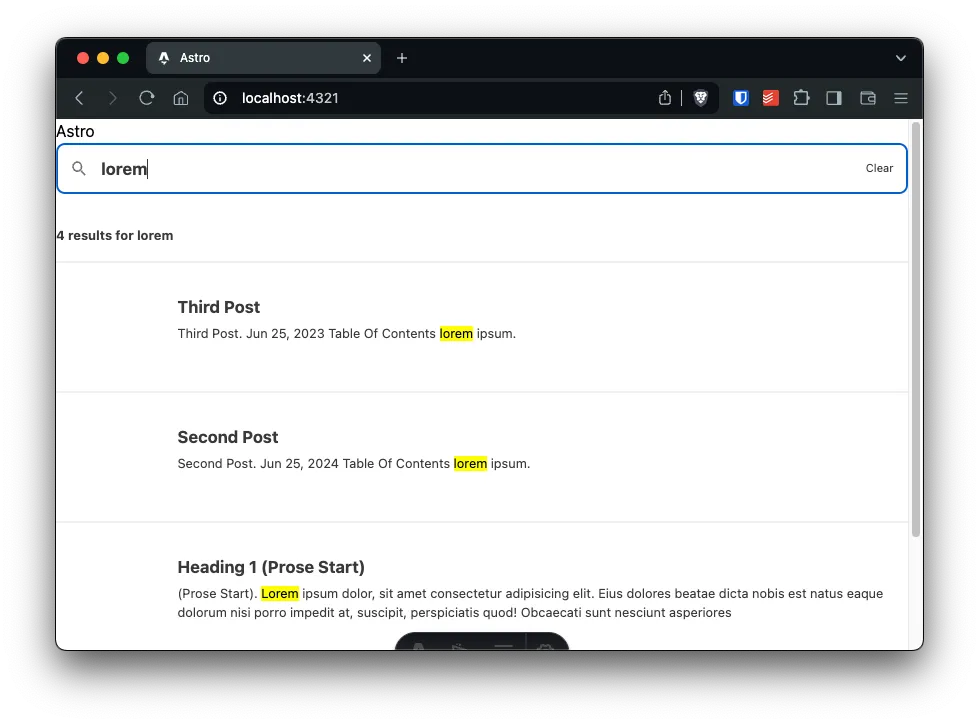
Pagefind
Algolia is great, but kind of an overkill for personal sites. So I opted for Pagefind as a local search solution.
2 very important notes:
- You have to “build” the project every time you add a new article
- Pagefind looks for a
<body>tag. So make sure that the[...slug].astrofiles has one directly in the file or trough a component
Installing it is as easy as:
npm i astro-pagefind
And then include the integration.
// astro.config.mjs

import tailwind from "@astrojs/tailwind";
import pagefind from "astro-pagefind";
import { defineConfig } from "astro/config";

// https://astro.build/config
export default defineConfig({
  site: "https://marioyepes.com/",
  build: {
    format: "file",
  },
  integrations: [tailwind(), pagefind()],
});
To actually make it work, you have to include the component in a page:
---
// src/pages/index.astro
import Search from "astro-pagefind/components/Search";
---

<html lang="en">
  <body>
    <h1>Astro</h1>
    <Search />
  </body>
</html>
Copy Code Button
Astro includes Shiki out of the box to highlight source code in your pages or in your Markdown files.
What it doesn’t include is any functionality to copy the code in a code block. But we can create the following script to enable it:
// src/scripts/copy-code-button.ts

let copyButtonInactive: string;
let copyButtonActive: string;

const buttonDeafultStyle = `
position: absolute;
top: .3em;
right: .5em;
`;

async function copyCode(
  codeBlock: HTMLPreElement,
  copyButton: HTMLButtonElement,
) {
  const codeText = codeBlock.innerText;
  const buttonText = copyButton.innerText;
  const textToCopy = codeText.replace(buttonText, "");

  await navigator.clipboard.writeText(textToCopy);
  copyButton.innerText = copyButtonActive;

  setTimeout(() => {
    copyButton.innerText = copyButtonInactive;
  }, 2000);
}

export function addCopyCodeButtons(
  iconButtonInactive: string,
  iconButtonActive: string,
) {
  copyButtonInactive = iconButtonInactive;
  copyButtonActive = iconButtonActive;
  const codeBlocks = Array.from(document.querySelectorAll("pre"));

  for (const codeBlock of codeBlocks) {
    const wrapper = document.createElement("div");
    wrapper.style.position = "relative";

    const copyButton = document.createElement("button");
    copyButton.innerText = copyButtonInactive;
    copyButton.classList.value = "copy-code";
    copyButton.setAttribute("style", buttonDeafultStyle);

    codeBlock.setAttribute("tabindex", "0");
    codeBlock.appendChild(copyButton);

    codeBlock.parentNode?.insertBefore(wrapper, codeBlock);
    wrapper.appendChild(codeBlock);

    copyButton?.addEventListener("click", async () => {
      await copyCode(codeBlock, copyButton);
    });
  }
}
And then we have to include the script in the pages where we want to add this functionality:
---
// src/pages/blog/[...slug].astro
---

<!-- ... -->
<main class="prose">
  <h1>{entry.data.title}</h1>
  <Content />
</main>
<script>
  import { addCopyCodeButtons } from "../../scripts/copy-code-button";
  addCopyCodeButtons("📋", "✅");
</script>
<!-- ... -->
SEO and Head Items with astro/SEO
We already touched on the modifying the <head> of a page when we created the RSS feed auto-discovery functionality. But there is a better option than to add a lot of <link> and <meta> tags in the head: astro-seo.
This package will also take care of creating any Open Graph tags you require
npm i astro-seo
And then replace all of your meta and links on your <head> with the SEO component.
---
// src/pages/index.astro
// ...
import { SEO, type SEOProps } from "astro-seo";

const headItems: SEOProps = {
  title: "My Site Title",
  titleTemplate: "%s | My Portfolio site",
  description: "This is my blog and online portfolio",
  openGraph: {
    basic: {
      type: "website",
      title: "OG Title",
      image:
        "https://gravatar.com/avatar/b7635ffd87fc354b559fc1e4aef1a981?s=500",
    },
    article: {
      authors: ["Mario Yepes"],
      tags: [],
    },
  },
  twitter: {
    card: "summary_large_image",
    image: "https://gravatar.com/avatar/b7635ffd87fc354b559fc1e4aef1a981?s=500",
    creator: "@marioy47",
  },
  extend: {
    meta: [
      { name: "generator", content: Astro.generator },
      { name: "viewport", content: "width=device-width" },
    ],
    link: [
      {
        rel: "alternate",
        type: "application/rss+xml",
        title: "My Blog Site",
        href: new URL("rss.xml", Astro.site).toString(),
      },
      { rel: "icon", type: "image/svg+xml", href: "/favicon.svg" },
      { rel: "sitemap", href: "/sitemap-index.xml" },
    ],
  },
};
---

<html lang="en">
  <head>
    <SEO {...headItems} />
  </head>
  <body class="bg-gray-200 text-gray-900 dark:bg-gray-800 dark:text-gray-200">
    <h1>Astro</h1>
  </body>
</html>
Here it is in a page. But would be more useful if you use it in a Layout
Sitemap
Astro’s sitemap integration will create a sitemap with all the contents of your site after every build.
npx astro add sitemap
Accepting the defaults is more than OK
npm run build
ls dist/sitemap-index.xml
Optionally, you can help search engines find your sitemap by adding the sitemap <rel> tag in your head. And since we’re using astro-seo, it’s just a matter of adding the following line on the head of your pages:
diff --git a/src/pages/index.astro b/src/pages/index.astro
index f0dffa2..0b6ac6f 100644
--- a/src/pages/index.astro
+++ b/src/pages/index.astro
@@ -26,6 +26,7 @@ const headItems: SEOProps = {
 		link: [
 			{ rel: "alternate", type: "application/rss+xml", title: "My Blog Site", href: new URL("rss.xml", Astro.site).toString() },
 			{ rel: "icon", type: "image/svg+xml", href: "/favicon.svg" },
+			{ rel: "sitemap", href: "/sitemap-index.xml" },
 		],
 	},
 };
Configure All with Environment Variables
You can use environment variables to build your site. This is particularly convinient if you don’t want to add information that differs from site to site directly in your pages or components.
# .env.production

SITE_URL=https://marioyepes.com

# Head Site title and description
SITE_TITLE="Hello I'm Mario"
SITE_TITLE_TEMPLATE="%s | Mario's Blog & Portfolio"
SITE_DESCRIPTION="This is my blog and online portfolio"
SITE_IMAGE=https://gravatar.com/avatar/b7635ffd87fc354b559fc1e4aef1a981?s=500

# Head twitter card
TWITTER_CREATOR="@marioy47"
TWITTER_IMAGE=https://gravatar.com/avatar/b7635ffd87fc354b559fc1e4aef1a981?s=500
Here is the src/pages/index.astro file configured using environment variables:
diff --git a/src/pages/index.astro b/src/pages/index.astro
index 79a6cbe..ae70fcf 100644
--- a/src/pages/index.astro
+++ b/src/pages/index.astro
@@ -6,25 +6,27 @@ import { SEO, type SEOProps } from "astro-seo";

 import "../styles/global.css";

+const { title, description, image, authors } = Astro.props;
+
 const headItems: SEOProps = {
-	title: "My Site Title",
-	titleTemplate: "%s | My Portfolio site",
-	description: "This is my blog and online portfolio",
+	title: title ?? import.meta.env.SITE_TITLE ?? "No title",
+	titleTemplate: import.meta.env.SITE_TITLE_TEMPLATE ?? "%s | My Site",
+	description: description ?? import.meta.env.SITE_DESCRIPTION ?? "This is my site",
 	openGraph: {
 		basic: {
 			type: "website",
-			title: "OG Title",
-			image: "https://gravatar.com/avatar/b7635ffd87fc354b559fc1e4aef1a981?s=500",
+			title: title ?? import.meta.env.SITE_TITLE ?? "Undefined title",
+			image: image ?? import.meta.env.SITE_IMAGE ?? "https://gravatar.com/avatar/b7635ffd87fc354b559fc1e4aef1a981?s=500",
 		},
 		article: {
-			authors: ["Mario Yepes"],
+			authors: authors ?? ["Mario Yepes"],
 			tags: [],
 		},
 	},
 	twitter: {
 		card: "summary_large_image",
-		image: "https://gravatar.com/avatar/b7635ffd87fc354b559fc1e4aef1a981?s=500",
-		creator: "@marioy47",
+		image: image ?? import.meta.env.TWITTER_IMAGE ?? "https://gravatar.com/avatar/b7635ffd87fc354b559fc1e4aef1a981?s=500",
+		creator: import.meta.env.TWITTER_CREATOR ?? "@marioy47",
 	},
 	extend: {
 		meta: [
Astro delegates environment variable management to Vite. This means that you can access environment variables with the global import.meta.env. But there is one caveat: Astro reads the astro.config.mjs file before starting the build. And that’s why you can not that global in that files.
So, to use environment variables in the config file, you have to import loadEnv and read the variable manually:
diff --git a/astro.config.mjs b/astro.config.mjs
index 0eb7e11..60dc59d 100644
--- a/astro.config.mjs
+++ b/astro.config.mjs
@@ -4,10 +4,13 @@ import sitemap from "@astrojs/sitemap";
 import tailwind from "@astrojs/tailwind";
 import pagefind from "astro-pagefind";
 import { defineConfig } from "astro/config";
+import { loadEnv } from "vite";
+
+const { SITE_URL } = loadEnv(process.env.NODE_ENV, process.cwd(), "");

 // https://astro.build/config
 export default defineConfig({
-	site: "https://marioyepes.com/",
+	site: SITE_URL ?? "https://localhost:4321",
 	build: {
 		format: "directory",
 	},
Configure Google Tag Manager
npx astro add partytown
You can answer all questions with yes
Then, modify the astro.config.mjs configuration file to add the new integration:
diff --git a/astro.config.mjs b/astro.config.mjs
index 0eb7e11..caf0e28 100644
--- a/astro.config.mjs
+++ b/astro.config.mjs
@@ -1,5 +1,6 @@
 // astro.config.mjs

+import partytown from "@astrojs/partytown";
 import sitemap from "@astrojs/sitemap";
 import tailwind from "@astrojs/tailwind";
 import pagefind from "astro-pagefind";
@@ -11,7 +12,7 @@ export default defineConfig({
 	build: {
 		format: "directory",
 	},
-	integrations: [tailwind(), pagefind(), sitemap()],
+	integrations: [tailwind(), pagefind(), sitemap(), partytown()],
 	markdown: {
 		shikiConfig: {
 			// List of themes here: https://shiki.style/themes
@@ -22,3 +23,4 @@ export default defineConfig({
 		},
 	},
 });
+
To install GTM we are going to use the astro-google-tagmanager integration
npm install @digi4care/astro-google-tagmanager
To use it I did 2 things:
- Added the GTM code to my
.envfile - Included the component in the
<head>section:
# .env

# ...
GTM_VERIFICATION_ID=GTM-ABCD1234
diff --git a/src/pages/index.astro b/src/pages/index.astro
index ae70fcf..85d12b2 100644
--- a/src/pages/index.astro
+++ b/src/pages/index.astro
@@ -2,6 +2,7 @@
 // src/pages/index.astro
 import Search from "astro-pagefind/components/Search";
 import ToggleLightDarkMode from "../components/toggle-light-dark-mode.astro";
+import { GoogleTagmanager } from "@digi4care/astro-google-tagmanager";
 import { SEO, type SEOProps } from "astro-seo";

 import "../styles/global.css";
@@ -45,6 +46,7 @@ const headItems: SEOProps = {
 <html lang="en">
 	<head>
 		<SEO {...headItems} />
+		<GoogleTagmanager id={import.meta.env.GTM_VERIFICATION_ID} partytown={true} />
 	</head>
 	<body class="bg-gray-200 text-gray-900 dark:bg-gray-800 dark:text-gray-200">
 		<h1>Astro</h1>
Astro icons
The astro-icon is a great package that allows you to use any icon in iconify trough a component.
To install it, to the good ‘ol:
npx astro add astro-icon
This will change the astro.config.mjs file
diff --git a/astro.config.mjs b/astro.config.mjs
index 65a97a3..ea0924a 100644
--- a/astro.config.mjs
+++ b/astro.config.mjs
@@ -4,6 +4,7 @@ import partytown from "@astrojs/partytown";
 import sitemap from "@astrojs/sitemap";
 import tailwind from "@astrojs/tailwind";
 import { transformerMetaHighlight } from "@shikijs/transformers";
+import icon from "astro-icon";
 import pagefind from "astro-pagefind";
 import { defineConfig } from "astro/config";
 import { loadEnv } from "vite";
@@ -16,7 +17,7 @@ export default defineConfig({
 	build: {
 		format: "directory",
 	},
-	integrations: [tailwind(), pagefind(), sitemap(), partytown()],
+	integrations: [tailwind(), pagefind(), sitemap(), partytown(), icon()],
 	markdown: {
 		shikiConfig: {
 			// List of themes here: https://shiki.style/themes
@@ -28,3 +29,4 @@ export default defineConfig({
 		},
 	},
 });
+
You could use a local .svg file as long is placed in src/icons or you could use a icon set. In my case I opted for Tabler since it has the most icons include the Astro icon:
npm install @iconify-json/tabler
You can check all the collections here
diff --git a/src/pages/blog/index.astro b/src/pages/blog/index.astro
index 182b259..26b6f5c 100644
--- a/src/pages/blog/index.astro
+++ b/src/pages/blog/index.astro
@@ -1,4 +1,5 @@
 ---
+import { Icon } from "astro-icon/components";
 import { ViewTransitions } from "astro:transitions";
 import { getCollection, type CollectionEntry } from "astro:content";
 import ToggleLightDarkMode from "../../components/toggle-light-dark-mode.astro";
@@ -36,6 +37,7 @@ const years = Object.keys(postsByYear).sort((a, b) => parseInt(b) - parseInt(a))
 	<ViewTransitions />
 </head>
 <body class="bg-gray-200 text-gray-900 dark:bg-gray-800 dark:text-gray-200">
+	<Icon name="tabler:brand-astro" size={32} title="The Astro logo"/>
 	<ToggleLightDarkMode />
 	<h1>Blog entries</h1>
 	<ul>