Ansible introduction for developers
Table Of Contents
All the code in this article can be found in GitHub along a very simple Vagrant test lab.
So you need to setup yet another LEMP (Linux, Nginx, MariaDB, PHP) server on Digital Ocean or EC2 that also includes additional services like a Redis cache and Letsencrpyt for SSL certificate creation.
… Or maybe you need to setup a new development environment using Vagrant or Docker that has that same LEMP stack with those same services.
You’ve done it so many times that you’ve created an installation script using bash that executes all the commands you need to have a working environment or working server. But this script is growing to be 300 lines long (in bash that’s a lot!) and its becoming unmanageable.
… And then you think… “There’s got to be a better way”.
It turns out there is!
Ansible is a orchestration and automation tool written in python that has been growing in popularity thanks to its simplicity, efficiency and most of all the ability to work without installing remote agents. I mean, if your are not sold by that last part, I don’t know what would.
Ansible works by connecting to remote hosts, or as Ansible calls them clients, using SSH. And executing modules (which are python scripts) that are uploaded to the remote machine at execution time.
The only requisite for the remote machine is that it has a fairly recent version of python (and sometimes not even that).
Among the advantages of Ansible are:
- Does not require the installation of remote agents.
- Can execute tasks in parallel on multiple machines.
- Works on Linux and Windows
- There are hundreds of modules that execute different tasks.
- Can be used to execute just one command or complete playbooks (more on that latter).
- Can be used in Vagrant and Docker for creating development environments.
- Can be programmed to execute different actions on different group of machines
- Its maintained by RedHat
Ansible works by using SSH to execute commands on Linux/MacOS, and WinRT to execute commands on Windows
Clients setup
Before we beginning, we need to setup SSH access to the remote machines we’re going to use.
For that we have to create public ssh key for my current account, and add it to the remote servers.
Since that is beyond the scope of this article, I’ll leave you to figure out how to create a SSH key, but I’m going to show you the steps to create a sudo user:
1. Create the remote user
Doesn’t matter how, but on the remote client (in this case client1) you should have access to the root user, at least for a little while.
then create the ansible execution user, meaning the user that you are going to use to execute ansible modules. In my case the user will be testuser.
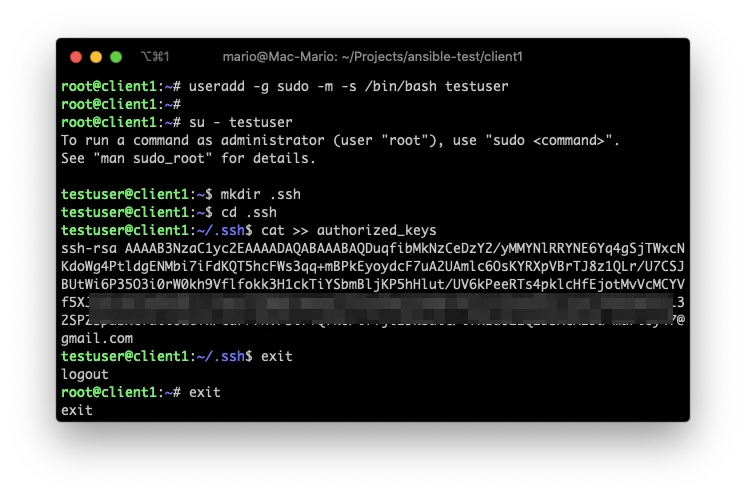
2. Paste your key on the new users .ssh/authorized_keys file
The next step is to copy your public key from you Ansible Server (your management computer), which in my case is my Mac. And paste it in the remote server on the .ssh/authorized_keys file.
This step is executed as the testuser user
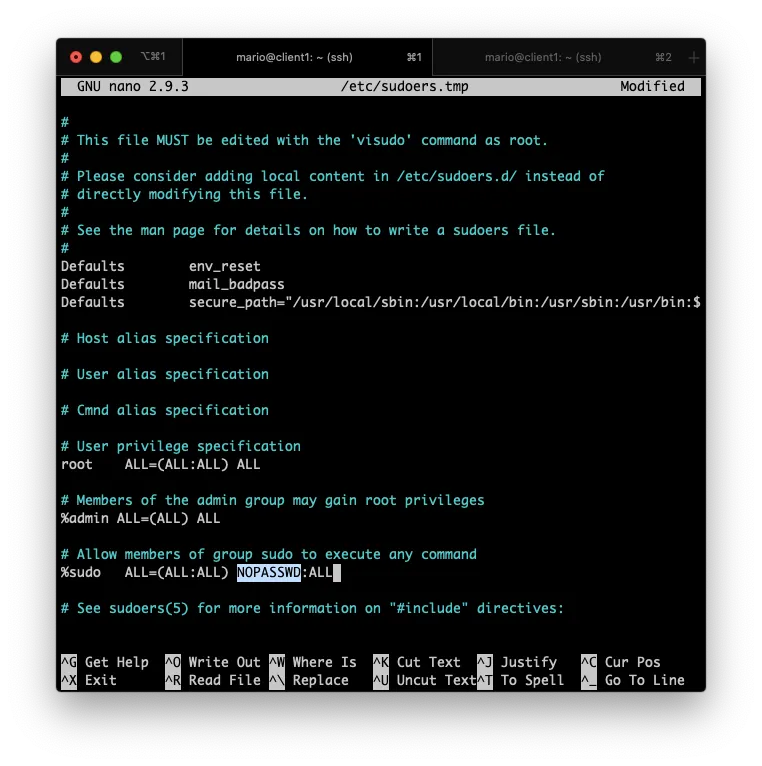
3. Add SUDO privileges to that user or group
Also, we need that the remote user(s) to have sudo privileges without requiring a password.
If you noticed in the previous step, I created the testuser user with the group sudo. That’s the group that’s going to have special privileges.
So, still as root execute visudo and add the NOPASSWD option.
This 3 steps have to be done for each computer you want to manage.
If you are using Digital Ocean, Linode or any VPS service, this steps can be done for you at machine creation time.
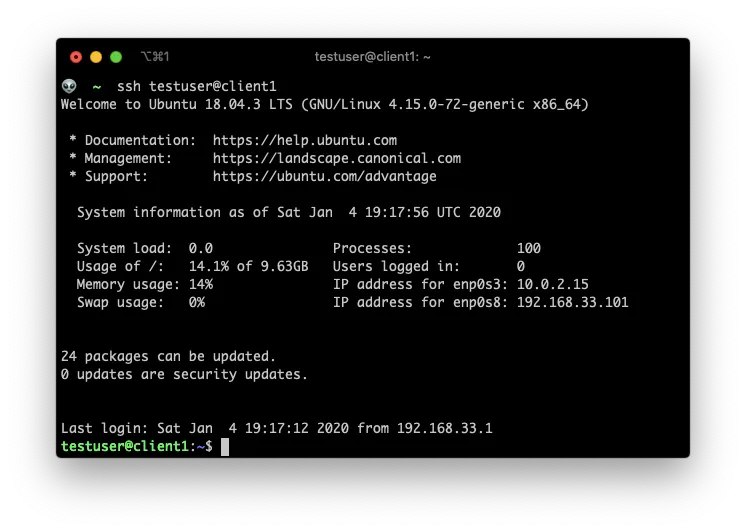
Test ssh access
just ssh to the remote host from your control machine:
Install Ansible
This part is easy… In your Ansible Server (your control machine) install the ansible package.
In Mac you just have to use Homebrew
brew install ansible
In Linux use apt or yum. Here is how to do it in Ubuntu.
sudo apt-add-repository ppa:ansible/ansible
sudo apt update
sudo apt-get install ansible
And we’re done… At least with the installation.
Inventories
The first and most important file for ansible is the inventory file.
Inventories are a list of hosts and variables that can be group and reused for multiple tasks execution. In other words, the inventory file is where the list of host are stored
So, lets create the inventory file inventory.yml, and add the list of remote hosts where you want to execute tasks, commands or modules.
### inventory.yml
client1
client2
This is an inventory file where I’m just adding 2 machines and no variables.
As you can see, by default the inventory file, and most other ansible files, are in the YAML format, which is a extremely simple a readable format. You can see a quick introduction of it in the official Ansible documentation, but the main thing to keep in mind with yaml is that indentation must be respected.
The
.ymlextension is optional. You can opt to not use any extension at all.
Execute a remote command
… Also called Ad-hoc commands.
Lets start by executing a remote command on each of the hosts (in our case just two) that we have in our inventory.
The structure an ansible command is
ansible -i <inventory-file.yml> <pattern or host> -m <module to use> -a <command in the module>
So lets execute the command hostname to determine the host’s name on the server client1 and server client2.
On the Mac terminal execute:
ansible -i inventory.yml all -a "hostname"
Here:
- We’re using the
inventory.ymlfile. Hence the-iparameter. allmeans “Use the patternall” which is the default group for all the clients in the inventory. More on patters latter.-ameans “arguments” and since we haven’t specified any module (again, more on modules and commands latter), Ansible will assume we are using thecommandmodule with the parameterhostname.
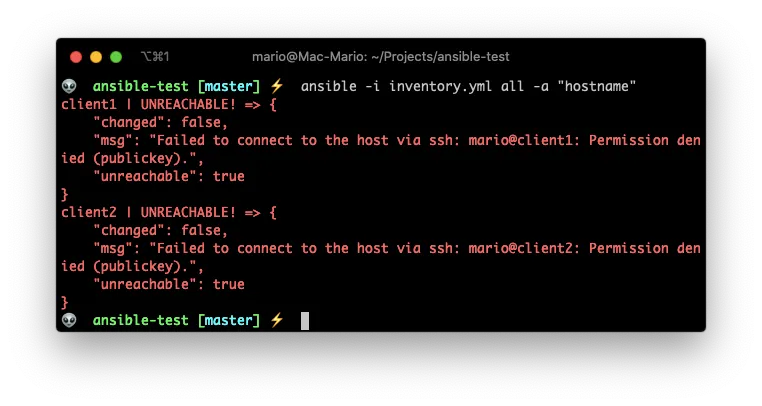
Wait! an error???
The reason for the error is that we’re trying to connect to the remote server as the user mario which only exists in the local machine.
Let’s provide a valid remote user by using the -u flag.
ansible -i inventory.yml all -u testuser -a "hostname"
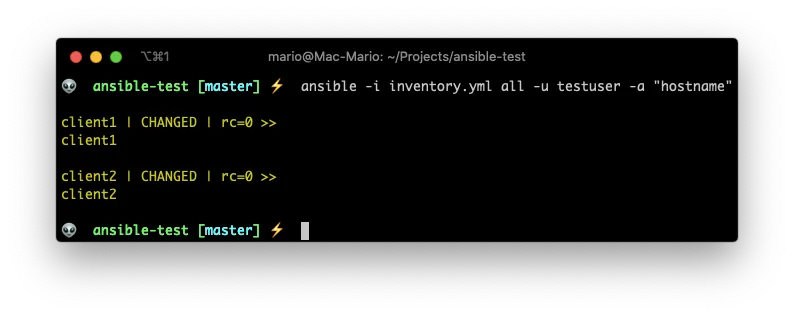
Even though is not very obvious. We get a successful answer: client1 and client2 is the name of each machine.
Execute a module
Ansible comes with a big list of modules, which are python scripts, that can execute multiple complex tasks on the remote server.
The beauty of the module system, is that they don’t have to reside on the remote server. They are copied (using sftp or scp) to each remote host on execution time, and then they get executed by the remote python interpreter.
So, lets execute our first module by issuing the command
ansible -i inventory.yml all -u testuser -m ping
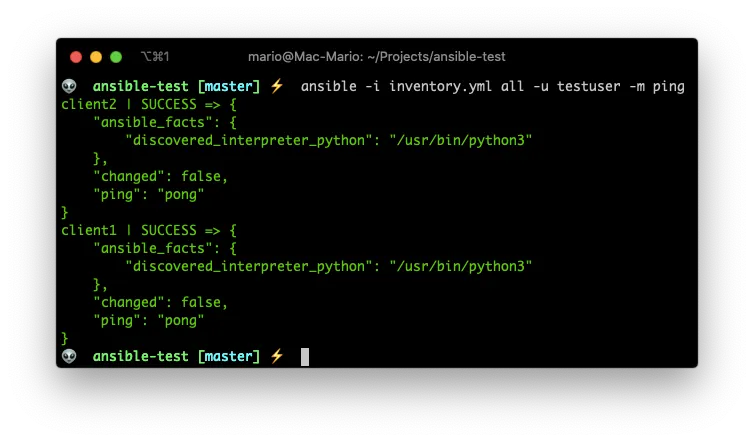
-mmeans “Use the module …” and we are using the module ping.- There is no
-aoption because thepingmodule does not requires it.
Take into account that the module ping is not the ping command. From the Ansible documentation:
This is NOT ICMP ping, this is just a trivial test module that requires Python on the remote-node
Setting defaults
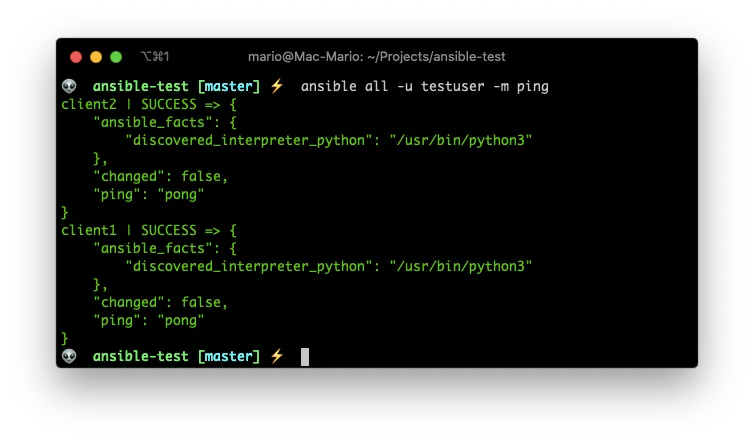
If you are following along this article. You’ve noticed that we have to pass the -i and the -u flag always… This can become old pretty soon.
So lets solve the -i issue now by creating an ansible configuration file or ansible.cfg on the directory where we are working on with the following content
### ansible.cfg
[defaults]
inventory = inventory.yml
This tells ansible to use the file inventory.yml as the default inventory file.
Now we can execute ansible like this:
ansible all -u testuser -m ping
We’ll solve the -u “issue” latter when we get to variables.
For a list of parameters that can be configured in the
ansible.cfgfile you can browse theansible.cfgfile in the github repo.
Become root
Now, lets assume that we need to execute a remote command as a super user. We can can achieve that by using the --become flag
Let’s first execute a remote command as the testuser user.
ansible all -u testuser -a whoami
And now lets execute the same command but as root.
ansible all -u testuser -a whoami --become
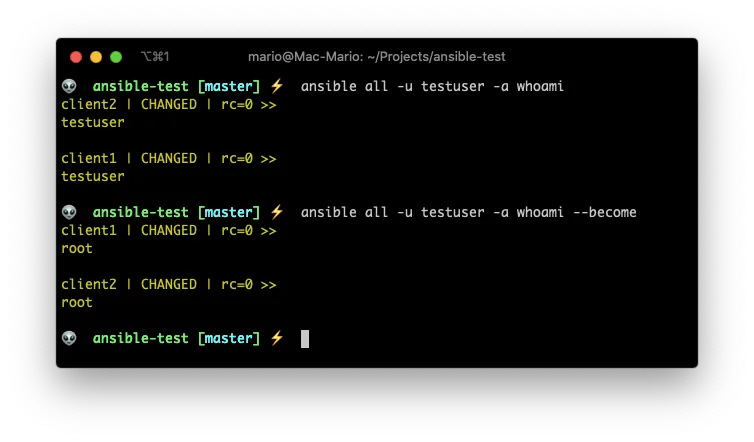
And just like that we executed a command (whoami) as root on the remote server.
Patterns in the inventory file
At the beginning we talked about groups of hosts in the inventory. Ansible calls them patterns because you can specify one group or several groups of hosts by using patterns.
That’s is somewhat out of the scope of this article since we’re focusing on developers here. So just know that we can specify multiple servers on the inventory file.
You can create a group of hosts by using hierarchy in the inventory file like so:
### inventory.yml
testgroup:
  hosts:
    client1:
    client2:
Here we created the testgroup group (or pattern) and that group has two hosts client1 and client2.
Lets see how we can use that pattern:
ansible testgroup -u testuser -a "echo hola mundo"
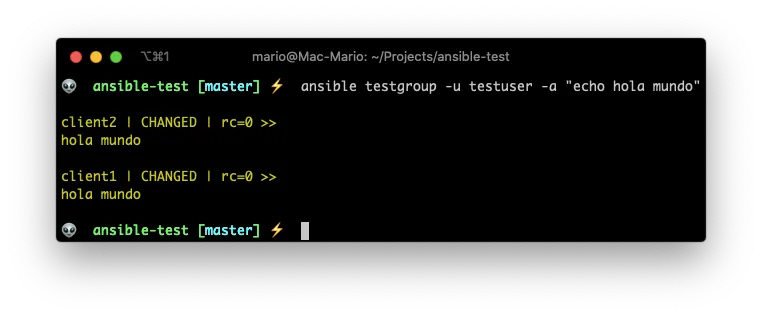
Its now obvious because the testgroup includes all the hosts in our test environment. But what we just did is to ask Ansible to execute a command in just a group of hosts.
Ansible has 2 defaults groups all and ungrouped. You can read more about those in the Ansible documentation.
Variables in inventories
Ansible wouldn’t be useful if you couldn’t use some kind variable on you inventory files or anywhere else.
The thing to remember with Ansible variables are that they are flattened out so you can overwrite a value of a variable for an specific host.
With what we’ve seen so far, we can say that we can specify variables by host, by group or both.
1. By host
### inventory.yml
testgroup:
  hosts:
    client1:
      my_custom_string: Hola Mundo
2. By group
### inventory.yml
testgroup:
  hosts:
    client1:
    client2:
  vars:
    my_custom_string: Hola Mundo
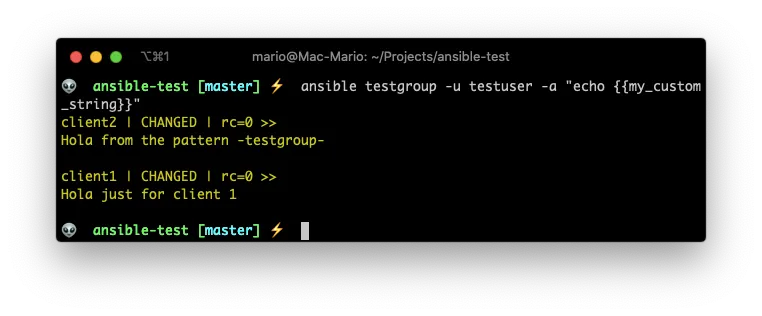
3. Combined
### inventory.yml
testgroup:
  hosts:
    client1:
      my_custom_string: Hola just for client 1
    client2:
  vars:
    my_custom_string: Hola from the pattern -testgroup-
And then use it in a command or a module
ansible testgroup -u testgroup -a "echo {{my_custom_string}}"
Awesome! We can now specify global parameters and variables depending on the host or the group.
Advanced variables
Variables like passwords or secrets are not a good idea to pass on the command line or have them stored in public files. And most of all, they should’t be committed to a git repo. That’s why you can use an external file for storing the variables.
For Ansible to know which variables file to use on a host or a group, you have to create a new sub-dir relative to the current working dir with the name group_vars/<group name>.yml.
So for instance, in our example we have the group testgroup. We should have the following hierarchy:
$ tree
.
├── group_vars
│   └── testgroup.yml
└── inventory.yml

1 directory, 2 files
Lets do a test to see vars in action in the inventory and in the group vars.
Lest change the inventory to look like this:
### inventory.yml
testgroup:
  hosts:
    client1:
      my_custom_string: Hola just for client 1
    client2:
And group_vars/testgroup.yml looks like:
### group_vars/testgroup.yml
my_custom_string: Hola from group_vars/testgroup.yml
And execute ansible like
ansible all -u testuser -a "echo {{my_custom_string}}"
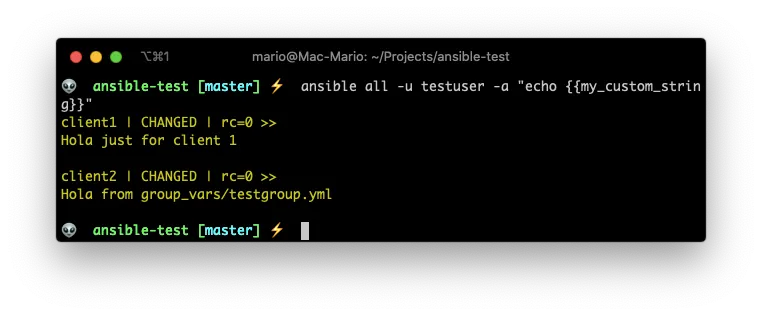
As you can see, the my_custom_string has different values in each client. On client1 it picked the value from inventory.yml. On client2 it picked it up from the group_vars/testgroup.yml file.
Ansible has a very clever flattening algorithm to overwrite variable values. More on that here
Special variables
Now that we know about variables, wouldn’t it be nice if we could store the username and password to a remote host in a variable file instead of passing it in the command line?
…Well …you can!
Ansible has set of special variables that can be used for instances like that.
So lets change group_vars/testgroup.yml to have the following contents:
### group_vars/testgroup.yml
ansible_user: testuser
And the inventory to:
### inventory.yml
testgroup:
  hosts:
    client1:
    client2:
  vars:
    my_custom_string: Hola mundo from inventory.yml
    ansible_become: true
And issue the following command:
ansible all -a "echo {{my_custom_string}}"
ansible all -a "whoami"
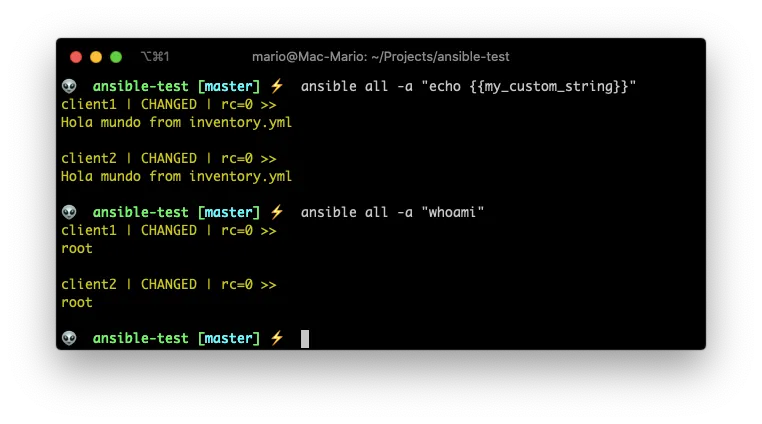
I bet that you already figured out that ansible_user is the username we use for connecting to the remote server, and that ansible_become tells Ansible to become the super user on the remote machine.
Also you’ve might noticed that I combined the usage of variables inside the inventory.yml and group_vars/testgroup.yml. I could have added the ansible_user var inside the inventory.yml file also.
You could use the
group_vars/testgroup.ymlfile for sensitive data that can not be committed to a repo by adding it to.gitignore.
Managing files
With Ansible you can also copy files to the remote machines… And not only that, those files can be templates that will be parsed a and complemented with local or remote variables.
Copying a file
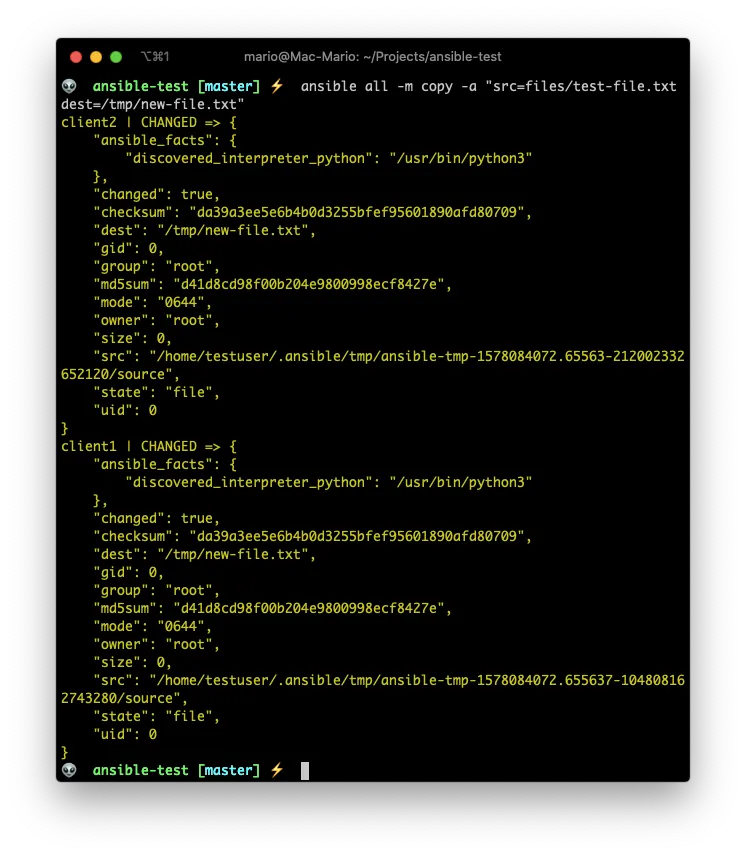
You can copy files directly with the copy module…
mkdir files/
touch files/test-file.txt
ansible all -m copy -a "src=files/test-file.txt dest=/tmp/new-file.txt"
ansible all -a "ls -l /tmp/new-file.txt"
Coping and parsing a template
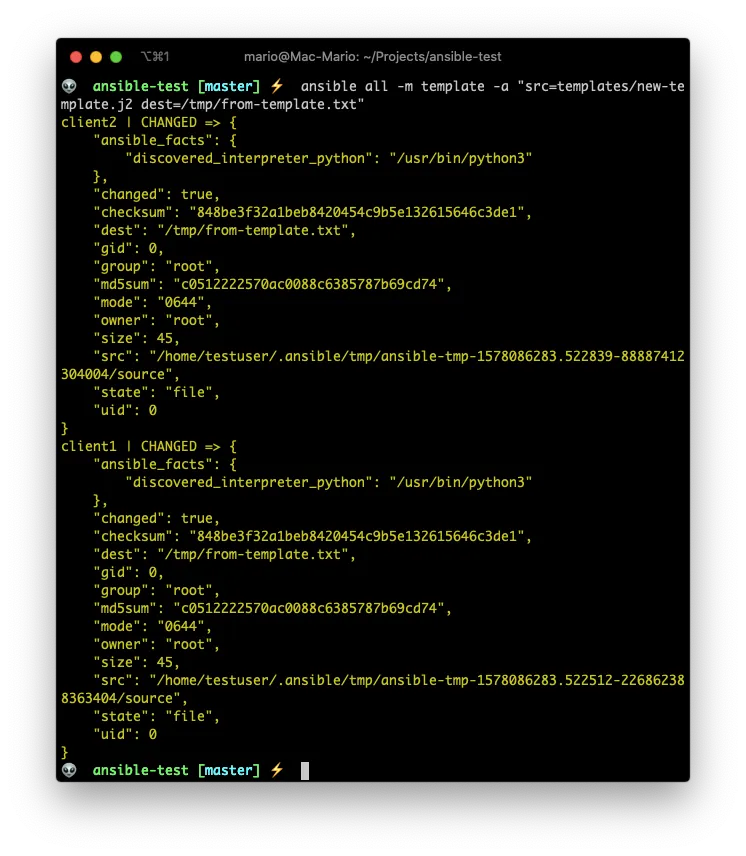
You can also create files with variables inside them that get parsed after uploading them with the template module.
### Create the template
mkdir templates/
echo "Template file: {{my_custom_string}}" > templates/new-template.j2

### Use the template
ansible all -m template -a "src=templates/new-template.j2 dest=/tmp/from-template.txt"
ansible all -a "cat /tmp/from-template.txt"
Ansible uses Jinja2 templating language for creating its templates.
If you’ve worked with Smarty, Twig or Liquid you should feel right at home with ansible templates.
Change owner and mode
I think its pretty self explanatory:
ansible all -m file -a "dest=/tmp/new-file.txt owner=ubuntu mode=600"
ansible all -a "ls -l /tmp/new-file.txt"
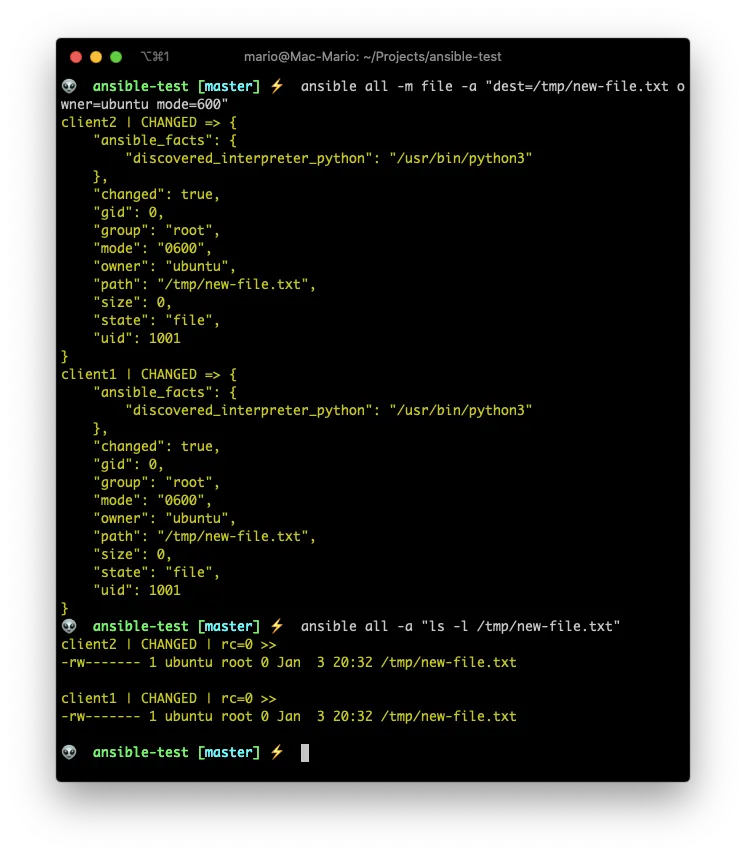
The
copyandtemplatemodules allow you to upload files and change the owner at the same time.
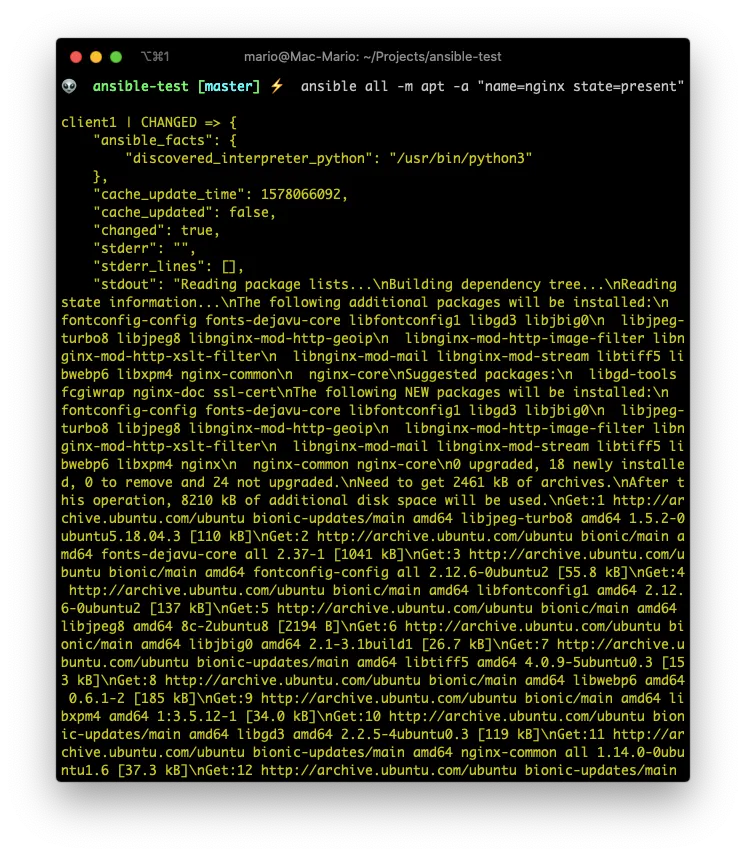
Installing packages
Install a package if its not present with the apt module
ansible all -m apt -a "name=nginx state=present"
Facts
Ansible facts are remote system properties that are collected by Ansible when it connects to a remote machine.
You can view ansible_facts by running the setup module on a remote system:
ansible client1 -u testuser -m setup
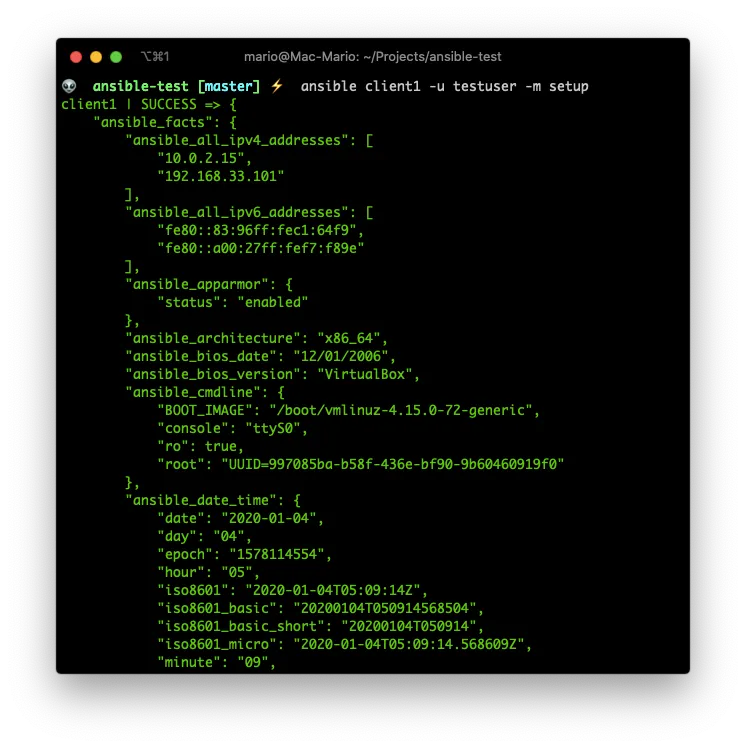
As you can see there are A LOT of lines. That’s why you can filter them by using the parameter filter:
ansible client1 -u testuser -m setup -a "filter=ansible_os_family"
ansible client1 -u testuser -m setup -a "filter=*ipv4"
Ansible Playbooks
Up until now, we’ve been using the ansible command to execute specific tasks on the remote systems listed in the inventory file.
The real power of Ansible is when you create a group of tasks or plays in what Ansible calls Playbooks.
The first and most important difference is that playbooks are executed using the ansible-playbook command as opposed to ansible for simple tasks.
Playbooks must be in the yaml format (its not optional) and are designed to be very easy to read and create.
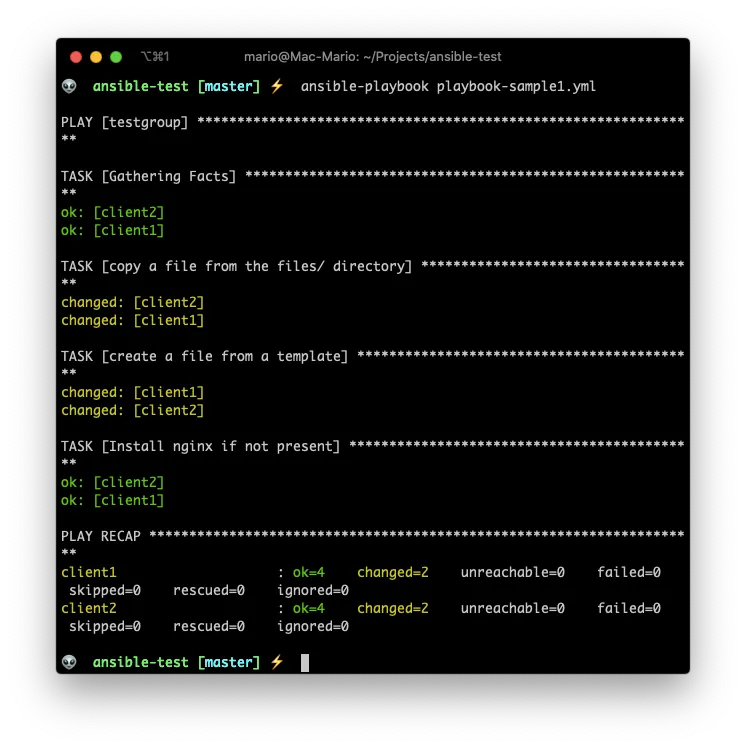
So lets create a playbook that does the last 3 tasks for us:
- Copy a file
- Create a file from a template
- Install a package
### playbook-sample1.yml
---
- hosts: testgroup
  vars:
    file_owner: ubuntu
    file_name: playbook-copy.txt
    my_custom_string: String from the playbook
  remote_user: testuser
  become: true
  tasks:
    - name: copy a file from the files/ directory
      copy:
        src: files/test-file.txt
        dest: /tmp/{{ file_name }}
        owner: "{{ file_owner }}"
    - name: create a file from a template
      template:
        src: templates/new-template.j2
        dest: /tmp/playbook-template.txt
    - name: install nginx if not present
      apt:
        name: nginx
        state: present
And lets execute it with
ansible-playbook playbook-sample1.yml
Take into account that variables should be enclosed in
"when used in a playbook as the sole parameter
… As you can see.
- A play starts with the
- hosts:label. - Each play has a
tasks:section where every tasks is added. - Each task starts with a
- name:label followed by a plain English (or plain Spanish in my case 😁) description of what it does. - Next, each tasks declares the module it uses, like
copy,templateorapt - Depending on the module there is one or more parameters (like
srcordestin the copy module)
Hope you see now the power of ansible. With just one very short command we created files, installed services, parsed templates and in 2 clients at the same time.
The big bonus of playbooks is that you can use everything we’ve seen so far inside a playbook without requiring external file (except for the inventory file):
- You can create vars for further usage inside the same playbook
- You can become
root, for the complete play or just for one task. - If there is a
group_vars/<patterns>.ymlfile, those vars will flattened and used also (the variables in the playbook take precedence) - You can use variables for naming files and services
- You can use variables for the content of a template
- You can (and must) execute tasks
- Tasks accept parameters that can also be variables
Playbooks with multiple plays
In the previous section, I showed you a playbook with just one play. The fact of the matter is that we can execute multiple plays in a playbook.
This is useful in cases where you want to execute some tasks in a group of servers, and then other tasks on other groups of server:
This a playbook with 2 plays:
---
- hosts: webgroup
  - tasks:
    - name: First task for webgroup
      ...

-hosts: dbgroup
  - tasks:
    - name: First task for dbgroup
      ...
One of the great advantages of having plays are that they are sequential and a play wont be executed before the previous finishes no matter how many servers are on the webgroup and dbgroup.
Debugging output
From the first playbook example, you might noticed that playbook commands do not generate any output, but most of the time you need to know what’s happening, specially while developing a playbook.
The - debug option is specially useful for such a cases.
The usage of the debug option almost always requires you to store the output on a variable. So let take a look at the following example:
### playbook-debug-example.yml
---
- hosts: testgroup
  remote_user: testuser
  tasks:
    - name: A test command
      command: cat /etc/hostname
      register: _command
    - debug:
      msg: { { _command.stdout } }

With register you can store the output of a command or module in a variable, and then use that variable latter in the playbook.
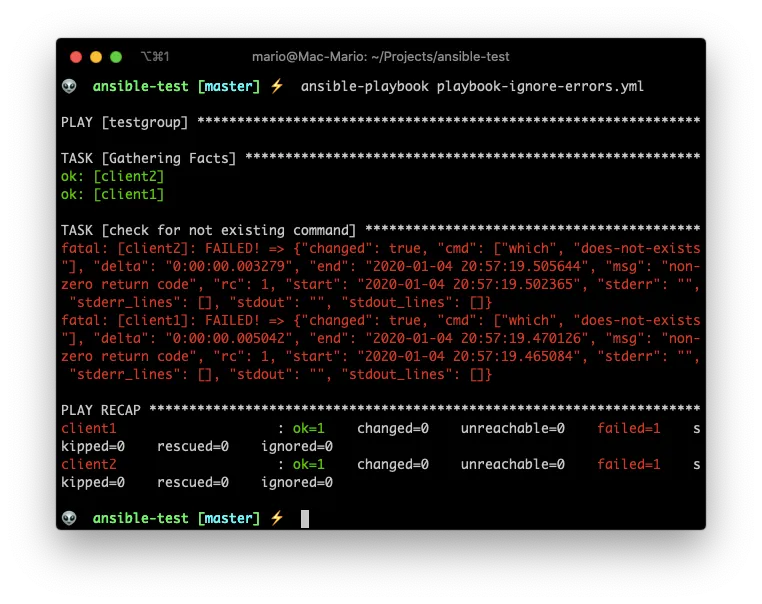
Ignoring errors or continued executing
If a task in a play returns a value different than 0, which is success in most OSs, the play will stop.
This is particularly important with the command and shell modules where some commands return values different than 0 (on bash think $? -ne 0) even on success.
Take the following example:
### playbook-ignore-errors.yml
---
- hosts: testgroup
  remote_user: testuser
  tasks:
    - name: check for not existing command
      command: which does-not-exists
    - name: this command should not be executed
      command: echo hola mundo
    - debug:
      msg: "finished the execution"
You can see that the debug section never gets executed.
But we can add ignore_errors: True on the task.
### playbook-ignore-errors.yml
---
- hosts: testgroup
  remote_user: testuser
  tasks:
    - name: check for not existing command
      command: which does-not-exists
      ignore_errors: True
    - name: this command should not be executed
      command: echo hola mundo
    - debug:
      msg: "finished the execution"
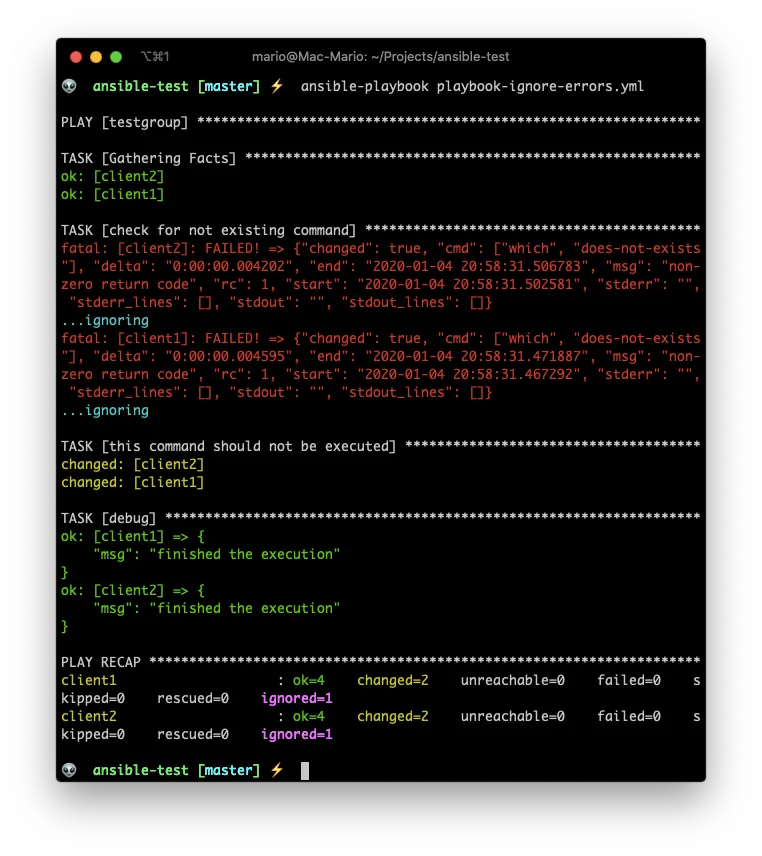
You see that event the tasks reports errors, but the debug section gets executed.
Events an notifications on execution
There are times when you want to configure your server by adding files on special places, like /etc/apache2/conf-available or /etc/php/7.0/fpm/conf.d/ for Apache and PHP respectively.
Most of the time you need to create an alias and restart the service for the configuration to take effect if the file is actually new or different
For those times, the notify parameter in conjunction with a handlers section is exactly what you need.
### playbook-notify-example.yml
---
- hosts: testgroup
  remote_user: testuser
  become: true
  vars:
    file_owner: ubuntu
    file_name: from-ansible-tpl.conf
    location_path: ansible-test
  tasks:
    - name: install nginx if not present
      apt:
        name: nginx
        state: present
    - name: create nginx conf file from template
      template:
        src: templates/nginx-template.j2
        dest: /etc/nginx/snippets/{{ file_name }}
        owner: "{{ file_owner }}"
      notify:
        - enable conf
        # - other handler
  handlers:
    - name: enable conf
      service:
        name: nginx
        state: restarted
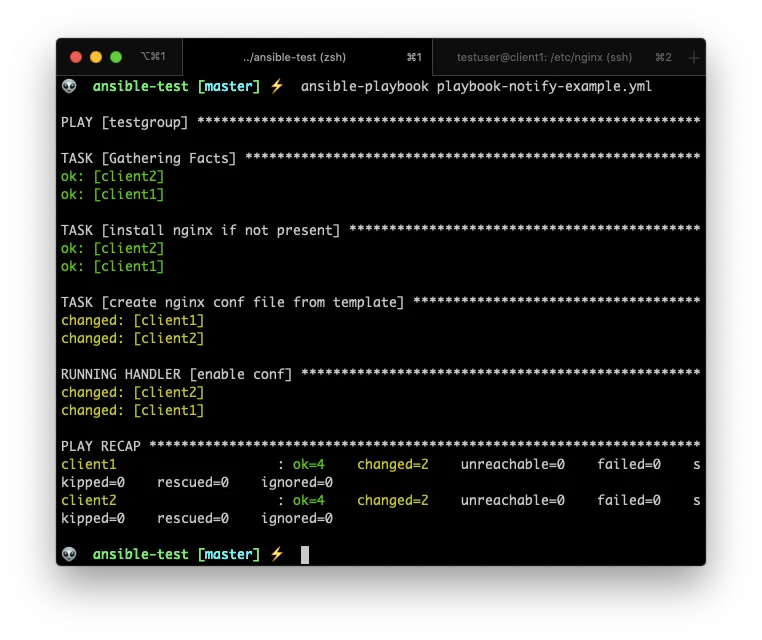
In this case, the tasks in the handlers section will be executed only if the template task actually created a new file, or created a new file with different content.
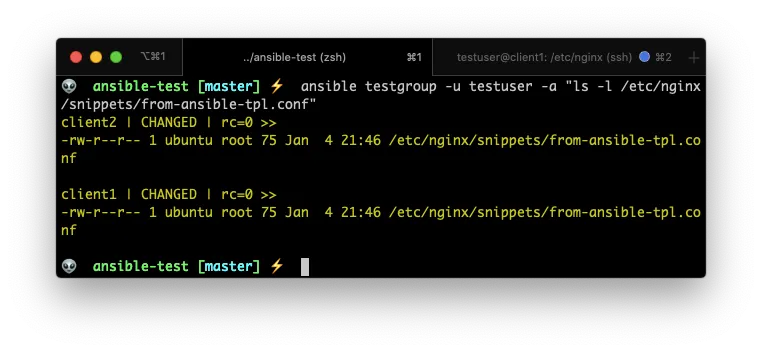
Lest test that the new file got created:
Now. If I run the command again you can confirm that the RUNNING HANDLER section is not there.
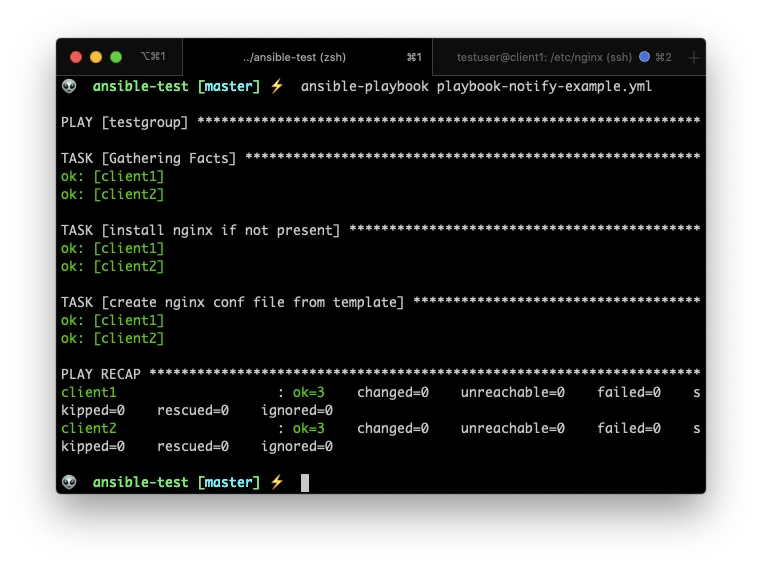
Nifty, right?
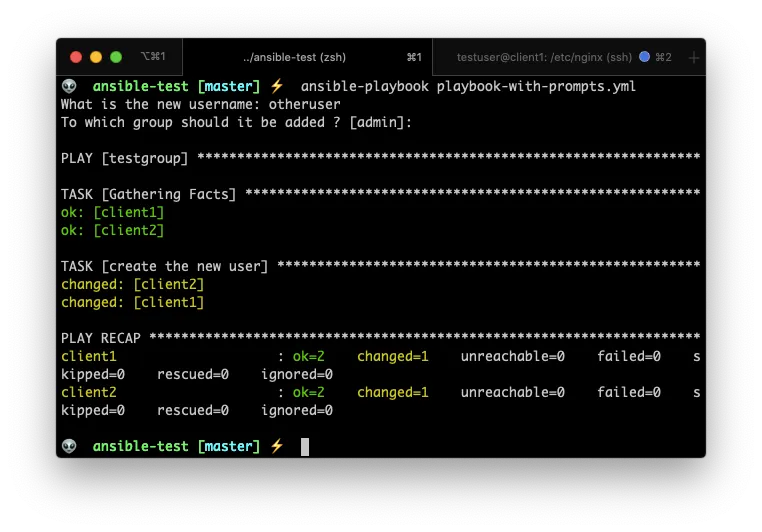
Playbook prompts
There are times when you need to execute a playbook several times, but each time with different data. Or maybe you have sensitive information that you don’t want to store in any file ever.
In those cases, prompting the user for input is very useful.
You can prompt the user for a variable value by using the vars_prompt command:
### playbook-with-prompts.yml
---
- hosts: testgroup
  remote_user: testuser
  vars_prompt:
    - name: username
      prompt: What is the new username
      private: no
    - name: user_group
      prompt: To which group should it be added ?
      default: admin
  tasks:
    - name: create the new user
      shell: useradd -m -s /bin/bash -g {{ user_group }} {{ username }}
Conditionals in playbooks
Conditionals is kind of a big subject in Ansible since there are a lot of use cases when you would need a conditional:
- The result of a play depends on the value of a variable, status or fact of a remote system
- A play is executed depending on a previous result
- The value of a variable is composed by the value of another
- Execute a task only on certain architectures or certain Linux Distributions.
- Etc.
So we’re just going to scratch the surface in this post.
The when statement is the main form of using conditionals on a playbook:
### playbook-when-and-facts.yml
---
- hosts: testgroup
  remote_user: testuser
  become: True
  tasks:
    - name: Shutdown only debian systems
      command: shutdown -h now
      when: ansible_os_family == "Debian"
Ansible Glaxy and final toughts
To finish this post, let me talk to you about Ansible Galaxy…
Ansible Galaxy is the GitHub or Docker Hub for your Ansible Playbooks!
There you can can store your plays in a way where they can be re-used in other playbooks. Also, you can browser other people playbooks that solve problems that you already have.
Going over Ansible Galaxy would be a topic for a new Blog, for now just know that there is a complete universe (or Galaxy if you will) of plays that you can download and use in your own plays.
And, if you want a video where a lot of this concepts get explained, you can find this playlinst very useful
… Hope this article was useful to you and you find value in it.
Good Bye!